background image

www.radioshack.com

SM

User’s Guide — 
Please read before using this equipment.

©

 2004 RadioShack Corporation.

All Rights Reserved.

RadioShack and RadioShack.com 

are trademarks used by 

RadioShack Corporation.

Phone Pick-Up Detection — 

stops recording when you 

pick up any phone on the same line as the answering 
system, and resets to answer the next call.

Speakerphone — 

lets you conduct a hands-free 

conversation using the handset and base speaker. 

Handset Remote Operation — 

lets you listen to your 

incoming messages from the handset. (See “Remote 
Operation” on page 68.)

Message Alert — 

beeps when you have new incoming 

message. (See “Setting the Message Alert On or Off” on 
page 61.)

Convenient Extension Placement — 

lets you place 

accessory handsets (up to four total) anywhere you have an 
AC outlet, regardless of phone jack location.

Call Waiting/Caller ID — 

lets you answer a call even 

when you’re on the phone and see who’s calling before 
you answer.

Corded Handset — 

lets you make/receive calls even if 

there is an AC power failure.
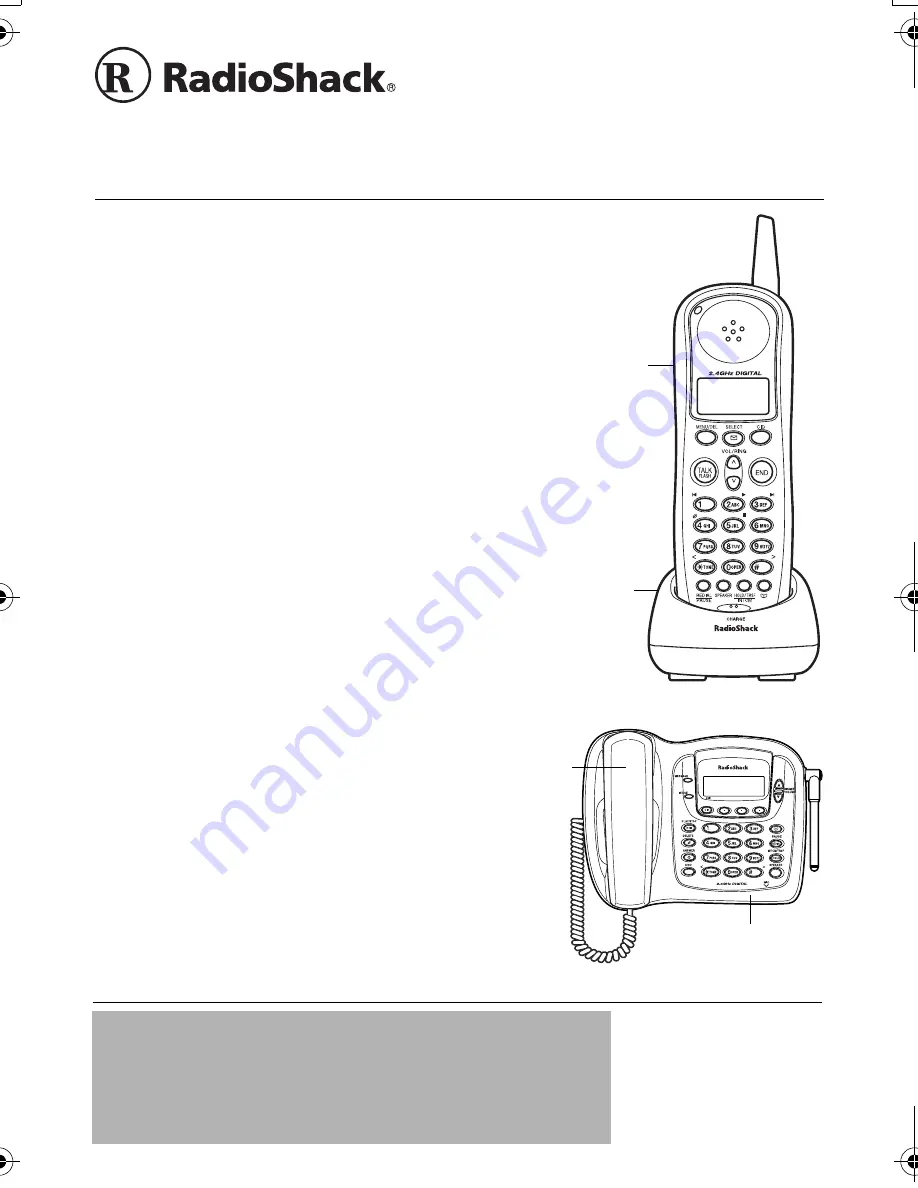
Handset

Charger 

Corded Handset

Base

2.4GHz Expandable

Corded/Cordless Phone

System with Digital

Answerer

!

 IMPORTANT 

!

If an icon appears at the end of a paragraph, go to the box on 
that page with the corresponding icon for pertinent information.

— 

Warning


!

 — 

Important

Ô

 — 

Note


 — 

Caution


Ó

 — 

Hint

43-3872

43-3880.book  Page 1  Monday, June 28, 2004  2:07 PM

Summary of Contents for 43-3872

Page 1: ...e 68 Message Alert beeps when you have new incoming message See Setting the Message Alert On or Off on page 61 Convenient Extension Placement lets you place accessory handsets up to four total anywhere you have an AC outlet regardless of phone jack location Call Waiting Caller ID lets you answer a call even when you re on the phone and see who s calling before you answer Corded Handset lets you ma...

Page 2: ...ter Handset Only 35 Privacy Mode 36 Conferencing 36 Find Handset 37 Speed Dialing 37 Phonebook 38 Storing and Editing Phone Numbers Names Distinctive Rings and Speed Dial 38 Editing or Erasing a Stored Name Phone Number Distinctive Ring and Speed Dial 43 Deleting all Phonebook Locations Base Only 44 Copying Phonebook Locations 45 Testing Stored Emergency Number 46 Caller ID and CIDCW Caller ID on ...

Page 3: ...e s day and time This gives you advanced capabilities over tape based answering machines You can delete individual messages and save the rest There are no tapes to bother with and no tape mechanisms to wear out The remote operation feature lets you operate your answering system from a touch tone phone or from a rotary phone with a pocket tone dialer Corded handset does not need AC power to operate...

Page 4: ... or corporation commission for information Ô The REN is used to determine the number of devices that may be connected to a telephone line Excessive RENs on a telephone line may result in the devices not ringing in response to an incoming call In most but not all areas the sum of RENs should not exceed five 5 0 To be certain of the number of devices that may be connected to a line as determined by ...

Page 5: ...changes to its lines equipment operations or procedures that could affect the operation of this phone The telephone company notifies you of these changes in advance so you can take the necessary steps to prevent interruption of your telephone service This device complies with Part 15 of the FCC rules Operation is subject to the following two conditions 1 This device may not cause harmful interfere...

Page 6: ...GE PROTECTION Your telephone has built in protection circuits to reduce the risk of damage from surges in telephone line and power line current These protection circuits meet or exceed the FCC requirements However lightning striking the telephone or power lines can damage your telephone Lightning damage is not common Nevertheless if you live in an area that has severe electrical storms we suggest ...

Page 7: ...ash bowl kitchen sink or laundry tub in a wet basement or near a swimming pool 2 Avoid using a telephone other than a cordless type during an electrical storm There may be a remote risk of electric shock from lightning 3 Do not use the telephone to report a gas leak in the vicinity of the leak 4 Use only the power cord and batteries indicated in this manual Do not dispose of batteries in a fire Th...

Page 8: ...aller s name only caller s name and number If you subscribe to Call Waiting and Caller ID the system can show you the incoming caller information even when you are already talking on the phone READ THIS BEFORE INSTALLATION We have designed your phone to conform to federal regulations and you can connect it to most phone lines However each device that you connect to the telephone line draws power f...

Page 9: ...lable at your local RadioShack store or have the telephone company update the wiring for you A plug and jack used to connect this equipment to the premises wiring and telephone network must comply with the applicable FCC Part 68 rules and requirements adopted by the ACTA A compliant telephone cord and modular plug is provided with this product It is designed to be connected to a compatible modular...

Page 10: ...nd into a modular phone line jack 5 Insert the supplied AC adapter s barrel plug into the DC IN 9V jack on the back of the base 6 Route the adapter s cord through the strain relief slot on the base then plug the adapter into a standard AC outlet 7 Lift the base s antenna to a vertical position CAUTION You must use a Class 2 power source that supplies 9V DC and delivers at least 350 mA Its center t...

Page 11: ... base s lower tab slots then press down on the bracket s latches and insert them into the upper slots 2 Plug one end of the supplied modular cord short for a wall plate long for direct wall mounting into the TEL LINE jack on the base s back 3 Insert the supplied AC adapter s barrel plug into the DC IN 9V jack 4 Route the adapter and modular cords through the base s grooves 5 For a wall plate plug ...

Page 12: ...o its slot and snap it back into place so it holds the handset 9 Connect the handset cord to left side of the phone and corded handset USING AC POWER You can power the cordless handset using the supplied 9V 210 mA AC adapter CAUTION You must use a Class 2 power source that supplies 9V DC and delivers at least 210 mA Its center tip must be set to positive and its plug must fit the charger s DC IN 9...

Page 13: ... battery pack then charge it for about 15 20 hours 1 Press down and slide off the battery compartment cover 2 Lift the battery pack out of the compartment 3 Plug the battery pack s connector into the socket in the compartment the connector fits only one way then place the battery pack in the compartment 4 Replace the cover To charge the battery pack place the handset on the charger The CHARGE indi...

Page 14: ...sconnect the battery pack This increases the battery pack s usable life The supplied battery pack should last for about a year If the battery pack does not hold a charge for more than two hours after an overnight charge replace it with a new 3 6 volt 800 mAh battery pack with a connector that fits the socket in the battery compartment You can order a replacement battery pack through RadioShack Ins...

Page 15: ... cover on the side of the handset then insert the headset s plug into the jack Ô Connecting a headset disconnects the handset s earpiece and microphone on the handset also controls the headset s volume With a headset connected you can make or answer calls as usual using the keys on the handset When you finish using the headset disconnect it from the handset and close the rubber cover to protect th...

Page 16: ...e Standby Talk The Battery icons indicate the handset battery status This icon changes depending on the battery status full medium low and empty Standby The Ringer off icon indicates that ringer is turned off Talk The Mute icon appears when you mute the handset Talk The Speaker icon appears when the handset speaker phone is used Talk The Privacy icon appears when the Privacy Mode is turned on Talk...

Page 17: ...ch soft key is determined by the icon that appears directly above it For example when the base is in standby mode pressing soft key 1 will page the handset When the handset is in talk mode pressing soft key 1 will accept a call waiting call Complete information on the features controlled by the soft keys can be found under each feature In standby mode In talk mode 570 0GY 2 07 4 14 Soft key 1 Soft...

Page 18: ...e a selection Press END to exit the menu From the base Press the MENU soft key to access the main menu Use to scroll through options Press the OK soft key to make a selection Press the BACK soft key to return to the previous screen Press CID EXIT to exit the menu Ô NOTES Ô For Global Setup Answ Setup and System Reset and HS Registration menu options make sure the line is not in use and the handset...

Page 19: ... mode press MENU DEL and then press SELECT or return the handset to the cradle Room Baby Monitor This feature allows you to monitor sounds in another room Place the base or a handset in the room you wish to monitor it will function as a microphone A second handset can be set to function as a remote speaker allowing you to monitor sounds in the room Ô Using Room Monitor 1 Press MENU DEL or the MENU...

Page 20: ...n s Symphony 9 Beethoven9 For Elise Elise We Wish You A Merry Christmas Merry Xmas Home Sweet Home Hm Swt Hm Lorri Song 6 Lorri Song When Irish Eyes Are Smiling Irish Eyes Aura Lee Let Me Call You Sweet Heart Sweetheart Star Spangled Banner Star Spngl Old MacDonald Old MacDld You must set a separate ringer tone on each handset 1 Press MENU DEL or the MENU soft key on the base Select the Handset Se...

Page 21: ...alls will have a normal ring tone Switching to Distinctive On activates all programmed distinctive ring memory locations 1 Press MENU DEL or the MENU soft key on the base Select the Handset Setup or Base Setup menu and then the Distinctive Ring submenu 2 Press to select On or Off default is on 3 Press SELECT or the OK soft key on the base You will hear a confirmation tone Setting the AutoTalk Hand...

Page 22: ...e will be displayed on the LCD screen during Standby Mode Intercom Intercom Hold Room Monitor and Copy Phonebook operation The banner name will be displayed on the receiving handset as well default is 1 Press MENU DEL Select the Handset Setup menu and then the Banner submenu 2 Use the number keypad 0 9 TONE or MENU DEL to enter or edit the name 3 Press SELECT You will hear a confirmation tone Sele...

Page 23: ...se Setup menu and then the Contrast submenu 2 Press to adjust the contrast of the LCD 10 levels default is level 5 3 Press the OK soft key You will hear a confirmation tone Setting the Key Touch Tone Key Touch Tone is the tone your keypad makes when keys are pressed You can turn this tone on or off 1 Press MENU DEL or the MENU soft key on the base Select the Handset Setup or Base Setup menu and th...

Page 24: ...on the base 3 Press to set hour and then press SELECT or the soft key on the base 4 Press to set minute and then press SELECT or the soft key on the base 5 Press to choose AM or PM and then press SELECT or the SAVE soft key on the base You will hear a confirmation tone Setting CIDCW Caller ID on Call Waiting Caller ID on Call Waiting CIDCW displays the name and number of an incoming call while you...

Page 25: ...firmation tone Setting the Dial Mode Sets the dial mode to tone or pulse Most phone systems use tone dialing the default setting is tone dialing Set the dialing mode to match the dialing system used by your local phone service If you are not sure of your dialing system set the unit to tone dialing Make a trial call If the call connects leave the setting as is otherwise set the unit to pulse dialin...

Page 26: ...er HS clears the handset ID from the base Use this option for example when you change the digital security code 1 Press MENU DEL or the MENU soft key on the base Select the System Reset menu and then the Deregister HS submenu 2 Press to select the handset ID to be de registered from the list and then press SELECT Deregister HS appears 3 Press to select Yes and then press SELECT You will hear a con...

Page 27: ...3570 or 43 3871 1 Press MENU DEL or the MENU soft key on the base Select the System Reset menu and then the Replacing Base submenu 2 Press to select Yes and then press SELECT You will hear a confirmation tone The base information will be deleted When replacing the base is complete Place handset on main base to register appears register the handset to the new base see page 52 ...

Page 28: ...base Call waiting feature on the main base DirectLink mode All other features are disabled during a power failure MAKING A CALL From the handset 1 Remove the handset from the cradle Ô 2 Press TALK FLASH 3 Listen for the dial tone 4 Dial the number OR 1 Remove the handset from the cradle 2 Dial the number If pause is required press REDIAL PAUSE P appears in the display which represents a pause 3 Pr...

Page 29: ... handset or press SPEAKER RECEIVING A CALL From the handset 1 Remove the handset from the cradle If AutoTalk is on the phone will automatically answer the call when you pick it up Ô 2 Press TALK FLASH OR If the handset is off the cradle press TALK FLASH or any number Anykey answer is on Ô NOTES Ô The handset microphone is located at the bottom of the handset Position yourself as near to the handse...

Page 30: ...you have Call Waiting service and a call waiting tone sounds while you are on a call press TALK FLASH on the handset or the FLASH soft key on the base to accept the waiting call There is a short pause and then you will hear the new caller To return to the original caller press TALK FLASH on the handset or the FLASH soft key on the base again Ô Ô NOTES Ô You must subscribe through your local teleph...

Page 31: ...f the key will display one of the last three number redialed 3 Press TALK FLASH or SPEAKER on the handset or pick up the corded handset or SPEAKER on the base The selected number is dialed 4 To hang up press END or return the corded handset to the base or SPEAKER on the base Ô NOTES Ô Placing a Call on Hold If you leave a call on hold for more than ten seconds the display screen will read Line on ...

Page 32: ...own key on the handset or base during a call will change the earpiece or speaker volume This setting will remain in effect after the telephone call has ended If you press the volume up key when the earpiece is at the maximum volume level an error tone sounds The error tone also sounds if you press the volume down key at the lowest volume Audio Tones Base only The audio tone features provide three ...

Page 33: ...minates To cancel the DND feature press DND again You can also mute the ringer tone while the phone is ringing by pressing DND on the base Temporarily Muting the Ringer To mute the ringer tone temporarily for each handset or the base when the phone is ringing press END on the handset you want to mute or PLAY STOP X on the base The mute will last for the current incoming call only The ringer tone w...

Page 34: ...tone dialing after the call connects This feature is useful when you need tone dialing to use any automated menu systems such as telephone bank tellers telephone prescription refills customer support menus etc Ô If your phone is set to pulse dialing mode make your call normally Once your call connects press the TONE key Any digits you enter from then on will be sent as tone digits When this partic...

Page 35: ...lay and then the handset returns to standby mode BOOSTER HANDSET ONLY If you encounter interference while using your phone you can manually improve the sound by setting the Booster to on This works only when the phone is in use 1 While on a call press MENU DEL 2 Press to move the pointer to Clarity Boost and then SELECT Boost On and B appear in the display To turn Off the Clarity Booster repeat ab...

Page 36: ... base Privacy Mode On and appear in the display To exit the Privacy Mode repeat above step again Privacy Mode Off appears CONFERENCING If you have more than one handset up to four people can participate in a conference call 3 Way Conferencing Outside line Handset Base or Handset 4 Way Conferencing Outside line Handset Handset Base Joining a Conference Call You can easily join a call already in pro...

Page 37: ... All registered handsets beep for 60 seconds and Paging appears on the handset display To cancel paging press any key on the handset or the CANCEL soft key on the base Ô SPEED DIALING You can program up to ten speed dial numbers in each handset You must program a speed dial number before you can use the speed dialing feature When the phone is in standby mode press and hold a number key 0 9 associa...

Page 38: ...stored 100 phonebook entries on your handset the handset will not store Caller ID messages The memory locations in the handset are not limited to phone numbers You can also store a group of numbers up to 20 digits that you need to enter once your call connects This is referred to as Chain Dialing STORING AND EDITING PHONE NUMBERS NAMES DISTINCTIVE RINGS AND SPEED DIAL 1 When the phone is in standb...

Page 39: ...he number corresponding to the key For example to enter Movies 1 Press 6 once and then press to move the cursor to the right 2 Press 6 six times 3 Press 8 six times 4 Press 4 six times 5 Press 3 five times 6 Press 7 eight times If you make a mistake while entering a name Use TONE to move the cursor to the incorrect character Press MENU DEL or the DELETE soft key or DELETE on the base to erase the ...

Page 40: ...stinctive Ring options and then press SELECT or the OK soft key on the base If you choose not to store a Distinctive Ring simply select the No Selectn option 8 Speed Dial appears Press to move the pointer to select the Speed dial location 10 locations SPD1 SPD0 If you choose not to store the name number as a Speed Dial simply choose the No Selectn option 9 Press SELECT or the OK soft key on the ba...

Page 41: ...ge 38 Storing a Redial Record 1 With the phone in standby mode press REDIAL PAUSE 2 Press REDIAL PAUSE repeatedly to display the number to be stored 3 Press SELECT or the STORE soft key on the base Store Edit Name appears 4 To complete the setting follow the steps 4 9 in Storing and Editing Phone Numbers Names Distinctive Rings and Speed Dial on Page 38 Ô NOTES Ô If a call comes in via a telephone...

Page 42: ... press the OK soft key If you are using the handset skip this step 3 Press to scroll through the phonebook locations Phonebook locations appear in alphabetical order from first to last when you press from last to first when you press You can also use the letters on the number keys to select the first letter of the desired name Press a number key 2 9 and 0 once for the first letter twice for the se...

Page 43: ...r SPEAKER on the base OR 1 Press TALK FLASH or SPEAKER or SPEAKER on the base 2 View the phonebook location to dial see Viewing the Phonebook on page 42 3 Press SELECT or the DIAL soft key The number in the displayed phonebook location is dialed 4 To hang up press END or SPEAKER on the base EDITING OR ERASING A STORED NAME PHONE NUMBER DISTINCTIVE RING AND SPEED DIAL 1 When the phone is in standby...

Page 44: ...ng Phone Numbers Names Distinctive Rings and Speed Dial on page 38 to complete the editing operation If you are deleting the entry press to select Yes and press SELECT or the OK soft key You will hear a confirmation tone and Deleted appears in the display DELETING ALL PHONEBOOK LOCATIONS BASE ONLY 1 When the phone is in standby mode press 2 Press to select Delete All and press the OK soft key on t...

Page 45: ... then press SELECT 4 Press to select the handset to which you want to transfer the phonebook locations and then press SELECT If you select All Memory in the step 2 Are you sure appears Press to select Yes and then press SELECT 5 The phonebook locations will be transferred to the handset Copying and the receiving handset name appear When the transfer is completed Done appear Ô NOTES Ô The phonebook...

Page 46: ... the phonebook location you want to export and then press the COPY soft key 5 The phonebook locations will be transferred to the handset Copying and the receiving handset name appear When the transfer is completed Done appears TESTING STORED EMERGENCY NUMBER If you store an emergency service s number police department fire department ambulance and you choose to test the stored number make the test...

Page 47: ... characters Ô You may receive any one of the following messages When a private name is received Private Name When a private number is received Private Number When a unknown name is received Unknown Name When a unknown number is received Unknown Number When invalid data is received Incomplete Data Ô NOTES Ô If you answer a call before the Caller ID message is received the Caller ID message will not...

Page 48: ... number keypad 1 7 to select an option Ask to Hold A prerecorded message states that user will be available shortly and the call is place on hold Tell Busy A prerecorded message tells the caller you are busy and the waiting call is disconnected Forward Call The caller is sent to your voice mail box if available Answer Drop 1 Disconnects the first call and connects to the new caller Conference Star...

Page 49: ... total messages 2 To view the Caller ID messages in historical order newest to oldest or from oldest to newest use key to scroll through the messages from the latest to the earliest or key to scroll back through the messages To view the Caller ID messages with alphabetical search press the number key pad 2 9 and 0 with the letter associated with the first letter of the desired message 3 To finish ...

Page 50: ...e 3 Press to select Yes 4 Press SELECT or the OK soft key on the base You will hear a confirmation tone DELETING ALL CALLER ID NAME NUMBERS 1 When the phone is in standby mode press CID or CID EXIT on the base 2 Press MENU DEL or DELETE or the DELETE soft key on the base Delete All appears 3 Press to choose Yes 4 Press SELECT or the OK soft key on the base You will hear a confirmation tone Ô NOTE ...

Page 51: ...SH or SPEAKER or SPEAKER on the base The displayed phone number dials automatically From Talk mode 1 Press TALK FLASH or SPEAKER or SPEAKER on the handset 2 View the Caller ID message you want to dial see Viewing the Caller ID List on page 49 3 Press SELECT or the DIAL soft key on the base The displayed phone number will be dialed Ô NOTES Ô When a long distance call has been set 1 appears in the d...

Page 52: ...en charged pre registered handsets display a handset ID number Handsets that have not been registered display Place handset on main base to register When you register an extra handset to the base the handset ID will be assigned Ô 1 Before registering the extra handset the battery pack MUST be charged for 15 20 hours 2 With the main base in standby mode press the MENU soft key on the base 3 Press o...

Page 53: ...the DirectLink mode see Using DirectLink Mode Handset only on page 19 DirectLink call 1 When the phone is in the DirectLink standby mode press the TALK FLASH 2 Select the handset to which you wish to DirectLink with by pressing the number keys 1 4 Your handset will then page the other handset 3 On the receiving handset press TALK FLASH or if Anykey Answer is on press any number key TONE or 4 When ...

Page 54: ...ure lets you communicate with another handset or the base without using the phone line Making an Intercom Page From a handset 1 With the phone in standby mode press HOLD TRSF INTCM 2 Use to select the base or the handset you want to talk with and then press SELECT If you select All all other handsets and the base will be paged An intercom tone sounds To cancel intercom press END or the CANCEL soft...

Page 55: ...handset or base that is paging From a handset 1 Pick up the handset from the cradle If AutoTalk is enabled the handset will automatically answer when you pick it up 2 Press TALK FLASH or HOLD TRSF INTCM From the base Pick up the corded handset To answer with the base speakerphone press INTCM TRSF HOLD or SPEAKER or the ANSWER soft key To hang up an intercom page from Handset press END or return th...

Page 56: ...SF HOLD on the base The Call will be put on hold 2 Use to select the handset you want to transfer the call to and then press the OK soft key If you select All all handsets will be paged A paging tone sounds To cancel the transfer press SPEAKER on the base Answering a Call Transfer Page When the page tone sounds the display will show the ID of the handset or base that is transfering the call To ans...

Page 57: ...andset To answer with the base speakerphone press HOLD TRSF INTCM SPEAKER or the ANSWER soft key Accepting the call transfer After answering the page if you want to accept the call and speak to the outside caller press TALK FLASH on the receiving handset or SPEAKER on the base ...

Page 58: ... 12 Minutes of Recording Time Call Screening On Off Personal or Pre recorded Outgoing Messages Voice Prompts for Menu Setup Guidance English Spanish or French Time and Day Announcement Remote Message Retrieval Toll Saver Conversation Recording Voice Memo Message Alert Digital Tapeless Recording allows you to quickly review save or delete the messages you choose You will never have to worry about a...

Page 59: ...microphone and record your greeting 4 When you are finished recording press the STOP soft key Your greeting will playback for confirmation Selecting Your Greeting Base only Select Greeting allows you to choose between the two outgoing messages a pre recorded message or your own greeting Ô 1 Press the MENU soft key Select the Answ Setup menu and then the Select Greeting Play back greeting appears a...

Page 60: ... soft key on the base Select the Answ Setup menu and then the Security Code submenu 2 Enter a two digit PIN code 01 99 using the number keypad 0 9 default is 80 3 Press SELECT or the OK soft key on the base You will hear a confirmation tone Setting the Ring Time Ring Time allows you to set the number of rings the caller hears before your answering system plays the outgoing message You can set the ...

Page 61: ...r from leaving a message 1 Press MENU DEL or the MENU soft key on the base Select the Answ Setup menu and then the Record Time submenu 2 Press to select Record Time 1 Minute 4 Minutes or Announce Only default is one minute 3 Press SELECT or the OK soft key on the base You will hear a confirmation tone Setting the Message Alert On or Off Message Alert sounds an alert tone when you have an unheard m...

Page 62: ...will not deactivate until all new messages are played back Setting the Language of your Answering System Language allows you to set the language of your answering system announcements to English French or Spanish 1 Press MENU DEL or the MENU soft key on the base Select the Answ Setup menu and then the Language submenu 2 Press to choose English Français French or Español Spanish default is English ...

Page 63: ...ar a confirmation tone The message counter displays the number of messages stored in memory If the display flashes then there are new messages waiting for you 2 To turn the answering system Off press ANSWER on the base You will hear the announcement Answering System is off USING YOUR ANSWERING SYSTEM The message counter displays the number of messages stored in memory If the display flashes then t...

Page 64: ...ge was received is announced after the message is played The message counter will then display the number of current stored messages Ô 2 When all new messages have been played you hear a confirmation tone and the system announces End of messages The system returns to standby After you have reviewed your new messages you can play your old messages by pressing PLAY STOP X again Once you have listene...

Page 65: ...he system plays back from the beginning of the current message it does not go back into the old message group 3 Press PLAY STOP X at any time to stop reviewing messages and return to standby The message counter shows the number of messages stored in memory Skipping a message 1 Press PLAY STOP X to review your messages The number of stored messages is announced 2 Press the soft key at anytime to sk...

Page 66: ...P X to review your messages 2 Press the DELETE soft key or DELETE at anytime during the message to delete the message You hear a confirmation tone and the message is deleted 3 To delete all messages press the DELETE soft key or DELETE on the base when the phone is in standby mode After the announcement To delete all messages press delete again press the DELETE soft key or DELETE again When you try...

Page 67: ...dset or the base more than two seconds and within ten minutes Ô From the base 1 During a conversation press the MENU soft key on the base 2 Press to select Call Record and then press the OK soft key Recording a Call and appears on the base A confirmation tone that can be heard by both parties sounds during recording 3 To stop recording press the MENU soft key and to select Call Record and then pre...

Page 68: ... During the greeting message or a series of beeps when the answering system is off press 0 and enter your PIN code within two seconds see Setting a PIN Code on page 60 3 The answering system announces the current time and the number of messages stored in memory You hear To play incoming messages press zero two For help press one zero You will hear a beep 4 Enter a command within 15 seconds each co...

Page 69: ...Ô 0 then 2 Playing incoming Messages 0 then 3 Skipping a Message 0 then 4 Deleting a Message 0 then 5 Stop Operation Ô 0 then 6 Answering System On 0 then 7 Memo Record Stop Ô 0 then 8 Greeting Message Record Stop Ô 0 then 9 Answer System Off 1 then 0 Help Guidance Ô NOTES Ô For Repeat a Message function press 0 then 1 within about four seconds to repeat the previous message or press 0 then 1 afte...

Page 70: ...o Record Stop Ô 8 Greeting Message Record Stop Ô 9 Answer System Off 0 Help Guidance Ô NOTES Ô Remote access with the handset If you press END before the answering system answers the phone will return to standby When the answering system does not answer within 6 seconds you hear a beep and the phone will return to standby When you receive a call the remote operation is canceled You can change the ...

Page 71: ...nished you hear intermittent beeps indicating that the system is in the command waiting mode You may enter another command at this time from the chart above 5 When you are finished press END to exit the system The answering system automatically returns to standby ...

Page 72: ...heck both ends of the base telephone line cord Make sure the AC adapter is plugged into the base and wall outlet Disconnect the AC adapter for a few minutes and then reconnect it Remove the base ID see Handset Registration on page 27 and register the handset see Register the Handset to the Base on page 52 Make sure that you are not too far from the base If an outside call is already established yo...

Page 73: ...e handset see Register the Handset to the Base on page 52 The handset doesn t communicate with another handsets Remove the base ID see Handset Registration on page 27 and register the handset see Register the Handset to the Base on page 52 Make sure that you have registered all handsets The handset or the base can t join the conversation Make sure there are not two handsets already using the three...

Page 74: ...Shack use the store locator feature on RadioShack s website www radioshack com or call 1 800 The Shack 843 7422 and follow the menu options Modifying or tampering with the phone s internal components can cause a malfunction and might invalidate its warranty and void your FCC authorization to operate it No sound on the base unit speaker during call monitoring or message playback Adjust the speaker ...

Page 75: ...75 MEMO ...

Page 76: ...the event of a product defect during the warranty period take the product and the Ra dioShack sales receipt as proof of purchase date to any RadioShack store RadioShack will at its option unless otherwise provided by law a correct the defect by product repair with out charge for parts and labor b replace the product with one of the same or similar design or c refund the purchase price All replaced...

Reviews: