AL
TM
AREA LIGHT INSTALLATION INSTRUCTIONS
®
Page
Thank you for buying RAB lighting
fixtures. Our aim is to design the
best quality products to get the job
done right. We’d like to hear your
comments. Call the Marketing
Department at 888-RAB-1000, or
email: [email protected]
IMPORTANT
READ CAREFULLY BEFORE INSTALLING FIXTURE. RETAIN THESE INSTRUCTIONS FOR FUTURE REFERENCE
.
RAB fixtures must be wired in accordance with the National Electrical Code and all applicable local codes. Proper
grounding is required for safety. This product must be installed in accordance with the applicable installation code by a
person familiar with the construction and operation of the product and the hazards involved.
WARNING:
Make certain power is OFF before installing or maintaining fixture.
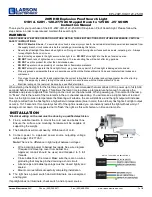
MOUNTING wITH SLIPfITTER
The slipfitter fits a 2 3/8” O.D. tenon.
Place the
slipfitter over the tenon and secure with the
(2) Set
Screws
on the side of the slipfitter.
To adjust the angle of the fixture:
a. Remove (2)
Cover Plate Screws
and the
Round Cover Plate
.
b. Hold the top of fixture, loosen the
Locking Bolt
and swivel the fixture.
c. Tighten the
Locking Bolt
and re-attach the
Round Cover Plate
.
1.
2.
Locking
Bolt
Set Screws
Round Cover
Plate
Cover Plate
Screws
fIXED ARM
For full cutoff, mount arm oriented as shown below.
UP TILT fIXED ARM
For 6 degree up tilt, mount arm oriented as shown below.
POLE DRILLING DETAIL
For mounting to a pole not drilled at RAB.
Note: These instructions do not cover all details or variations
in equipment nor do they provide for every possible situation
during installation, operation or maintenance.
RAB fixture designs are protected under
U.S. and International Intellectual Property laws.
Patent pending.