


Reviews:
No comments
Related manuals for Q48

H-3619
Brand: U-Line Pages: 5
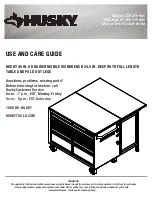
1005 019 985
Brand: Husky Pages: 20

MaXLine II 250
Brand: Maxtor Pages: 50

CISCO MDS 9124 - UPDATE FOR SYSTEM STORAGE
Brand: IBM Pages: 37

Exos ST2000NM0075
Brand: Seagate Pages: 42

DJSA-210 - Travelstar 10 GB Hard Drive
Brand: IBM Pages: 211

S-HD-100
Brand: Olympus Pages: 4

DXi V1000
Brand: Quantum Pages: 344

810 AZT
Brand: Yardmaster Pages: 24

PRS2100
Brand: Kreg Pages: 32

WB-MS14
Brand: PowerTec Pages: 40

30768H1
Brand: Maxtor Pages: 63

ST625211CF
Brand: Seagate Pages: 2

7700
Brand: VIOLIN SYSTEMS Pages: 208

IO90.195.060.K1.WDC
Brand: asecos Pages: 11

SDS
Brand: BITO Pages: 64

4310794
Brand: Karibu Pages: 27

ASR-3100
Brand: Advantech Pages: 6


