Proficient High Resolution Series, User Manual
The Proficient High Resolution Series user manual is a comprehensive guide that allows you to maximize your experience with this exceptional product. Offering easy access, you can download this manual for free from our website, ensuring you have all the information you need to fully utilize your device.
Share
Download


Reviews:
No comments
Related manuals for High Resolution Series

UCS1P
Brand: YORKVILLE Pages: 12

PULSE PS110P
Brand: YORKVILLE Pages: 10

PS210PX - SERVICE
Brand: YORKVILLE Pages: 9

BASIS 100
Brand: Dali Pages: 17

Aelite Sub
Brand: Acoustic Energy Pages: 8

BassX Dual 6
Brand: SpeakerCraft Pages: 3

Uinta
Brand: Escalante Disign Pages: 15

Daimond Series
Brand: Mach Pages: 8

Electronic 1000
Brand: Hama Pages: 11

LB1-SW60
Brand: Bosch Pages: 10

GT-X1250T
Brand: JBL Pages: 4

SUB-115 Pro
Brand: Better Music Builder Pages: 2

Bass BP1
Brand: Renkforce Pages: 4

Subwoofer 18NW100
Brand: B&C Speakers Pages: 1

MicroVee
Brand: Velodyne Pages: 24
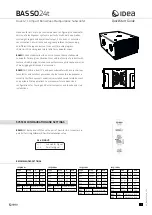
BASSO24t
Brand: Idea Pages: 4

X10
Brand: M&K Sound Pages: 20

DECIMATOR XFR10D11
Brand: XFIRE AUDIO Pages: 4


