WINDOW
Instruction Manual
Read the Instruction Manual carefully before operation
Remarks
1. Thank you for your interest in the new Window FX Holiday projector. Please read the instruction
manual carefully before operating the projector.
2. Please use the adapter and power cord supplied. Failure to use these may create a fire hazard
and may void any warranty.
3. For proper protection, please do not look directly into the lens during set up or operation
4. During operation please keep the lens at least 3 ft. from fabrics, such as
window curtains, furniture or other flammable items.
5. Always operate in a ventilated area and do not block or cover the vents in the main housing.
6. Always operate in a dry environment as the projector and power adapter are for indoor use only.
7. For additional protection, please turn off the projector and remove from the power
supply when not in use.
8. Please use original supplied box and packing material when transporting.
9. Never open the Projector housing. Only authorized personnel should be
allowed access to the projector electronics.
10. For Adult use only. Not intended for the use by children under the age of 15.
11. Use only fresh button cell battery CR2025 size batteries for the remote control.
12. If you find any operational defects, please do not attempt to repair. Unplug the Projector.
Please contact ProductWorks customer service toll free: 888-476-7100, or return to
original place of purchase.
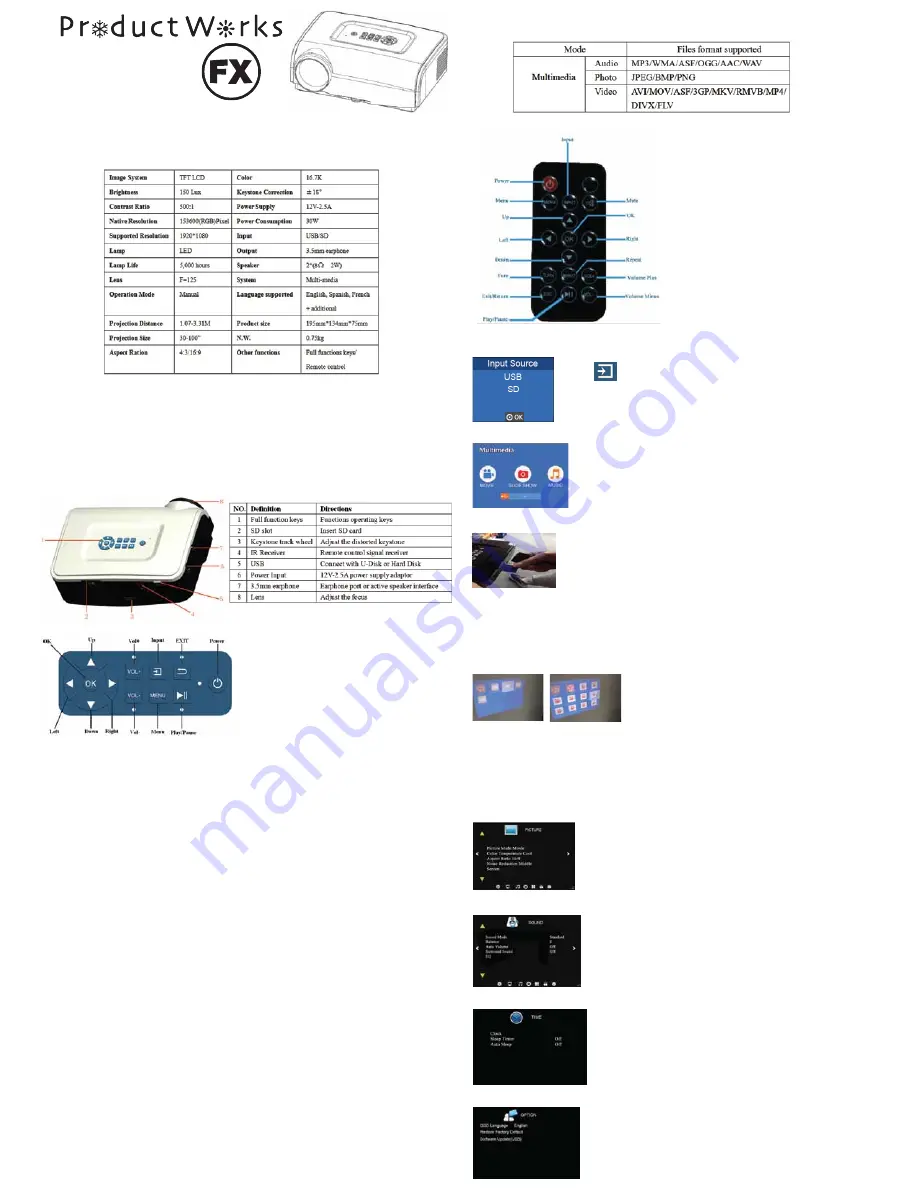
Specifications (specifications subject to adjustment):
File formats supported
Product Features
1. Completely sealed design with high efficiency ventilation and highly upgraded stability and lifetime.
2. LED lamp, with over 5,000 hours lifetime, with vivid color and abundant details
3. Electronic zoom function, easy picture size change.
4. Picture switch from 16:9 to 4:3
5. 30 W low power LED bulb
6. Multi-function input: USB / SD
7. Keystone correction supported
Remote control button function
Remarks:
1. Please remove batteries for
extended periods of inactivity.
2. For better performance, always
point the remote control
towards the IR receiver at back
of Projector
Product Details
System Set Up
The WindowFX Projector is designed to project from the inside
of your home on WINDOWS, for outside viewing, or on a Wall,
for inside viewing. Arrange your set up to match your viewing
selection. Window Projection- Projector should be set up within
4’ to 8’ from the window you will be using. Use the included
Projection Screen with two-sided tape to attach to your window.
Stretch it tight to minimize creases in the fabric. Be sure to
place the Projector on a stable surface and use the tripod for
improved viewing angles. When playing your video, use the
TURN option for reverse imaging. Wall Projection-Projector
should be set up within 4’ to 8’ from the wall you will be using.
The included Projection Screen with two-sided tape may be used
to provide a high quality image. Be sure to place the Projector
on a stable surface and use the tripod for improved viewing angles.
Menu Operation
1. Signal source selection
Press “ ”on the projector or “input” on the remote and the
main menu will appear (see image at left). Press Input again
until the desired option, then press “OK” on the projector or
remote to confirm selection. Default setting is for SD card input.
2. Multimedia Menu
After selecting Input, the Multimedia Menu will provide Output
options as image at left showing MOVIE, SLIDE SHOW or
MUSIC play options:
3. Insert SD or USB Flash Drive
4. Adjust Focus by Rotating Lens Barrel
5. Select HORIZONTAL or VERTICAL Orientation
6. Select Folder, then the Files to be Played
7. Play
Press PLAY to start video or slide show viewing. The files selected
will play and repeat.
8. For REVERSE file operation, press FLIP
On remote control so that image is reversed for outside viewing.
9. ADDITIONAL On Screen Menu Operations
Projector Operation
1. ON/OFF: Connect the power adaptor to the projector, then connect the power adaptor to
the AC power outlet. The indicator light on the main unit will flash to show it is in stand-by mode.
2. POWER ON : Press the power button on the projector or the remote. Projector is now ON in active mode.
3. POWER OFF: Press power button on the projector or the remote, projector returns to standby status.
4. FOCUS Operation: Place the projector across from selected projection screen or wall, then
manually rotate the lens until the picture attains clearest image. You can open the on screen menu
to help with ideal focus settings.
5. KEYSTONE correction function: In some placement locations, the image will present a slight
trapezoid distortion. Keystone Correction technology allows you to compensate for the distortion
image via optical technology. Use the Keystone tracking wheel to adjust for any distortion.
a) Picture menu operation:
Press “menu” then press left or right “
<
/
>
” to reach pop
up menu at left. Then press up or down “
▲
/
▼
”to reach
additional submenu for MOVIE: TXT, COLORS, ASPECT
RATIO, SCREENS and NOISE REDUCTION
b) Sound menu adjustment:
Press “menu” then press left or right “
<
/
>
” to reach pop
up menu at left. Then press up or down “
▲
/
▼
” to reach submenu
for SOUND: MODE, AUTO VOLUME, SURROUND SOUND
and EQUALIZER
c) Time menu adjustment:
Press “menu” then press left or right “
<
/
>
” to reach pop up
Menu as left image. Then press up or down “
▲
/
▼
” to reach
submenu for TIME as left image. TIME SETTINGS, SLEEP TIMER
AND AUTO SLEEP
d) Optional Menu Adjustment:
Press “menu” then press left or right “
<
/
>
” to reach pop up
menu as left image. Then press up or down “
▲
/
▼
” to reach
submenu for OPTIONS as left image. LANGUAGE, RESTORE
FACTORY SETTINGS, SOFTWARE UPDATES
If you have any questions on the operation or use of the WindowFX Holiday Projector please
contact ProductWorks Customer Service @ 888-476-7100
Both formats are available depending on your window size.
For operation, carefully rotate to the side and attach tripod.
Press enter for each file to be played in sequence. The file
will show a check in the upper right corner of each file: