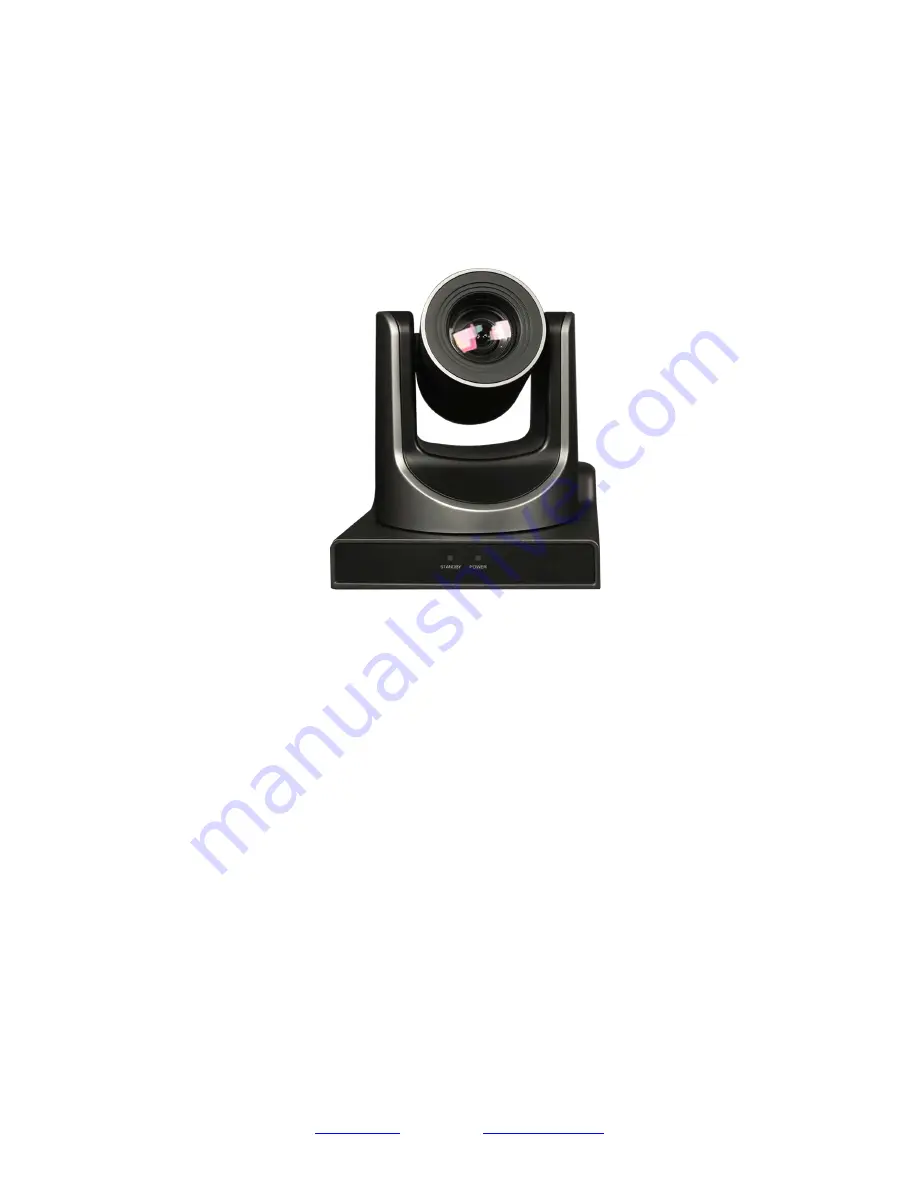
background image

www.prisual.us

Support

:  

[email protected]

Prisual

PTZ Video Camera 

User Manual 

Model Nos: 

TEM-

3

0

(English) 

Copyright Notice 

The entire contents of this manual, whose copyright belongs to 

Prisual

 Corporation, may not be cloned, copied

or translated in any way without the explicit permission of the company. Product specifications and information 

referred to in this document are for reference only and as such are subject to updating at any time without prior 

notice

Summary of Contents for TEM-30N

Page 1: ...ntire contents of this manual whose copyright belongs to Prisual Corporation may not be cloned copied or translatedin any way without the explicit permission of the company Product specifications and information referred to in thisdocument are for reference only and as such are subject to updating at any time without prior notice ...

Page 2: ... of the cover may result in an electric shock in addition to voiding the warranty In case of abnormal operation contact the manufacturer Never operate outside of the specified operating temperature range humidity or with any other power supply than the one originally provided with the camera Please use a soft dry cloth to clean the camera If the camera is very dirty clean it with diluted neutral d...

Page 3: ...2 Interface 13 VISCA Network Configuration 14 Serial Communication Control 14 Command List 15 Menu Settings 30 Network Connection 34 Setting up a Network VideoStream 35 Additional Network Info 37 Camera Web Interface 38 Menu 38 Live 38 DirectionalArrows 38 Video 39 Image 40 Network 41 Information 43 Language 43 Network Camera ControlProtocol 43 Photobooth Functionality 47 Maintenance andTroublesho...

Page 4: ...uct is 12VDC with a maximum current supply of 2A Polarity of the power supply plug is critical and is as follows Handling Avoid any stress vibration or moisture during transportation storage installation and operation Do not lift or move the camera by grasping the camera head Do not turn the camera head by hand Doing so may result in mechanical damage Do not expose camera to any corrosive solid li...

Page 5: ...Page 2 Prisual Support prisual av gmail com www prisual us Quick Start Step1 Please check that all connections are correct before powering on the camera ...

Page 6: ...itch you need to restart the camera to takeeffect CAUTION A B C F Broadcast frame rate options are considered BETA features and may not be supported byall platforms Step3 Press the Switch ON button on the rear of the camera the power lamp willilluminate Step 4 The Pan Tilt mechanism will rotate the lens to the maximum position of top right after the camera starts then it will return to the center ...

Page 7: ...effectively reduces noise even under low illumination conditions Video Outputs o Simultaneous IP network streaming 3G SDI and HDMI video outputs o 3G SDI High Definition video output up to 60 frames per second o HDMI 1 3 High efinition video output up to 60 frames per second o RTSP RTMP RTMPS streaming using H 264 H 265 MJPEG o Line level audio embedding over IP network stream HDMI Uses AAC audio ...

Page 8: ...00K 5000K Outdoor 6500K_1 6500K_2 6500K_3 One Push Manual Backlight Compensation Support Digital Noise Reduction 2D 3D Digital Noise Reduction Video S N 55dB Horizontal Angle of View 60 7 2 28 Vertical Angle of View 34 1 1 28 Horizontal Rotation Range 170 Vertical Rotation Range 30 90 Pan Speed Range 1 7 100 s Tilt Speed Range 1 7 69 9 s Image Flip Support Image Mirror Support Image Freeze Support...

Page 9: ...PEG Video Stream Two 2 IP video output streams available Main Stream Sub Stream First Stream Resolutions 1920x1080 1280x720 1024x576 960x540 640x480 640x360 Second Stream Resolutions 1280x720 1024x576 720x480 720x408 640x360 480x270 320x240 320x180 Video Bit Rate 32Kbps 102400Kbps Bit Rate Type Variable Rate Fixed Rate Frame Rate 50Hz 1 FPS 50 FPS 60Hz 1 FPS 60 FPS Audio Compression AAC Audio Bit ...

Page 10: ...eaming control 2 CVBS composite video SD Interface 8 HDMI Digital Video Output 3 System select dial resolution 9 HD SDI Serial Digital Video Output 4 RS485 jack 10 USB 2 0 no video out Future USB Storage 5 RS232 IN jack 11 DC 12V power jack 6 RS232 OUT jack pass through for daisy chain 12 Power switch Dimensional Drawings mm 30X ...

Page 11: ...all presets 5 14 Pan Tilt Control Buttons Press the arrow buttons to perform panning and tilting Press the HOME button to face the camera back to front 6 Return Button Press the button to back previous menu 7 Zoom Buttons Zoom Zoom In Slow and fast speed Zoom Zoom Out Slow and fast speed 8 L R Set Button Set the left right direction of the remote control L R Set 1 Normal direction L R Set 2 Left a...

Page 12: ... again to disable the backlightcompensation NOTE Effective only in auto exposure mode NOTE If there is a light behind the subject the subject will appear dark In this case press the backlight ON OFF button To cancel this function press the backlight ON OFF button 17 P T RST Button Press the button to self calibrate pan and tilt once again Shortcuts for some Set Functions 1 Display OSD menu in Engl...

Page 13: ...he up down left right buttons to keep panning or tilting from slow to fast until the camera reaches the mechanical limit The camera stops as soon as the button is released 2 Zoom Control Zoom Out press button under FAST or SLOW Zoom In press button under FAST or SLOW Press and hold the button to keep zooming in or out until the lens reaches the mechanical limit The lens stops as soon as the button...

Page 14: ...Control Press button to put camera in standby mode In standby mode the camera will provide no image respond to no commands and use less than half its normal power Press button again to put camera in normal mode 6 Presets Setting and Clearing 1 To store a preset position The user should manually setup the desired shot using the Pan Tilt and Zoom controls Press the PRESET button first and then press...

Page 15: ...ras to be operated via the same IR remote in the same room 9 Camera IR Address Set Press 3 buttons in the sequence shown below to set change the camera s IR address This allows up to 4 cameras to be controlled from the same IR remote control Be sure that only one camera is picking up the IR signal when you perform this function If multiple cameras receive the command they will all change to the ne...

Page 16: ... 1 CD 2 DSR 2 RXD 3 TXD 3 TXD 4 GND 4 DTR 5 RXD 5 GND 6 GND 6 DSR 7 IR OUT 7 RTS 8 NC 8 CTS 9 RI For Control Daisy Chain 1st Camera 2nd Camera Mini DIN 1 DTR 1 DTR 2 DSR 2 DSR 3 TXD 3 TXD 4 GND 4 GND 5 RXD 5 RXD 6 GND 6 GND 7 IR OUT 7 NC 8 NC 8 NC No Function 1 DTR 2 DSR 3 TXD 4 GND 5 RXD 6 GND 7 IR OUT 8 NC ...

Page 17: ...The camera can be controlled via RS232 The parameters of RS232C are as follows Baud rate 2400 4800 9600 or 38400 bps Start bit 1 bit Data bit 8 bits Stop bit 1bit Parity bit none RS485 Communication Control The camera can be controlled via RS485 Half duplex mode with support for VISCA Pelco D or Pelco P protocol The parameters of RS485 are as follows Baud rate 2400 4800 9600 or 38400 bps Start bit...

Page 18: ...z0 60 03 FF Indicates that two sockets are already being used executing two commands and the command could not be accepted when received Command Canceled z0 6y 04 FF y Socket No Returned when a command which is being executed in a socket specified by the cancel command is canceled The completion message for the command is not returned No Socket z0 6y 05 FF y Socket No Returned when no command is e...

Page 19: ...8x 01 04 38 03 FF Auto Manual 8x 01 04 38 10 FF Focus Lock 8x 0a 04 68 02 FF Prevents any other operation or command from adjusting the current focus state Focus Unlock 8x 0a 04 68 03 FF CAM_WB Auto 8x 01 04 35 00 FF Normal Auto Indoor mode 8x 01 04 35 01 FF Indoor mode Outdoor mode 8x 01 04 35 02 FF Outdoor mode OnePush mode 8x 01 04 35 03 FF One Push WB mode Manual 8x 01 04 35 05 FF Manual Contr...

Page 20: ... 04 0D 00 FF Bright Setting Up 8x 01 04 0D 02 FF Down 8x 01 04 0D 03 FF Direct 8x 01 04 0D 00 00 0p 0q FF pq Bright Position CAM_ExpComp On 8x 01 04 3E 02 FF Exposure Compensation On Off Off 8x 01 04 3E 03 FF Reset 8x 01 04 0E 00 FF Exposure Compensation AmountSetting Up 8x 01 04 0E 02 FF Down 8x 01 04 0E 03 FF Direct 8x 01 04 4E 00 00 0p 0q FF pq ExpComp Position CAM_BackLight On 8x 01 04 33 02 F...

Page 21: ...00 0W 0Y 0Y 0Y 0Y 0Z 0Z 0Z 0Z FF W 1 UpRight 0 DownLeft YYYY Pan Limit Position ZZZZ Tilt Position LimitClear 8x 01 06 07 01 0W 07 0F 0F 0F 07 0F 0F 0F FF CAM_Brightness Direct 8x 01 04 A1 00 00 0p 0q FF pq Brightness Position CAM_Contrast Direct 8x 01 04 A2 00 00 0p 0q FF pq Contrast Position CAM_Flip Off 8x 01 04 A4 00 FF Single Command For Video Flip Flip H 8x 01 04 A4 01 FF Flip V 8x 01 04 A4 ...

Page 22: ...t error CAM_ZoomPosInq 8x 09 04 47 FF y0 50 0p 0q 0r 0s FF pqrs Zoom Position CAM_FocusAFMode Inq 8x 09 04 38 FF y0 50 02 FF Auto Focus y0 50 03 FF Manual Focus CAM_FocusPosInq 8x 09 04 48 FF y0 50 0p 0q 0r 0s FF pqrs Focus Position CAM_WBModeInq 8x 09 04 35 FF y0 50 00 FF Auto y0 50 01 FF Indoor mode y0 50 02 FF Outdoor mode y0 50 03 FF OnePush mode y0 50 05 FF Manual y0 50 20 FF ColorTemperature...

Page 23: ...F y0 50 00 00 0p 0q FF pq Aperture Gain SYS_MenuModeInq 8x 09 06 06 FF y0 50 02 FF On y0 50 03 FF Off CAM_PictureEffectM odeInq 8x 09 04 63 FF y0 50 02 FF Off y0 50 04 FF B W CAM_LR_ReverseInq 8x 09 04 61 FF y0 50 02 FF On y0 50 03 FF Off CAM_PictureFlipInq 8x 09 04 66 FF y0 50 02 FF On y0 50 03 FF Off CAM_ColorGainInq 8x 09 04 49 FF y0 50 00 00 00 0p FF p Color Gain setting 0h 60 to Eh 200 Pan ti...

Page 24: ...ocus Mode 1 Auto 0 Manual CAM_CameraBlockIn q 8x 09 7E 7E 01 FF y0 50 0p 0p 0q 0q 0r 0s tt 0u vv ww 00 xx 0z FF pp R_Gain qq B_Gain r WB Mode s Aperture tt AE Mode u bit2 Back Light u bit1 Exposure Comp vv Shutter Position ww Iris Position xx Bright Position z Exposure Comp Position CAM_OtherBlockInq 8x 09 7E 7E 02 FF y0 50 0p 0q 00 0r 00 00 00 00 00 00 00 00 00 FF p bit0 Power 1 On 0 Off q bit2 L...

Page 25: ...us 81 01 04 38 03 FF Auto Manual 81 01 04 38 10 FF Focus Lock 81 0a 04 68 02 FF Prevents any other operation or command from adjusting the current focus state Focus Unlock 81 0a 04 68 03 FF CAM_WB Auto 81 01 04 35 00 FF Normal Auto Indoor mode 81 01 04 35 01 FF Indoor mode Outdoor mode 81 01 04 35 02 FF Outdoor mode OnePush mode 81 01 04 35 03 FF One Push WB mode Manual 81 01 04 35 05 FF Manual Co...

Page 26: ... 04 0D 00 FF Bright Setting Up 81 01 04 0D 02 FF Down 81 01 04 0D 03 FF Direct 81 01 04 0D 00 00 0p 0q FF pq Bright Position CAM_ExpComp On 81 01 04 3E 02 FF Exposure Compensation On Off Off 81 01 04 3E 03 FF Reset 81 01 04 0E 00 FF Exposure Compensation AmountSetting Up 81 01 04 0E 02 FF Down 81 01 04 0E 03 FF Direct 81 01 04 4E 00 00 0p 0q FF pq ExpComp Position CAM_BackLight On 81 01 04 33 02 F...

Page 27: ... 00 0W 0Y 0Y 0Y 0Y 0Z 0Z 0Z 0Z FF W 1 UpRight 0 DownLeft YYYY Pan Limit Position ZZZZ Tilt Position LimitClear 81 01 06 07 01 0W 07 0F 0F 0F 07 0F 0F 0F FF CAM_Brightness Direct 81 01 04 A1 00 00 0p 0q FF pq Brightness Position CAM_Contrast Direct 81 01 04 A2 00 00 0p 0q FF pq Contrast Position CAM_Flip Off 81 01 04 A4 00 FF Single Command For Video Flip Flip H 81 01 04 A4 01 FF Flip V 81 01 04 A4...

Page 28: ...cuit error CAM_ZoomPosInq 81 09 04 47 FF 90 50 0p 0q 0r 0s FF pqrs Zoom Position CAM_FocusAFMode Inq 81 09 04 38 FF 90 50 02 FF Auto Focus 90 50 03 FF Manual Focus CAM_FocusPosInq 81 09 04 48 FF 90 50 0p 0q 0r 0s FF pqrs Focus Position CAM_WBModeInq 81 09 04 35 FF 90 50 00 FF Auto 90 50 01 FF Indoor mode 90 50 02 FF Outdoor mode 90 50 03 FF OnePush mode 90 50 05 FF Manual 90 50 20 FF ColorTemperat...

Page 29: ...F 90 50 00 00 0p 0q FF pq Aperture Gain SYS_MenuModeInq 81 09 06 06 FF 90 50 02 FF On 90 50 03 FF Off CAM_PictureEffectM odeInq 81 09 04 63 FF 90 50 02 FF Off 90 50 04 FF B W CAM_LR_ReverseInq 81 09 04 61 FF 90 50 02 FF On 90 50 03 FF Off CAM_PictureFlipInq 81 09 04 66 FF 90 50 02 FF On 90 50 03 FF Off CAM_ColorGainInq 81 09 04 49 FF 90 50 00 00 00 0p FF p Color Gain setting 0h 60 to Eh 200 Pan ti...

Page 30: ... Address 0x00 0x20 0x00 0x00 SUM Zoom Out 0xFF Address 0x00 0x40 0x00 0x00 SUM Focus Far 0xFF Address 0x00 0x80 0x00 0x00 SUM Focus Near 0xFF Address 0x01 0x00 0x00 0x00 SUM Set Preset 0xFF Address 0x00 0x03 0x00 Preset ID SUM Clear Preset 0xFF Address 0x00 0x05 0x00 Preset ID SUM Call Preset 0xFF Address 0x00 0x07 0x00 Preset ID SUM Auto Focus 0xFF Address 0x00 0x2B 0x00 0x01 SUM Manual Focus 0xF...

Page 31: ...0x00 0x00 0x00 0xAF XOR Set Preset 0xA0 Address 0x00 0x03 0x00 Preset ID 0xAF XOR Clear Preset 0xA0 Address 0x00 0x05 0x00 Preset ID 0xAF XOR Call Preset 0xA0 Address 0x00 0x07 0x00 Preset ID 0xAF XOR Auto Focus 0xA0 Address 0x00 0x2B 0x00 0x01 0xAF XOR Manual Focus 0xA0 Address 0x00 0x2B 0x00 0x02 0xAF XOR Query Pan Position 0xA0 Address 0x00 0x51 0x00 0x00 0xAF XOR Query Pan Position Response 0x...

Page 32: ...ompMode is On Backlight Set the backlight compensation optional items On Off Effective only in Automode Bright Intensity control optional items 00 17 Effective only in Bright mode Gain Limit Maximum gain limit optional items 0 15 Effective only in SAE AAE Bright mode Anti Flicker Anti flicker optional items Off 50Hz 60Hz Effective only in Auto AAE Bright mode Shutter Shutter value optional items 1...

Page 33: ...fective only in Auto One Push mode 4 IMAGE Move the main menu cursor to IMAGE and press the HOME key to enter the image page as shown in the following figure Luminance Brightness adjustment optional items 0 14 Contrast Contrast adjustment optional items 0 14 Sharpness Sharpness adjustment optional items 0 14 Flip H Image flipped horizontally optional items On Off Flip V Image Flip Vertical optiona...

Page 34: ... and press the HOME key to enter the noise reduction page as shown in the following figure NR2D Level 2D noise reduction optional items Close Auto 1 5 NR3D Level 3D noise reduction optional items Off 1 8 7 SETUP Move the main menu cursor to SETUP and press the HOME key to enter the setup page as shown in the following figure Language Optional items EN Chinese Russian French Spanish Italian German ...

Page 35: ...ge as shown in the following figure V_Address Camera VISCA address optional items 1 7 V AddrFix Fixed VISCA address optional items Off On Net Mode Optional items Serial Paral Baudrate Optional items 2400 4800 9600 38400 P_D_Address Pelco D Address optional items 0 254 P_P_Address Pelco P Address optional items 0 31 9 RESTORE DEFAULT Move the main menu cursor to RESTORE DEFAULT and press the HOME k...

Page 36: ... or CAT6 patch cable or directly to your PC via a CAT5 or CAT6 cross over cable 2 Turn on camera power 3 If successful the orange network light will illuminate and the green light will start flashing If unsuccessful the cableis bad you are using the wrong cable or you have connected to an inactive network jack 3 Network Connection Connection method between network camera and computer as in picture...

Page 37: ... dropdown menu and click Search 4 The next thing you would want to do is change your cameras IP address to be in the same range as yournetwork The camera comes with a default IP address of 192 168 100 88 a See the Additional Network Info section to identify your network scheme 5 Click and select the camera item you wish to change the IP address of and select Config a You have two 2 options for ass...

Page 38: ...interface 8 You can now receive an RTSP stream from your camera To view the RTSP stream type in rtsp Camera IP address 554 1 for the first HD stream and rtsp Camera IP address 554 2 for the second SD stream 9 You can test the RTSP streaming in VLC Media Player Once VLC is installed and launched click the Media drop down menu and select Open Network Stream NOTE If the camera is used for the first t...

Page 39: ...start menu 2 Type in ipconfig and press Enter on your keyboard 3 Scroll down to IPv4 Address This is your computer s local IP address 4 In the example above the PC s local address is IPv4 Address 192 168 111 219 making the IP range 192 168 111 Mac 1 Open a new finder window and go to Applications then Utilities and select the Terminalprogram 2 Type in IP config get if addr en0 and press Enter on y...

Page 40: ...ft Right buttons to Pan Tilt the camera or traverse the OSD Menu Home Button Use the Home Button to send the camera to the Home position or to make a selection within the OSD Menu Zoom In Use the Zoom In button to for narrow tele views of the scene Zoom Out Use the Zoom Out button for wide views of the scene Focus In Out Use the Focus In and Focus Out buttons to make manual focus adjustments of th...

Page 41: ...4x576 720x480 720x408 640x360 480x270 320x240 320x180 Bit Rate Adjust the maximum bit rate of the network video The higher the bit rate the clearer the image will be Bit rates set too high can congest the network and cause the video to not transmit properly causing the video to appear worse Range 32 20480 kbps Frame Rate Adjust the frame rate of the network video The higher the frame rate the smoo...

Page 42: ...mbedding Audio Type AAC Sample Rate Options include 44 1K 48K Bit Rate Options include 96K 128K 256K Input Type Line in Input Vol L Volume of left channel 97 30 db Input Vol R Volume of right channel 97 30 db ADTS Options Enable Disable ADTS Work Mode Options include RTSP SDK Multicast Reboot Used to power cycle the camera Username Username to login to device Username admin Password Password to lo...

Page 43: ...ction allows you to adjust the IP parameters of the camera The default IP address of the camera is 192 168 100 99 You cannot change the MAC address IP Configuration Type Fixed IPAddress Static Dynamic IP Address DHCP IP Address Camera s IPaddress Subnet Mask Network Subnet Mask Gateway Network Gateway ...

Page 44: ...s you to enable or disable the two 2 RTMPS stream s video and audio sources First Stream Enable Disable Stream 1 Video Audio First Stream MRL Text field for RTMPS Stream 1 s Media Resource Locator MRL Second Stream Enable Disable Stream 2 Video Audio Second Stream MRL Text field for RTMPS Stream 2 s Media Resource Locator MRL RTSP Settings The RTSP Settings section allows you to enable or disable ...

Page 45: ...face HTTP CGI and TCP UDPprotocol The camera includes an internal TCP server The default port number is 5678 When client and server set up aTCP connection the client sends PTZ command to the internal server and the server will then parse and execute thePTZ commands The camera includes an internal UDP server The default port number is 1259 When client and server set up aUDP connection the client se...

Page 46: ...osition Number 0 89 Range 1 100 254 Range 2 Home Position Recall http Camera IP cgi bin ptzctrl cgi ptzcmd home PT Reset http Camera IP cgi bin param cgi pan_tiltdrive_reset Direct Position Recall Control http Camera IP cgi bin ptzctrl cgi ptzcmd Mode Pan Speed Tilt Speed Pan Position Tilt Position Mode ABS REL Pan Speed 1 Slowest 24 Fastest Tilt Speed 1 Slowest 20 Fastest Pan Position 0001 First ...

Page 47: ...cmd Action Action UP DOWN LEFT RIGHT OSD Menu Selection Control http Camera IP cgi bin param cgi navigate_mode Mode Mode CONFIRM OSD_BACK HTTP CGI ImageAdjustment Image Settings Control http Camera IP cgi bin param cgi post_image_value Mode Level Mode BRIGHT SATURATION CONTRAST SHARPNESS HUE Level 0 14 Image Orientation Control http Camera IP cgi bin param cgi post_image_value Mode State Mode FLIP...

Page 48: ..._media_audio Network AudioConfiguration Network http Camera IP cgi bin param cgi get_network_conf Network Configuration Information http Camera IP cgi bin param cgi get_device_conf Camera Information Serial Number http Camera IP cgi bin param cgi get_serial_number Serial Number Not always accurate ...

Page 49: ...at has approximately a four 4 second delay between four 4 still images being captured To retrieve your series of four 4 still images you will need to open a standard web browser with network access tothe camera and use the following HTTP strings to retrieve the still image files asdesired Image 1 http Camera IP photo1 jpg Image 2 http Camera IP photo2 jpg Image 3 http Camera IP photo3 jpg Image 4 ...

Page 50: ...u will need to open a standard web browser with network access to thecamera and use the following HTTP strings to retrieve the still image files asdesired Video 1 http Camera IP video1 mp4 Video 2 http Camera IP video2 mp4 Video 3 http Camera IP video3 mp4 Video 4 http Camera IP video4 mp4 Video note It can take the camera time for the video files to be fully captured and processed If they are not...

Page 51: ... cord is connected voltage is OK POWER lamp is lit 2 Check whether the camera can self test after startup camera will do a brief pan tilt tour and return tothe home position or if preset 0 is set the camera will return to the preset 0 position 3 Check that the HDMI cable is connected correctly 1 If HDMI make sure that the destination device is accessing the HDMI port that you plugged into 2 If SDI...

Page 52: ...Select 1 on the remote to controlthe camera 3 Try removing other sources of IR interference e g sunlight fluorescent lighting Serial communication does not control the camera 1 Make sure the camera is on and functioning with the IR remote control 2 Verify that the RS232 cable is connected correctly and using the proper pinout 3 Verify the communication settings of the control software or device e ...

Reviews: