Pride Z11, Owner'S Manual
Introducing the Pride Z11, a revolutionary electric scooter designed to enhance your mobility experience. Unlock the full potential of this remarkable device with the comprehensive Owner's Manual. Download the user manual for free from our website manualshive.com, and discover how to maximize the Z11's capabilities effortlessly.
Share
Download


Reviews:
No comments
Related manuals for Z11
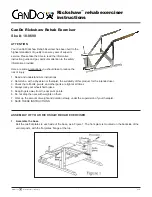
Rickshaw
Brand: Cando Pages: 2

Ezi-Fold D10
Brand: Monarch Pages: 24

WC01060.BLU
Brand: I-GO Pages: 28

KING-SSBA-20
Brand: Timago Pages: 10

FS863-12
Brand: Rainbow Pages: 4

Ben 9 Plus
Brand: Invacare Pages: 50

0811308
Brand: Mobiak Pages: 18

Van Seat
Brand: Invacare Pages: 44

TA IQ RWD
Brand: TA Service Pages: 76

multi frame Series
Brand: R82 Pages: 32

Infinity Duo
Brand: CareCo Pages: 11

B-5181
Brand: Bobrick Pages: 2

Tobago
Brand: B+B Pages: 38

700 002
Brand: IDEAL Pages: 19

Line
Brand: FORTA Pages: 16

CHM 100 Series
Brand: SOMA Pages: 8

Eclips X4 90
Brand: Vermeiren Pages: 24

Eclips X4 kids 90 Degrees
Brand: Vermeiren Pages: 152


