background image

1

PRESTIGIO NOBILE 157

ENG

Prestigio Nobile 157 - User’s guide

Preface

This notebook computer incorporates the latest mobile technologies in a slim and portable package. This manual should
answer most of the questions you have about the day-to-day operation of your notebook computer. You should also take
advantage of the online help files that are available with almost all of the programs shipped with your computer.
We hope you enjoy your notebook computer. With proper care, your computer will provide you with years of productive
service.

Connecting the computer

Connecting the computer is as easy as 1-2-3.

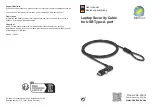
1. Insert the battery at an angle (1); press gently on the battery
(2) until it clicks into place. Then slide the battery lock to the lock
position (3).

Note: When using a battery pack for the first time, fully
recharge the battery, then disconnect the adapter to use up
the battery before recharging again. Perform this action
twice to condition the battery pack.

2. Connect one end of the AC adapter to the DC-in port on the
computer’s rear panel (1); connect the power cord to the AC
adapter (2) and the other end to a properly grounded power
outlet (3).

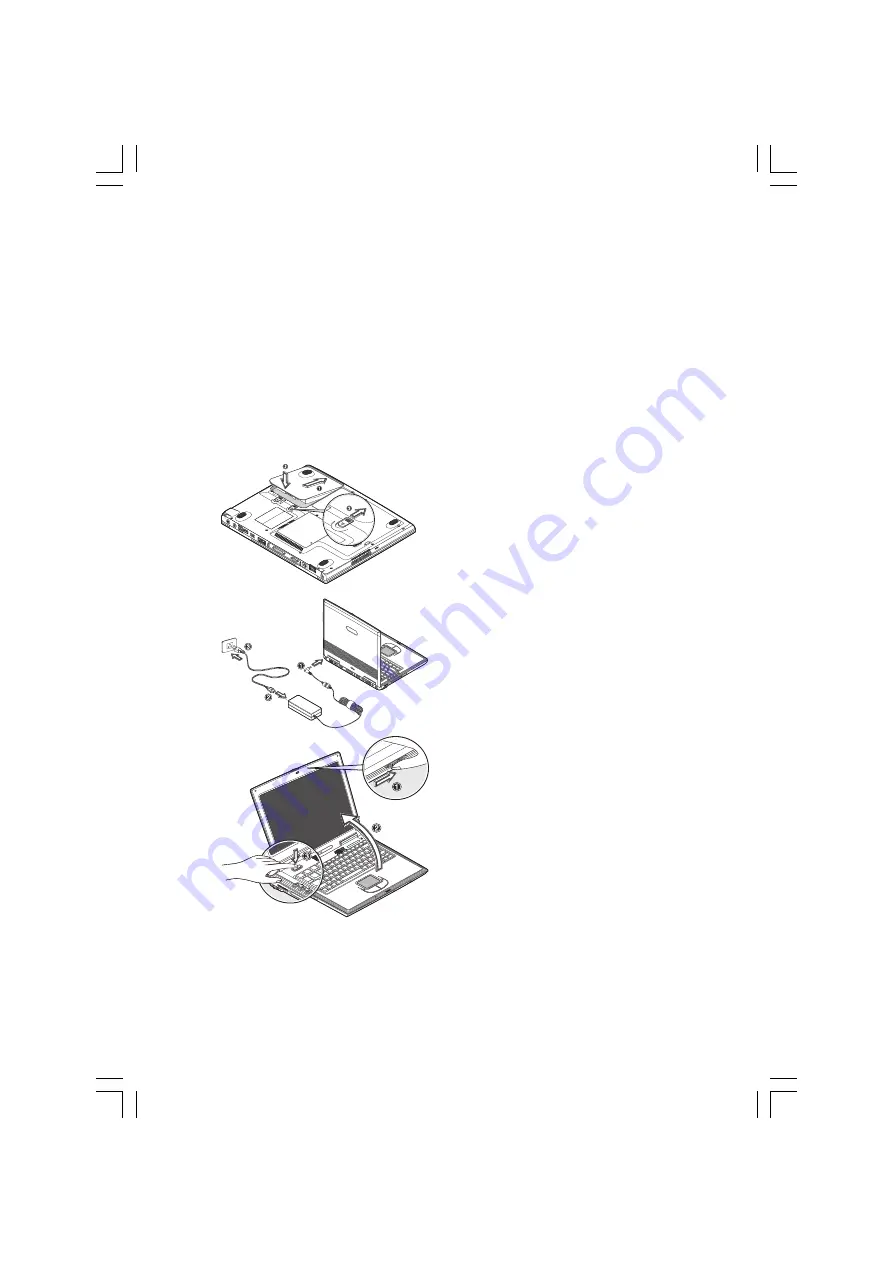
3. Press the display cover release latch (1) and open the display
(2) to a comfortable viewing angle. Press the power switch (3)
to turn on the power. The POST (power-on self-test) routine
executes and Windows begins loading.

Summary of Contents for NOBILE 157

Page 1: ...nnectingthecomputerisaseasyas1 2 3 1 Insertthebatteryatanangle 1 pressgentlyonthebattery 2 untilitclicksintoplace Thenslidethebatterylocktothelock position 3 Note Whenusingabatterypackforthefirsttime fully rechargethebattery thendisconnecttheadaptertouseup thebatterybeforerechargingagain Performthisaction twicetoconditionthebatterypack 2 ConnectoneendoftheACadaptertotheDC inportonthe computer s re...

Page 2: ...t button Press to eject the drive tray 5 Emergency eject hole Insert a pin to eject the drive tray when power is off Top view Item Icon Description 1 Display screen Also called LCD liquid crystal display displays computer output 2 Status indicators LEDs light emitting diodes that turn on and offto show the status of the computer and its functions and components 3 Power button Turns on the computer...

Page 3: ...ur hands when you use the computer 9 Keyboard Inputs data into your computer Left view Item Icon Description 1 Volume control Adjusts the volume 2 Memory Stick Secure Digital Accepts a Memory Stick Secure Digital SD or MultiMediaCard MMC card slot option memorycard 3 PC Card slot Accepts one Type II 16 bit PC Card or 32 bit CardBus PC Card 4 PC Card eject button Ejects the PC Card from its slot 5 ...

Page 4: ... g parallel printer 5 Modem jack Connects a phone line only for models with an internal fax data modem 6 Network jack Connects to an Ethernet based network 7 IEEE 1394 port Connects to a IEEE 1394 compatible 4 pin device e g digital video camera 8 USB ports Connect to USB devices e g USB digital camera 9 Line in jack Accepts audio line in devices e g audio CD player stereo walkman 10 S PDIF line o...

Page 5: ...dstatusindicators LEDs underthedisplayscreen ThePowerandStandbyindicatorsarevisibleevenwhenyouclosethedisplaycoversoyoucanseethestatusofthecomputer whilethecoverisclosed Item Icon Description 1 Wireless communication Lights when the wireless LAN optional capabilities are enabled 2 Power Lights when the computer is on Blinks when a battery low condition occurs 3 Standby Blinks when computer enters ...

Page 6: ...r in Sleep mode which can be defined via the advanced section of the Power Management Properties in the Windows Control Panel Fn F3 Display toggle Switches display output between the display screen external monitor if connected and both the display screen and external monitor Fn F4 Screen blank Turns the display screen backlight off to save power Press any key to return Fn F5 Speaker on off Turns ...

Page 7: ...ics Locatedbelowthekeyboard thewideandcurvedpalmrestisergonomicallydesignedtoprovideyouwithaverycomfort ableplacetorestyourhandswhileyoutype Touchpad Thebuilt intouchpadisapointingdevicethatsensesmovementonitssurface Thismeansthecursorrespondsasyoumoveyourfingeronthesurfaceofthetouchpad Thecentrallocationonthepalm restprovidesoptimumcomfortandsupport ...

Page 8: ...ick twice quickly Tap twice at the same speed as double clicking the mouse button Select Click once Tap once Drag Click and hold then use Tap twice at the same speed as finger to drag the cursor double clicking the mouse on the touchpad button and hold finger to the touchpad on the second tap to drag the cursor Access context menu Click once Scroll Note Keepyourfingersdryandcleanwhenusingthetouchp...

Page 9: ...Icon Description 1 Wireless communication This button is used to enable or disable the wireless LAN optional function 2 Email The mail button is used to launch the email application 3 Internet browser By default is used to launch your internet browser 4 P1 This button is user programmable 5 P2 This button is user programmable ...

Page 10: ...erpushobjectsofanykindintothisproductthroughcabinetslotsastheymaytouchdangerousvoltagepointsorshort outpartsthatcouldresultinafireorelectricshock Neverspillliquidofanykindontheproduct 11 Donotattempttoservicethisproductyourself asopeningorremovingcoversmayexposeyoutodangerousvoltage pointsorotherrisks Referallservicingtoqualifiedservicepersonnel 12 Unplugthisproductfromthewalloutletandreferservici...

Page 11: ...ysupportupto1280x1024resolution 32 bitcolorat85Hzor1600x1200resolution 32 bitcolorat60Hz Audio Built inspeakersandmicrophone SoundBlasterPro andWindowsSoundSystem compatible Separateaudioportsforline in microphone inandline out S PDIF devices Keyboardandpointingdevice 84 85 88 keyWindowskeyboard Touchpadpointingdevicewith4 wayscrollbutton Easylaunchkeys I Oports OnetypeII ICardBusPCCardslot OneRJ ...

Page 12: ... Humidity non condensing Operating 20 80 RH Non operating 20 80 RH System MicrosoftWindowsXPoperatingsystem Power Batterypack 65 WattHourLi Ionbatterypack 1 5 hourrapidcharge 2 5 4 hourcharge in use ACadapter 70 Watt Autosensing100 240Vac 50 60Hz Options 256 512MBPC2100 PC2700 266MHz 333MHzDDR soDIMMmemorymodules AdditionalACadapter USBfloppydrive CD ROM DVD DVD CD RWcombo DVD RWorDVD Multidrive 8...

Reviews: