HD Action Camera
Package Contents
www.polaroidaction.com
USER MANUAL
MANUEL D’UTILISATION · MANUALE UTENTE ·
BENUTZERHANDBUCH · MANUAL DEL USUARIO
XS10 Extreme Edition
• Camera
• Waterproof
case
• Camera back adapter
• USB
cable
• Neck
strap
• Arm/head
strap
• Bike
Mount
• Cleaning
Cloth
• Lens
Cover
• Manual
Welcome
Thank you for purchasing the
Polaroid
XS10 HD action camera. This camera is extremely small, a requirement when the activities are extreme
sports. It is so small, so lightweight you won’t even know you’re wearing it.
The camera’s unique micro design enables digital video recording in situations where it may not be possible to use standard consumer camcorders.
As supplied herein, the XS10 can be mounted with the head/arm strap or with the handlebar mount.
Avertissements et précautions
• Éteignez l'appareil photo si des corps étrangers ou de l'eau pénètrent à l'intérieur. Continuer à utiliser l'appareil dans ces conditions peut entraîner
une blessure physique.
• Éteignez l'appareil photo s'il est tombé ou que son boîtier est endommagé. Continuer à utiliser l'appareil photo dans ces conditions peut entraîner
des dégâts permanents et/ou une blessure physique.
• L'appareil ne contient aucune pièce remplaçable par le propriétaire
: NE DÉMONTEZ PAS L'APPAREIL
! Ne positionnez pas l'appareil photo sur
une surface instable. L'appareil pourrait chuter ou basculer, provocant des dégâts.
• Pour toutes réparations, visitez polaroidaction.com pour plus d'informations sur le service clients.
• Un appareil photo est un instrument de précision. Ne le laissez pas tomber, ne le cognez pas et ne le manipulez pas avec trop de force. Vous
pourriez sinon rendre l'appareil inopérant.
• Ne laissez pas l'appareil dans un endroit où la température peut s'élever de manière importante, comme l'intérieur d'une voiture. Une température
élevée peut provoquer des dommages au boîtier ou aux pièces internes de l'appareil photo.
• Avant de déplacer l'appareil photo, déconnectez tous les câbles et cordons. Dans le cas contraire, vous pourriez endommager les câbles et
les
cordons.
• Ce produit est un appareil vidéo dédié aux sports extrêmes. Veuillez faire attention à ne pas fixer l'appareil photo dans une position où, dans le
cas d'un accident, vous risquez d'entrer en contact physique avec l'appareil photo.
Contenu de la boîte
• Appareil
photo
• Boîtier
étanche
• Adaptateur pour le dos de l'appareil
• Câble
USB
• Sangle de cou
• Sangle de tête/bras
• SMonture pour vélo
• STissu de nettoyage
• Capuchon pour l'objectif
• Manuel
INTRODUCTION
Merci d'avoir acheté l'appareil photo
Polaroid
XS10 micro action. Cet appareil est miniaturisé
; une nécessité lorsque l'on pratique les sports extrêmes.
Il est tellement petit et léger que vous ne le remarquerez même pas lorsque vous le porterez.
Son design miniature unique permet d'enregistrer des vidéos même dans les situations où d'autres caméscopes grand public sont inutilisables.
Le XS10 peut être monté avec la sangle de tête/bras fournie dans la boîte.
Warning & Cautions
• If foreign objects or water enter the camera, turn the power off. Continued use may cause an injury.
• If the camera has been dropped or its case has been damaged, turn the power off. Continued use may cause permanent damage and/or
personal
injury.
• There are no user serviceable parts in the camera: DO NOT DISASSEMBLE! Do not place the camera on unstable surfaces. This may cause the
camera to fall or tilt over, causing damage.
• For repair, visit polaroidaction.com for customer service information.
• A camera is a precision instrument. Do not drop, strike, or use excessive force when handling the camera. Doing so may render the
camera
inoperative.
• Do not leave the camera in places where the temperature may rise significantly such as inside a car. High temperatures may adversely affect the
case or internal parts of the camera.
• Before you move the camera, disconnect cords and cables. Failure to do so may damage the cords and cables.
• This is an extreme sports video product. Please be careful that you don’t mount the camera in a fixed position where, in the event of an accident,
you subject yourself to bodily contact with the camera.
Charger la batterie
1 Chargez l'appareil photo en connectant le câble USB à votre ordinateur et en branchant l'autre extrémité du câble USB dans le port mini USB de l'appareil.
Lorsque vous chargez l'appareil, l'indicateur de chargement se met à clignoter lentement. Une fois l'appareil chargé, l'indicateur de chargement cesse de
clignoter pour rester allumé.
2 Si la batterie est chargée correctement et que l'appareil est allumé, mais qu'aucun bouton n'a été activé pendant 15 secondes, l'appareil s'éteindra
automatiquement.
Prise de vue photo
1 Pour prendre une photo, appuyez sur le bouton photo.
2 L'indicateur d'état clignotera une fois
; la photo est enregistrée
3 La photo sera enregistrée au format «
.jpg
».
4 Les photos (et les vidéos) ne peuvent être visionnées qu'en connectant l'appareil via USB à un ordinateur.
Lecture
1 Pour transférer les fichiers enregistrés sur votre ordinateur afin de les visionner ou des les enregistrer, connectez l'appareil à l'ordinateur en
utilisant le câble USB fourni, en le branchant dans un port USB disponible de l'ordinateur. Votre appareil deviendra un disque de données externe
et votre ordinateur lui assignera une lettre.
2 Une fois l'appareil reconnu par votre ordinateur, vous pouvez copier et coller les fichiers dans le dossier de voter choix et/ou supprimer des fichiers.
3 Vous pouvez aussi lancer votre logiciel de montage vidéo ou de retouche photo préféré et ouvrir les fichiers dans ces logiciels.
Insérer une carte Micro SD
1 Insérez la carte mémoire micro SD dans l'emplacement carte mémoire sur le côté gauche de l'appareil photo, en vous assurant que les contacts électriques
soient orientés dans le même sens que l'objectif.
2 Appuyez sur le bouton d'allumage pour allumer l'appareil photo. L'indicateur de la batterie s'allumera pendant 4 secondes, puis s'éteindra. L'indicateur d'état
s'allumera à son tour, et l'appareil photo sera prêt.
3 Si aucune carte mémoire n'est insérée, l'indicateur de la batterie clignotera. Appuyez sur le bouton d'allumage et insérez la carte Micro SD, puis suivez les
étapes 1 & 2.
Enregistrement vidéo
1 Allumez
l'appareil
photo
2 Choisissez la qualité de la résolution en basculant le bouton HD/D1 sur HD pour 1280 x 720 lignes ou sur D1 pour 848 x 480 lignes (en utilisant D1, la
résolution est moindre et la taille des vidéos est réduite, ce qui permet des durées d'enregistrements plus longues par mégaoctet de stockage.).
3 Appuyez une fois sur le bouton vidéo
; l'appareil commencer l'enregistrement et l'indicateur d'état clignote lentement.
4 Pour arrêter l'enregistrement, appuyez sur le bouton vidéo
; le clip vidéo sera enregistré sur la carte mémoire et l'indicateur d'état s'éteindra.
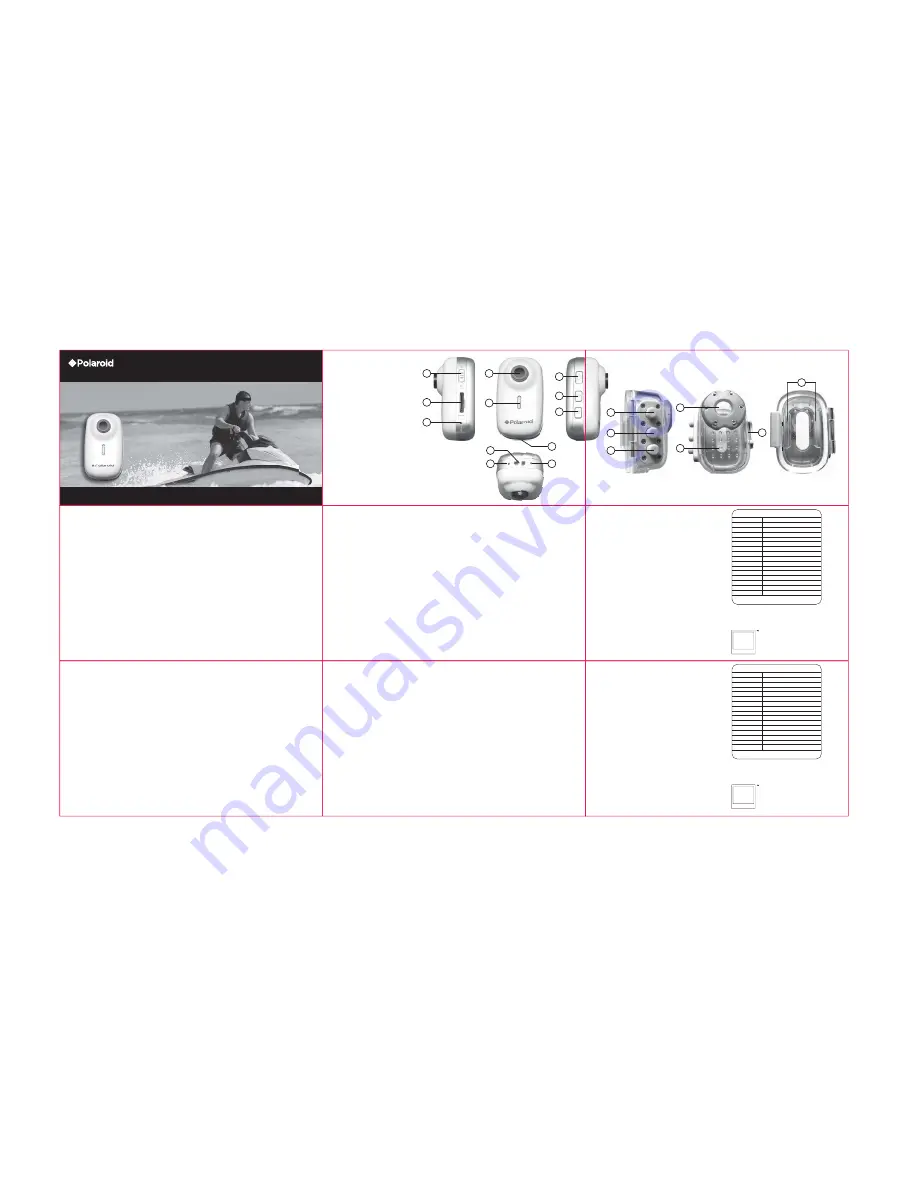
Camera Parts
Nomenclature | Parti della Videocamera |
Kamerateile | Partes de la Cámara
1
Lens | Objectif | Lenste | Objektiv | Lente
2
Power Button | Bouton d'allumage | Pulsante di alimentazione |
Ein- / Aus-Knopf | Botón de encendido
3
Video Button | Bouton vidéo | Bottone Video | Video Knopf |
Botón de vídeo
4
Strap Holes (2) | Trous pour la sangle (2) | Fori per cinghie (2) |
Bandlöcher (2) | Agujeros para la cinta (2)
5
Status Indicator | Indicateur d'état | Indicatore di stato |
Status Indikator | Indicador de estado
6
Memory Card Slot | Fente pour carte mémoire | Slot della
scheda di memoria | Schlitz für Speicherkarte | Ranura para
la tarjeta de memoria
7
Microphone | Microfono | Mikrofon | Micrófono
8
Battery Indicator | Indicateur de la batterie | Indicatore della
batteria | Batterie Anzeige | Indicador de batería
9
Photo Button | Bouton photo | Bottone Foto | Fotoknopf |
Botón de fotografía
10
USB Port | Port USB | Porta USB | USB-Port | Puerto USB
11
HD/D1 Switch | Bouton HD/D1 | Interruttore HD/D1 |
HD/D1 Schalter | Interruptor HD/D1
12
Reset Button | Bouton de réinitialisation | Pulsante di reset |
Rückstellknopf | Botón de reinicio
13
Glass Lens | Lentille de l’objectif | Lente in vetro | Glasobjektiv | Lente de cristal
14
Main Body | Boîtier principal | Corpo principale |Kamerakörper | Cuerpo principal
15
Housing Clamp | Pince d'attache | Scocca di montaggio | Gehäuseklemme | Abrazadera del armazón
16
Connection Slip Slot | Emplacement connexion SLIP | Connessione SLIP Slot | Verbindungsschlitz |
Ranura
de
conexión
17
Power Button | Bouton d'allu mage | Pulsante di accensione | Ein- / Aus- Schalter | Botón de encendido
18
Video Button | Bouton vidéo | Bottone Video | Video-Knopf | Botón de vídeo
19
Photo Button | Bouton photo | Bottone Foto | Photo-Knopf | Botón de fotografía
1
8
11
6
12
2
3
13
17
18
19
14
9
5
15
10
7
4
Polaroid, Polaroid & Pixel, and Polaroid Classic Border Logo are trademarks of PLR IP Holdings, LLC, used under
license. All other trademarks are the property of the respective owner, who has not sponsored, endorsed or
approved this product. PLR IP Holdings, LLC does not manufacture this product or provide any Manufacturer’s
Warranty or support.
Distributed by: C&A Licensing LLC, 2 Bergen Turnpike, Ridgefield Park, NJ 07660, USA
© 2012 All Rights Reserved
MADE IN CHINA
Charging the Battery
1 Charge the camera by connecting the USB cable to your computer and attaching the other end of the USB cable to the mini USB port on the
bottom of the camera. While charging, the Charging Indicator will blink slowly. Once it’s fully charged, the Charging Indicator will remain on.
2 If the batteries have an adequate charge and the camera is on, but no button has been pressed for 15 seconds, it will automatically shut off.
Taking Photos
1 To take a still picture, press the Photo Button.
2 The Status Indicator will flash once; the photo is recorded.
3 The photo will be saved as a “.jpg” file.
4 Photos (and videos) can only be viewed through the use of a USB connection to a PC.
Playback
1 To transfer recorded files to your PC for viewing or saving, connect the camera to the computer using the provided USB Cable connected
between the camera and an available USB port on your computer. Your camera will become an external drive and will be assigned a drive letter
by
the
computer.
2 Once recognized by your computer, you can copy and paste files to the folder of your choice and/or delete files.
3 You can also start your favorite video editing or photo retouching program and open the files in those programs.
Time Stamp
1 The date and time can be recorded at the bottom of your videos and photos;
connect the camera to your computer and turn the camera on. An autoplay
menu should pop up on the screen.
2 Select the “Open folder to view files” option.
3 Create a text file which which will be saved to the MicroSD flash drive.
4 To create the text file, click on the Windows Start Tab located in the Task Bar.
5 In the Search box, type “notepad.”
6 When Notepad opens, type the current date and time in the form...
YYYY MM DD HH MM SS. Example: 2012 11 18 12 22 30 , the date is
November 18, 2012 and time is 30seconds past 12:22pm. (Using a 24 hour
clock, hour 12 is noon, 13 is 1pm, 14 is 2pm... 23 is 11 pm, 24 is midnight,
01 is 1 am... 06 is 6am, 11 is 11 am.)
7 Click “File” and then “Save.”
8 Name the file “TIMESET.TXT” and choose the drive letter of the camera
which was assigned by your computer.
9 Lastly, click on the “Save” button at the bottom of the “Save As” window.
10 The time/date file will be saved to the MicroSD card
Inserting Micro SD
1 Insert the micro SD memory card into the Memory Card Slot on the left side of the camera with the electrical contacts facing upward toward the
Camera
Lens.
2 Push the Power Button to turn on the camera. The Battery Indicator will light for 4 seconds, and then shut off. The Status Indicator will then light,
and the camera is ready.
3 If no memory card is inserted, the Battery Indicator will light for 4 seconds and turn off. This will be followed by the Status Indicator flashing.
Press the Power Button and Insert a MicroSD card and follow Steps 1 & 2.
Video Recording
1 Turn on the camera
2 Choose a resolution quality by switching the HD/D1 Switch to HD for 1280x720 lines or D1 for 848x480 lines (D1 provides lower resolution and
smaller video files allowing for longer recording times per megabyte of storage.).
3 Press the Video Button once; the camera will begin recording video and the Status Indicator will flash slowly.
4 To stop recording, press the Video Button the video clip will be saved to the memory card and the Status Indicator will turn off.
Indicator Lights At a Glance
Indictator Status
Meaning
Battery Indicator
Flashes Slowly
Charging
Battery Indicator
Stays on
Battery Is Fully Charged
Battery Indicator
Flashes Quickly
Low Power
Battery Indicator
Turns On Then Off Power On And Standby
Status Indicator
On
Power On And Standby
Battery Indicator / Status Indicator Both Stay On
Need to reset Camera
Status Indicator
Flashes Quickly
MicroSd is Full
Status Indicator
Flashes Once
Taking a Photo
Specifications*
Images sensor:
3MP CMOS Sensor
Photo:
3MP = 2048x1536
Video:
720p=1280x720, D1=848X480
FPS:
25-30 FPS depending on Illumination
Photo Format:
JPG
Video Format:
AVI
FOV:
120º
Battery Capacity: 450mah
Recording time: 2 hr
Charge time:
2 hr
USB:
USB 1.1/2.0
Memory Card:
Micro SD
Memory capacity: 2-32gb
Water depth:
20 meters
Weight:
24g
Dimensions:
3x2.6x5.2cm
*Product features, specifications and appearances are subject to change
without notice.
16
Visit www.polaroidaction.com to download the user manual.
Посетите
www.polaroidaction.com
скачать
руководство
пользователя
.
사용자
설명서를
다운로드
할 수
www.polaroidaction.com
를
방문하십시오
.
ユーザーマニュアルをダウンロードするために
www.polaroidaction.com
をご
覧
ください。
english
français
Instantly recognizable. Instantly
reassuring. The Polaroid Classic Border
lets you know you’ve purchased a product
that exemplifies the best qualities of our
brand and that contributes to our rich
heritage of quality and innovation.
PLR IP Holdings, LLC, its licensees and affiliates, fully support all electronic waste initiatives. As responsible stewards of the environment,
and to avoid violating established laws, you should properly dispose of this product in compliance with all applicable regulations, directives
or other governances in the area where you reside. Please check with local authorities or the retailer where you purchased this product to
determine a location where you can appropriately dispose of the product.
You may also go to www.polaroid.com to learn more about the specific laws in your area to locate a collection facility near your home.
If your electronic device has internal memory on which personal or other confidential data may be stored, you may want to perform a data
sanitization process before you dispose of your device to assure another party cannot access you personal data. Data sanitization varies by
the type of product and its software, and you may want to research the best sanitization process for your device before disposal. You may
also check with your local recycling facility to determine their data sanitization procedures during the recycling process.
Polaroid, Polaroid & Pixel, Polaroid Classic Border Logo, et Polaroid Color Spectrum sont des marques de PLR IP
Holdings, LLC, utilisées sous licence. PLR IP Holdings, LLC n’est pas le fabricant de ce produit et n’assure aucune
garantie ni assistance du constructeur.
Distribué par: C&A Licensing LLC, 2 Bergen Turnpike, Ridgefield Park, NJ 07660 USA
© 2012 Tous Droits Réservés
FABRIQUÉ EN CHINE
Estampille temporelle
1 La date et l'heure peuvent être enregistrées en bas de vos vidéos et photos
;
connectez l'appareil à votre ordinateur et allumez-le. Un menu en lecture
automatique devrait apparaître sur l'écran.
2 Sélectionnez
l'option
«
Ouvrir le dossier pour voir les fichiers
».
3 Créez un fichier texte qui sera enregistré sur le lecteur flash MicroSD.
4 Pour créer un fichier texte, cliquez sur l'onglet de démarrage de Windows situé
dans la barre de tâches.
5 Dans la zone de recherche, saisissez «
notepad
».
6 Lorsque Notepad s'ouvre, saisissez la date et l'heure du jour, au format
:
AAAA MM JJ HH MM SS. Exemple : 2012 11 18 12 22 30 , la date est le
18 novembre 2012 et l'heure est 12 h 22 m et 30 s. (En utilisant le format 24
heures, 12 est midi, 13 est 1 P.M., 14 est 2 P.M. … 23 est 11 P.M., 24 est minuit,
01 est 1 A.M.
… 06 est 6 A.M., 11 est 11 A.M.)
7 Cliquez
sur
«
Fichier
» puis «
Enregistrer
».
8 Nommez le fichier «
TIMESET.TXT
» et choisissez la lettre du disque assignée à
votre appareil photo par l'ordinateur.
9 Pour finir, cliquez sur le bouton «
Enregistrer
» en bas de la fenêtre
«
Enregistrer sous
».
10 Le fichier heure/date sera enregistré sur la carte MicroSD
Aperçu des indicateurs lumineux
indicateur de la batterie
Clignote lentement
Chargement en cours
indicateur de la batterie
Reste allumé
La batterie est pleine
indicateur de la batterie
Clignote rapidement
Chargement faible
indicateur de la batterie
S'allume puis s'éteint
Allumé et en attente
Indicateur d'état
Allumé
Allumé et en attente
indicateur de la batterie /
Indicateur d'état
Restent tous les deux allumés
Il faut réinitialiser l'appareil
Indicateur d'état
Clignote constamment
La MicroSd est pleine
Indicateur d'état
Clignote une fois
Prise d'une photo
Caractéristiques*
Capteur optique Capteur CMOS 3 MP
Photo
3 MP = 2048 x 1536
Vidéo
720p = 1280x720, D1 = 848 X 480
IPS
25-30 IPS en fonction de la luminosité
Format photo
JPG
Format vidéo
AVI
AdV
120º
Capactié de la batterie
450mah
Durée d'enregistrement
2 h
Temps de chargement
2 h
USB
USB 1.1/2.0
Carte mémoire Micro SD
Capacité mémoire
2 à 32 Go
Profondeur d'étanchéité
20 mètres
Poids
24g
Dimensions
3 x 2,6 x 5,2 cm
*Les caractéristiques du produit, les spécifications et apparences sont
sujettes à changement sans préavis.
Instantly recognizable. Instantly
reassuring. The Polaroid Classic Border
lets you know you’ve purchased a product
that exemplifies the best qualities of our
brand and that contributes to our rich
heritage of quality and innovation.
PLR IP Holdings, LLC et ses affiliés soutiennent complètement toutes les initiatives concernant les déchets électroniques. Nous vous
demandons d’être responsable vis-à-vis de l’environnement et de disposer de ce produit en conformité avec les règlements et directives
de la région où vous résidez pour éviter de violer les lois en vigueur. Veuillez vérifier auprès des autorités ou du détaillant chez qui vous
avez acheté ce produit pour savoir où vous pouvez le jeter de manière appropriée.
Vous pouvez également consulter le site www.polaroid.com pour en savoir plus sur les lois spécifiques de votre région et pour trouver un
site de collecte près de chez vous.
Si votre appareil électronique possède une mémoire interne sur laquelle des données personnelles ou confidentielles peuvent être
stockées, vous pouvez les effacer avant de jeter l’appareil pour vous assurer que personne ne pourra y accéder. La manière d’effacer les
données varie selon le type de produit et son logiciel. Nous vous conseillons donc de vous renseigner auprès de votre centre de recyclage
local pour connaître leurs procédures de suppression des données lors de leur processus de recyclage.