SOUNDSHIELD WIRELESS
Quick Start Guide
STEP 1: SETTING UP YOUR HEADSET
Soundshield Wireless offers the choice of two wearing
styles - Headband and Earhook.
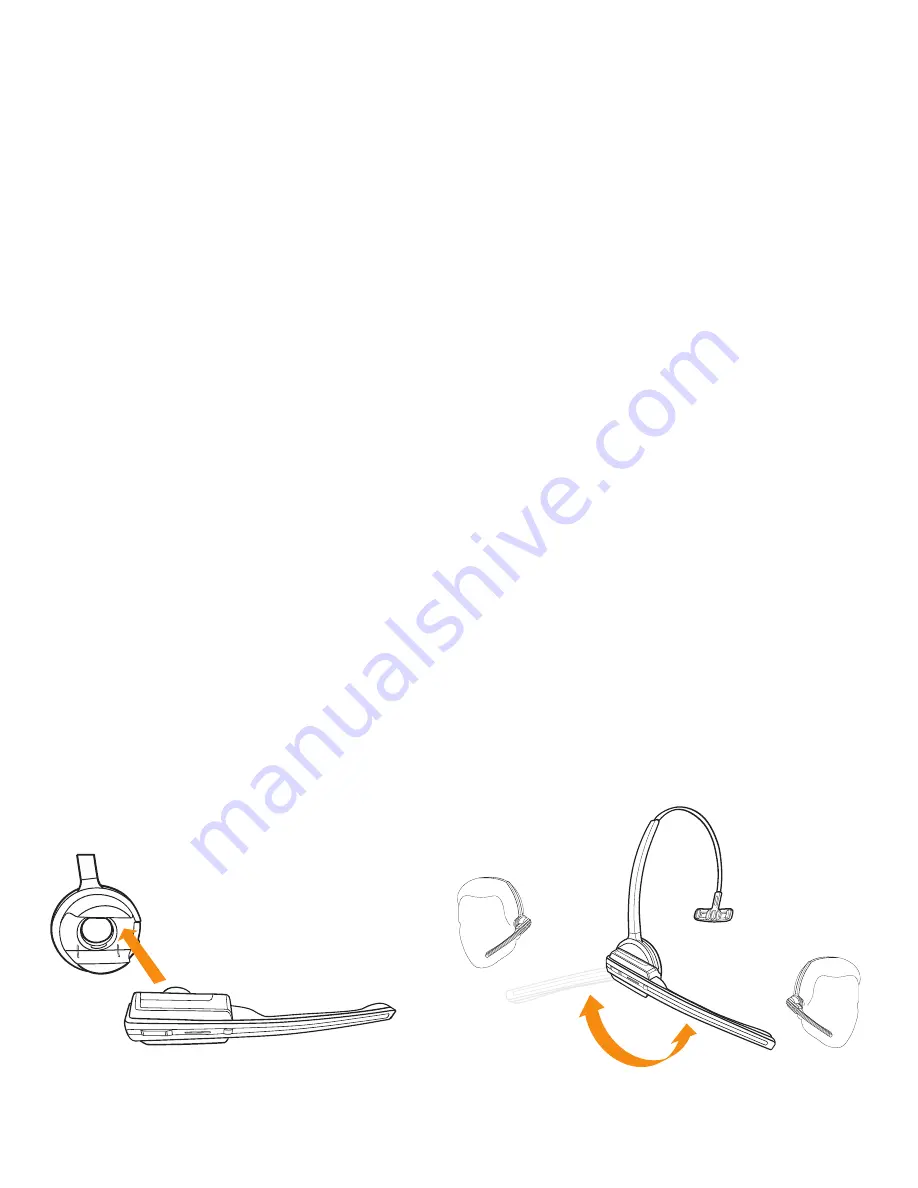
Option 1: Attaching the Headband
1. Align the headset and the headband attachment, as
illustrated, and press firmly together until they click
into place.
2. Rotate the microphone boom arm for left or right
ear use.
3. Adjust the length of the headband to fit comfortably
against your head.
STEP 5: CONNECTING YOUR SOUNDSHIELD
WIRELESS TO A PC
1. Plug the supplied USB cable into the PC port on the
Soundshield Wireless headset base.
2. Connect the other end of the USB cable to any free
USB slot on your PC.
Note:
USB connection is only required for PC audio.
Soundshield Wireless™
comes with guarantees that cannot be excluded under
Australian Consumer Law. You are entitled to a replacement or refund for a major
failure and compensation for any other reasonably foreseeable loss or damage.
You are also entitled to have the goods repaired or replaced if the goods fail to be
of acceptable quality and the failure does not amount to major failure. Three (3)
year warranty coverage commences from the date of purchase. Batteries are
covered by a one (1) year warranty. Warranty does not cover misuse, accidental
damage (i.e. liquid spillage, natural disasters, etc.), normal wear and tear or
replacement consumables (eg. headbands, earhooks and ear cushions). To claim
your warranty please contact your Local Headset Supplier. You will be required to
send the goods back to them.
Repaired or replacement goods will be dispatched back to you free of charge.
The benefits provided under this warranty are in addition to other rights and
remedies under Australian law in relation to the goods and services to which the
warranty relates.
IMPORTANT HEADSET SAFETY INFORMATION
Please read carefully before using your new headset:
> If your telephone has a volume control, turn the volume down before
connecting your headset.
> Whilst wearing your headset, adjust the volume to your preferred volume level.
Make sure that the ear cushion is resting gently on the exterior of your ear.
> Position the microphone approximately two finger widths away from your lips
to ensure your voice is not transmitted too loudly.
Operational Information:
Clean the product by wiping with a dry cloth or alcohol
wipe as required. Avoid exposing the product to rain or other liquids. Do not
immerse the product in water.
Keep out of the reach of children:
The packaging, including plastic bags and
wrapping parts, are not toys for children. Please be aware that small parts may
cause choking if swallowed.
Product disposal:
Please dispose of the product according to local standards and
regulations.
Certification and safety approvals:
Assurance that the Soundshield Wireless
meets the relevant safety standards. Soundshield Wireless meets the test
requirements of the Australian Industry Standard AS/NZS 60950 and the
Australian TT4 mode - Acoustic Limiting measurements for Telephones and
Headsets and I-ETS 300 245-5 – Wideband mode compatible.
It also meets the electrical safety standards AS/NZS CISPR 22, AS/NZS CISPR 24
and European electrical safety standards EN55022 and EN55024.
CE:
This product is CE marked according to the provisions of the R & TTE
Directive (99/5/EC). Hereby, Polaris Communications Pty. Ltd. declares that this
product is in compliance with the essential requirements and other relevant
provisions of Directive 1999/5/EC.
Soundshield Wireless
is a registered trademark of Polaris Communications Pty
Ltd. Polaris Communications Pty Ltd owns, reserves and retains all copyright in
the Sonaron™ software and icons in our Soundshield product, which is also the
subject of Patent Application No. 2011904477. You are prohibited from copying,
distributing, adapting, reverse engineering or otherwise dealing with the product,
or any part of it, in a way that would infringe our exclusive rights. We reserve our
rights to take any legal action necessary to protect our rights and to seek
compensation to the maximum extent.
www.polaris.com.au
© 2013 Polaris Communications Pty Ltd
WIRELESS
CLICK!
Left
Right


