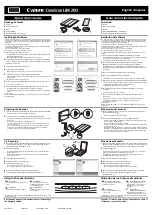
Assemble and Connect
1. Open cover and remove all packing material. Close the cover until you
hear it click into place.
2. Connect the scanner to the computer by using the bundled USB
cable and AC adapter.
Install Software
1. Insert the product DVD or download and run your product’s software
package.
https://www.plustek.com/ps188.
2. Execute DocAction II and check scanner connection. You can start
scanning now.
check
Scan a Document
1. Fan the stack of paper well to avoid paper jams and misfeeds.
At an angle
Feed direction
2. Load your original facedown, top edge first.
3. Double-click the
Quick Scan
button to quickly scan
through the simplify settings dialog.
Adjust Source, DPI, Color Mode and Save Path, then click Scan button.
The application starts automatically and your document is scanned.
Customizing your scan profile
1. Double-click
New
button. Set Profile Name and Filename Format.
2. Configure saving destination, scan settings, and choose your file
format. Click OK to complete the settings.
3. Double-click the job button you created to start scanning, or you can
drag the buttons to the left for shortcut.
SmartOffice PS188
Quick Start Guide
Please read this guide before using your scanner.
P/NO.: 17-07-2BB1040-C
1
2
Software tutorials