3
4
2
Controls and Connections
Feder
al C
ommunic
ation C
ommission I
nt
er
fer
enc
e S
ta
temen
t
This equipmen
t has been t
est
ed and f
ound t
o c
omply with the limits f
or a Class B
dig
ital devic
e, pursuan
t t
o P
ar
t 15 of the FC
C Rules
. T
hese limits ar
e desig
ned t
o
pr
ovide r
easonable pr
ot
ec
tion against har
mful in
ter
fer
enc
e in a r
esiden
tial
installa
tion.
This equipmen
t gener
at
es uses and can r
adia
te r
adio fr
equenc
y
ener
gy and
, if not installed and used in ac
cor
danc
e with the instruc
tions
, ma
y
cause har
mful in
ter
fer
enc
e t
o r
adio c
ommunica
tions
. Ho
w
ev
er
, ther
e is no
guar
an
tee tha
t in
ter
fer
enc
e will not oc
cur in a par
ticular installa
tion. I
f this
equipmen
t does cause har
mful in
ter
fer
enc
e t
o r
adio or t
elevision r
ec
eption, which
can be det
er
mined b
y tur
ning the equipmen
t off and on, the user is enc
our
aged t
o
tr
y t
o c
or
rec
t the in
ter
fer
enc
e b
y one of the f
ollo
wing measur
es:
-R
eor
ien
t or r
eloca
te the r
ec
eiving an
tenna.
-I
ncr
ease the separ
ation bet
w
een the equipmen
t and r
ec
eiv
er
.
-
Connec
t the equipmen
t in
to an outlet on a cir
cuit diff
er
en
t fr
om tha
t t
o which
the r
ec
eiv
er is c
onnec
ted
.
-
Consult the dealer or an e
xper
ienc
ed r
adio/T
V t
echnician f
or help
.
FC
C C
aution: A
ny changes or modifica
tions not e
xpr
essly appr
ov
ed b
y the par
ty
responsible f
or c
omplianc
e c
ould v
oid the user's author
ity t
o oper
at
e this
equipmen
t.
This devic
e c
omplies with P
ar
t 15 of the FC
C Rules
. Oper
ation is subjec
t t
o the
follo
wing t
w
o c
onditions: (1)
This devic
e ma
y not cause har
mful in
ter
fer
enc
e, and
(2) this devic
e must ac
cept an
y in
ter
fer
enc
e r
ec
eiv
ed
, including in
ter
fer
enc
e tha
t
ma
y cause undesir
ed oper
ation.
This equipmen
t c
omplies with FC
C RF r
adia
tion e
xposur
e limits set f
or
th f
or an
unc
on
tr
olled en
vir
onmen
t.
To main
tain c
omplianc
e with FC
C RF e
xposur
e
complianc
e r
equir
emen
ts
, please a
void dir
ec
t c
on
tac
t t
o the tr
ansmitting an
tenna
dur
ing tr
ansmitting
.
Version 2.00 OCTOBER 2020
BTH-800-OHB SHOWN
PO Box 499
Fox Island, W
A 98333
Tel: 253 238 0643 / fax 253 559 8555
www
.Planetheadset.com
PLANETHADSET
®
PHS-700/800/900
Bluetooth Dual Muff Headsets
The PHS -700/800/900 are Bluetooth Muff Headsets designed
for use with a BT Bluetooth ada
pter and a two-way
radio (each sold separa
tely)
PLANETBLU
PHS-700 HMB
PLANETBLU
PHS-800-OHB
PLANETBLU
PHS-900-EMB
Made in T
aiwan
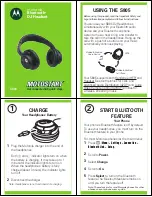
CHARGING THE HEADSET
The PLANETBLU Muff Headset has an internal Lithium Ion rechargeable battery pack which must be
charged prior to operation. A fully charged battery will provide approximately 10 hours (or more) of
operation before needing to be recharged. However, operating time can vary depending on usage and
the condition of the battery pack. Recharge the battery regularly.
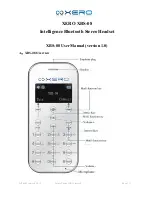
PUSH-TO-TALK BUTTON
When the Headset is paired with
a BT Bluetooth adapter, holding
this button down activates the
Push-to-Talk feature of the
two-way radio.
The PTT button on the
BTH-900 is different than
the BTH-700 and BTH-800.
PHONE BUTTON
When the Headset is paired with a
cellular telephone, this button can be
used to manage telephone functions
such as answering or hanging up a call.
USB CHARGE JACK
This micro-USB jack is used to connect
the supplied charge cable to the Headset
in order to recharge the device’s internal
lithium-ion battery pack.
MUFF EARPHONES
Received calls are heard
through these Headset
speakers.
HEADBAND / HELMET MOUNTING CLIPS
Depending on the model, the headset
may be furnished with mounting clips
for attaching to a hard hat (PHS-700-HMB),
an over-the-head band (PHS-800-OHB)
or a behind-the-head band (PHS-900-EMB).
VOLUME UP/DOWN BUTTONS
These button are used to adjust
the volume level of received calls
heard through the Headset.
POWER BUTTON / STATUS LED
Pressing this button for one second
turns the PLANETBLU Muff Headset
on or off. This button is also used to
place the Headset in pairing mode
so that it can be connected
wirelessly to a BT Bluetooth adapter
or a cellular telephone. The status
LED behind the button flashes
messages that let the user know the
current status of the device. For a
complete list of LED messages, see
pg 6.
To charge the PLANETBLU
Headset:
1. Ensure the PLANETBLU Headset is turned off using the Power Button.
2. Plug the supplied wall charger into a standard 120 volt AC outlet.
3. Plug the charge cable into the AC wall charger and then into the charge jack on the Headset. You
will need to remove the protective rubber cover that is inserted into the charge jack. (To prevent dust
and moisture from damaging your Headset, always ensure this cover is in place when you are not
charging the Headset.)
4. Once the charging process has begun, the LED indicator on the Headset will show a continuous red
light. When the battery is done charging, the LED light will turn off.
5. Typical charge time is approximately 4 hours. Actual charge time will vary depending on several
factors including the battery’s charge state, condition, and age.
6. Disconnect the charger from the lapel mic when charging is completed.
Charging Cautions:
- Use only the wall charger supplied by the
manufacturer. Do not use any other charger.
- Do not use a wall charger that appears
to be damaged. (Example: frayed wires,
melted plastic, etc.) Contact
Planet Headset
to
get a new manufacturer-approved
replacement charger.
- Do not tamper with or modify the
Headset or charger.
- Always turn the power switch to the off position
when charging the Headset.
PHS P-CBL-USB-MICRO charger cable and PHS P-CHA-BT-USB
wall charger included with the Headset.
PAIRING THE HEADSET WITH A
PLANETBLU
ADAPTER OR CELLULAR TELEPHONE
Before you can use the PLANETBLU Muff Headset,
it must be paired with the BT Bluetooth
adapter and/or cellular telephone that you wish
to use.
To pair the Headset with a
BT
Bluetooth radio adapter:
1. Begin by first making sure that the Headset, BT Bluetooth radio adapter, and the two-way radio the
adapter is connected to are all powered off. You should also power off any nearby Bluetooth devices.
2. Place the BT Bluetooth radio adapter into pairing mode by following the instructions that were provided
with that device. On most BT Bluetooth adapters this is done by pressing and holding the PTT/Multifunction
button on the adapter while turning the two-way radio on. Continue to hold the button down until the LED
indicator on the adapter shows two blue flashes every second.
3. Press and hold down the Power Button on the PLANETBLU Muff Headset for five seconds, until the LED on
the Headset flashes RED-BLUE-RED-BLUE continuously in sequence. The Headset is now in pairing mode.
4. After a few seconds, the two devices should synch to one another. Once the Headset and
BT
Bluetooth
radio
adapter are paired with each other the status LED on the adapter will show a constant blue light for three
seconds. The LEDs on both the adapter and Headset will then show one blue flash every few seconds.
5. If the
BT Bluetooth radio adapter does not detect the Headset within 60 seconds of being put into pairing mode,
the adapter will exit the pairing mode and resume normal operation without synching to the .
6. Once successfully paired, you will be able to operate your 2-way radio using the PLANETBLU Muff
Headset.
To pair the Muff Headset with a cellular telephone:
The
PLANETBLU
headset is capable of working with a Bluetooth-enabled cellular telephone.
1. When pairing the Headset with a cellular phone, first make sure that the headset and all other nearby
Bluetooth devices are powered off before beginning.
2. Press and hold down the Power Button on the headset for five seconds, until the LED on the adapter flashes
RED-BLUE-RED-BLUE continuously in sequence. The headset Headset is now in pairing mode.
3. Activate the Bluetooth feature on your phone.
4. Activate the “scan/discover new Bluetooth devices” feature on the phone. The exact steps needed to do
this will vary depending on the brand/model of phone you are using.
5. Select the Headset from the list of Bluetooth devices shown on your phone. If the phone asks for a
passcode, enter “0000”. The phone may also prompt you to confirm the connection.
6. After a few seconds, the two devices should synch to one another. Once the
Planet Headset
and phone
are paired with each other, the status LED on the microphone will revert back to a single blue flash every
few seconds.
7. Once successfully paired, you will be able to make and receive telephone calls using the Headset.
ADJUSTABLE BOOM MICROPHONE
The Muff Headset boom microphone
picks up the user's voice audio to send
over-the-air.
PHS-700
PHS-800
PHS-900