Quick Guide
Quick Guide
DKVM-1708
DKVM-1716
DKVM-1708
DKVM-1716
2011-F00250-002
PLANET Technology Corporation
Tel: 886-2-2219-9518
Fax: 886-2-2219-9528
Email: [email protected]
www.planet.com.tw
11F., No.96, Minquan Rd., Xindian Dist., New Taipei City 231, Taiwan (R.O.C.)
PLANET reserves the right to change specifications without prior notice. All brand names and trademarks are property of
their respective owners. Copyright © 2013 PLANET Technology Corp. All rights reserved.
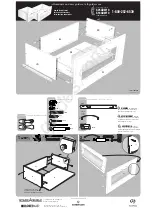
Screw
CD-ROM
KVM Cable
Quick Installation Guide
Power Cord
STEP 1 : Mount the LCD onto the rack
STEP 2 : Install front and rear brackets on
cabinet (Both sides)
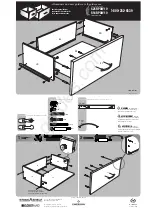
STEP 6 : Pull and turn the lock knobs (left and right at the
same time) and then put out the screen and open
console to operate.
STEP 3 : Screw the KVM module into the console
from the back
STEP 5 : Finish installation as shown below
STEP 4 : Please fix KVM module with the rack
mount bracket kit
VERIFY THE CONTENTS INSIDE PACKAGE BOX
The package box should contain the items indicated below plus DKVM-1708/DKVM-1716. If any item is missing or damaged, please contact the seller
immediately.
Bracket Kit
x 8
Specifications
Display Size
17 inches
Chassis Construction
Heavy duty steel materials
Panel Type
2CCFL LCD Panel
Resolution Capabilities
Maximum resolution up to 1280 x 1024 (SXGA)
Pixel Pitch
Supports 0.264(H) x 0.264(V) / 0.294(H) x 0.294(V)
Backlight Lifetime
50,000 hrs
Operating System
Windows 2000/XP/2003/Vista/Win7 Server, Linux, Mac OS9/OSX
and Sun Microsystems.
Multi Platform
Support PS/2 and Combo-Free KVM module
Keyboard Mouse
104 key keyboard with touch pad
Keyboard Language
English
Touch Pad
1000 points/inch (40 points/mm) - graphics tablet mode
KVM Switch Module PC Connectors
Video: 8/16 HDB-15 female
KB/MS: PS/2 & USB signal combined
Rail Slide Dimensions
51 cm (extended length of 30 cm) - standard
Power Adaptor
Universal 100~240V AC input
Caution:
1. Two installers are needed while installing the KVM drawer device.
2. Care is needed during installation as the device might be
damaged.
OSD (On Screen Display)
Press the NumLock on the keyboard twice or simultaneously press the Push Buttons 1 and 2 of the Port Selection Switch on the KVM panel to start the OSD.
Use the Up, Down and Enter keys on the keyboard to switch or directly move the mouse to the target PC, and then double click the left button.
For more information about your DKVM-1708/DKVM-1716, please also refer to the user's manual.
Knobs
KVM Module
KVM Drawer
Unlock
Lock
Knob
Mounting Installation of KVM Device