

English
français
Language
Switch on the recorder.
Also switch on your TV
and make sure that the
video input is set to this
recorder.
Select an OSD language.
Start using the Setup Navigator.
Clock Setting
Auto
Manual
Set the clock.
O f f
U S A
A l a s k a
Manual Clock Setting
1/2
Time Zone
D.S.T
English
Cancel
Start
Complete this setup before you
start using your recorder.
Please use the Initial Setup if you
want to make more detailed settings.
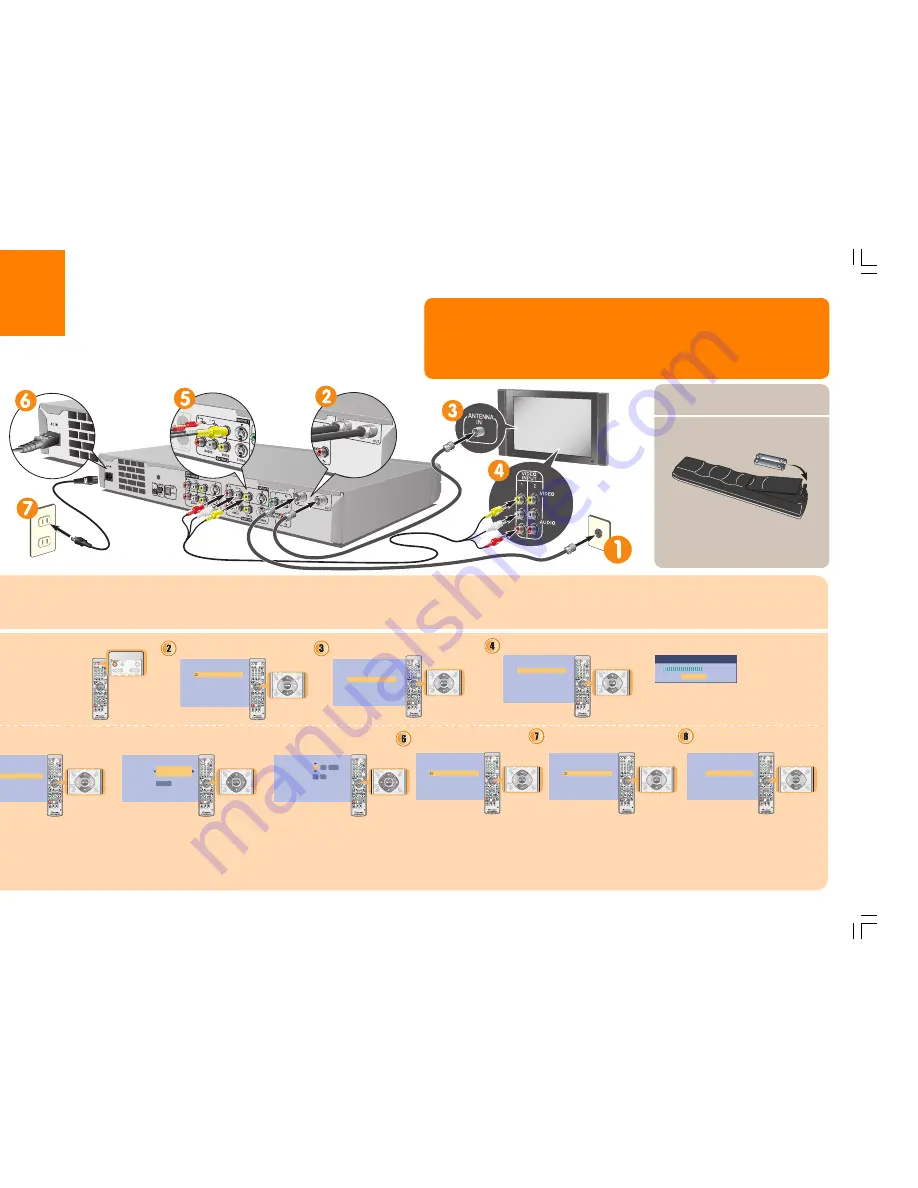
Antenna/
Cable TV
wall outlet
Wall outlet
C
o n n e c t i n g u p
Please refer to the main operating instructions if you want to connect other components, such as a cable box or satellite receiver.
If you want to use the TV Guide On Screen system to control a cable box, see the Connection and Setup Guide sheet.
Q u i c k
S t a r t G u i d e
Select
Manual
to start setting
the clock.
• Use the
/
buttons to set your
time zone, then press
.
• Use the
/
buttons to set
summer (daylight saving) time
On
or
Off
, then press
ENTER
.
• Set the time and date. Use the
/
buttons to change the value in
the highlighted field; use the
/
buttons to move from one field
to another.
• Press
ENTER
to finish setting the time.
S
w i t c h i n g o n a n d s e t t i n g u p
When you switch the recorder on for the first time, you can make several basic settings using the Setup Navigator feature. This takes you through setting the clock, the internal TV tuner and the video output settings.
If you're using the recorder for the first time, we strongly recommend you use the Setup Navigator before starting to use the recorder.
Manual Clock Setting
2/2
Date
Time
Time Zone
D.S.T
O f f
0 1
0 1
S AT
/
/
0 0 : 0 0 A M
2 0 0 5
U S A
A l a s k a
Select the kind of TV
you have.
TV Screen Size
Wide (16:9)
Standard (4:3)
Next, follow the on-screen
instructions that will take you
through setting up the TV Guide
On Screen guide. See also see
the Connection and Setup
Guide sheet.
Finish setting up.
Select
Go Back
if you want to start again.
S e t u p i s c o m p l e t e !
E n j o y u s i n g y o u r D V D r e c o r d e r !
F i n i s h S e t u p
G o B a c k
F i n i s h S e t u p
Select ‘Not Compatible’ for
the progressive scan setting.
If you want to use progressive
scan video, please see the main
operating instructions for more
information.
Progressive
Compatible
Not Compatible
Don't Know
Not Compatible
3
Select how you receive your terrestrial TV channels.
Tuning
7/68
Cancel
After selecting
Antenna
or
Cable
the
recorder starts automatic tuning. This
takes a couple of minutes to complete.
Auto Channel Setting
English
Cable
Do not Set
Antenna
P
utting the batteries in the remote
control
Insert two AA/R6P batteries into the battery
compartment following the indications (
,
)
inside the compartment.
<VRG1010-A>
Product Use Questions – (800) 421-1404 (US)
In the event that you have additional questions, Pioneer maintains a Toll-Free Customer Service Hotline at (800) 421-1404.
Telephone lines are open Monday through Friday 6:00 AM to 4:30 PM (Pacific Time) and Saturday 8:00 AM to 4:30 PM (Pacific
Time).
Product Use Questions – (877) 283-5901 (Canada)
In the event that you have additional questions, Pioneer maintains a Toll-Free Customer Service Hotline at (877) 283-5901.
Telephone lines are open Monday through Friday 9.00 AM to 5.00 PM (EST).
You can also use this remote control to
operate most brands of TV. See the
Additional
Information
chapter in the main operating
instructions for how to set this up.
VRG1010A_EN_01_02.p65
05.4.12, 8:39 AM
1


