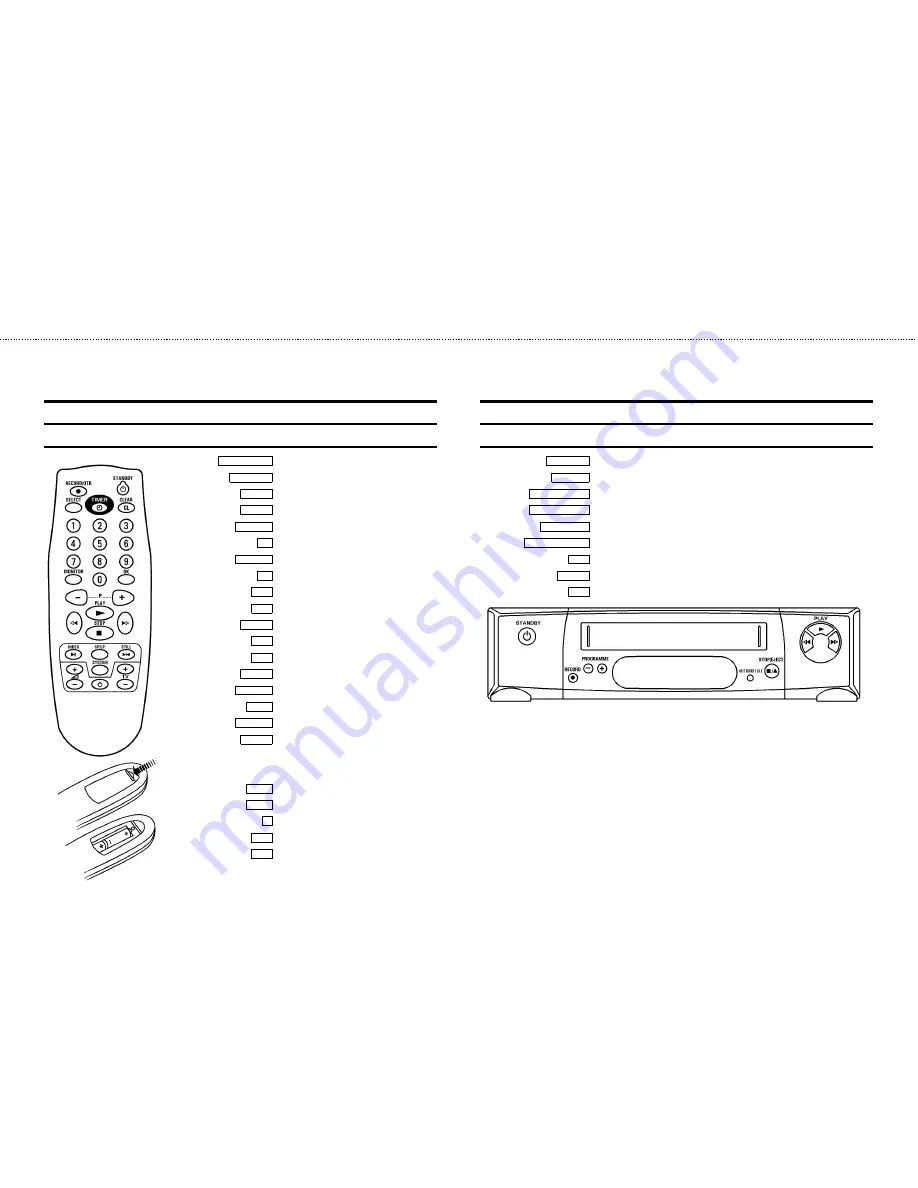
background image

The remote control

RECORD/OTR

n

Record

STANDBY

m

Standby

SELECT

Function selector

TIMER

k

’VIDEOPlus’ / ’TIMER’ programming

CLEAR (CL) Reset, clear

0-9 Digit buttons 0-9

MONITOR TV monitor function

OK Confirm button

P

r

Down, number minus

P

q

Up, number plus

PLAY

G

Playback

H

Rewind/Reverse scanning

I

Forward wind/ Forward scanning

STOP

h

Pause/Stop, Tuner-mode

INDEX

E

Index search

SP/LP

SP/LP selection

STILL

R

Still picture

SYSTEM Special function

Additional TV functions:

Only function with televisions with the

same

remote control code.

Sq

TV volume plus

Sr

TV volume minus

m

Switch off TV

TV

q

Programme 

TV

r

Programme number -

Front of the video recorder

STANDBY

m

Standby

RECORD

n

Record

PROGRAMME

r

Down/Minus, number

PROGRAMME

q

Up/Plus, number

AUTOINSTALL

Installation

STOP/EJECT

?

Stop/Cassette eject

H

Rewind/Reverse scanning

PLAY

G

Playback

I

Forward wind/ Forward scanning

OPERATING INSTRUCTIONS IN BRIEF

&

Summary of Contents for VR 285

Page 1: ...NDEX E Index search SP LP SP LP selection STILL R Still picture SYSTEM Special function Additional TV functions Only function with televisions with the same remote control code Sq TV volume plus Sr TV volume minus m Switch off TV TV q Programme number TV r Programme number Front of the video recorder STANDBY m Standby RECORD n Record PROGRAMME r Down Minus number PROGRAMME q Up Plus number AUTOINS...

Page 2: ... button Programming is now complete The data has been stored in a TIMER block 7 Make sure that a cassette without erase protection has been loaded Switch to standby with the STANDBY m button A programmed recording will only function when the video recorder is switched to standby with the STANDBY m button How to programme a recording manually 1 Switch on the TV set Press the TIMER k button twice 2 ...

Page 3: ...ts Please make use of the facilities available in your country for disposing of the packaging of the video recorder in a way that helps to protect the environment This electronic equipment contains many materials that can be recycled Please inquire about the possibilities for recycling your old set VIDEOPlus and PlusCode are trademarks of Gemstar Develop ment Corporation The VIDEOPlus system is ma...

Page 4: ... be connected to the terminal which is marked with the letter L or coloured RED 3 Do not connect either wires to the earth terminal in the plug which is marked with the letter E or by the safety earth symbol or coloured green or green and yellow Before replacing the plug cover make certain that the cord grip is clamped over the sheath of the lead not simply over the two wires Connecting VCR with s...

Page 5: ... 6 with the P r or the P q button Confirm the adjusted frequency with the OK button Automatic adjustment of modulator frequency If you press the I button in step 6 the next optimal modulator frequence will be selected automatically Confirm the frequency displayed with the OK button Switching off the modulator If you cannot eliminate picture or sound interference using the above method you can swit...

Page 6: ...play the corresponding functions appear on the TV screen The most important button functions are displayed at the bottom of the screen For instance DATE PROG START V P END 01 01 20 00 21 30 NEXT gTIMER CLEAR gCL 0 9 D WgSELECT OK Throughout this instruction manual use the following buttons for these functions Select Enter Adjust Confirm Select Use the P r or the P q button Enter Adjust Use the P r...

Page 7: ...EL ALLOCATION with the P q or P r button Confirm with the OK button 3 Use the P r or P q button to select the TV channel on the TV screen to which you wish to give a programme number starting with P 01 4 Confirm this allocation with the OK button If you wish to allocate further programme numbers repeat step 3 and step 4 until you gave a programme number to all the required TV channels 5 To end pre...

Page 8: ... the STILL R button You see a still picture Inter ference stripes will appear on the screen 2 Each time you press STILL R again the picture will move on one step Note If the still picture vibrates vertically hold the P r or the P q button at step 1 until the vibration is minimal This setting will be stored automatically Please note however that interference may still occur with poor quality casset...

Page 9: ...cture interference Cleaning function 1 During playback hold the P q button until TRAC track ing appears in the display 2 Hold the P q or P r button until the playback quality is at its best 3 Wait a few seconds until TRAC disappears from the display This setting will remain until you remove the cassette 4 If horizontal lines still appear on the screen use the Cleaning function Cleaning function Du...

Page 10: ...r or slide the special tab to the left Later if you no longer want the cassette to be erase protected you can seal the gap again with adhesive tape or slide the special tab to the right Auto assembling You can use the auto assembling func tion to join individual recordings without any major picture disturbance between the recordings During playback search for the correct position on the tape and t...

Page 11: ...flashes in the display please set the clock 6 Finally press the OK button Programming is now com plete The data has been stored in a TIMER block 7 Make sure that a cassette without erase protection has been loaded Switch to standby with the STANDBY m but ton A programmed recording will only function when the video recorder is switched to standby with the STANDBY m but ton Note VIDEOPlus Aerial cod...

Page 12: ...screen for a few seconds If you insert a cassette with erase protection after programming the recording PROTECTED CASSETTE will appear on the TV screen for a few seconds The cassette will then be ejected When after pressing the TIMER k button TIMER FULL appears on the TV screen all TIMER blocks have been programmed Then with the P q or P r button select the TIMER block you want to adjust or clear ...

Page 13: ...before the recording has actually started hold the MONITOR button until REC P disappears from the video recorder display 4 If you want to interrupt this function while a recording is being made press the STANDBY m button On Screen Display OSD You can switch the On Screen Display OSD on or off 1 Switch on the TV set Press the AUTOINSTALL button on the video recorder 2 With the P q or P r button sel...

Page 14: ... with the OK button 5 With the P q or P r button or the digit buttons 0 9 select the programme number that you wish to give to this TV channel e g P 01 6 Confirm with the OK button If you want to allocate more TV channels repeat steps 3 to 6 until all TV channels have been stored 7 To end press the STANDBY m button Note Channel number or frequency can also be entered directly at step 3 using the 0...

Page 15: ...m video recorder TV set not properly adjusted Cassette badly worn or of poor quality Read the section about How to eliminate picture disturbance in chapter PLAYBACK FUNCTIONS No recording possible TV channel not stored or wrongly selected Cassette with erase protection has been loaded Programmed recording does not function TIMER not set properly Time date wrongly programmed A cassette with erase p...

Page 16: ...14 3103 166 21201 8203 001 VR 285 WwnnNNNwwnwNNnwnWwnNwNnnWNnwwN ...

Reviews: