background image

使用手册

VTR8400

Voice

Tracer

音视频记录仪

User manual

Summary of Contents for VoiceTracer VTR7800

Page 1: ...使用手册 VTR8400 VoiceTracer 音视频记录仪 User manual ...

Page 2: ......

Page 3: ...1 开 关机 9 4 2 充电方法 10 4 3 按键锁定 HOLD 功能 10 4 4 连接电脑 10 5 录音 12 5 1 远距离录音 13 5 2 降噪录音 13 5 3 外置麦克风录音 14 5 4 电话录音 14 6 语音模式 16 6 1 语音播放 16 6 2 文件编辑 17 6 3 变速播放 17 6 4 复读模式 17 6 5 书签 17 6 6 文件保护 17 6 7 删除文件 18 7 音乐模式 19 7 1 播放模式 19 7 2 变速播放 19 7 3 复读模式 20 7 4 书签 20 7 5 删除文件 21 8 系统设置 22 8 1 文件菜单 22 ...

Page 4: ...4 ZH 8 2 录音设置 23 8 3 屏幕设置 25 8 4 设备设置 26 9 常见问题 29 9 1 无法启动录音笔 29 9 2 录音笔无法录音 29 9 3 录音笔无法播放录音 29 10 技术参数 30 10 1 存储器 30 10 2 尺寸和重量 30 10 3 系统要求 30 10 4 录音 30 10 5 运行条件 30 ...

Page 5: ...技 术支持 如 使用手册 软件下载 保修信息等 www philips com 1 1 产品特点 一键录音 按下录音键机器开始准备录音 再次按下录音键 机器开始录音 按下停止键保存录音 支持远距离录音 支持多场景录音 用途广泛 支持本机录音文件编辑功能 高清扬声器 采用高品质喇叭 无论播放录音文件或音乐文 件 都让人身临其境的享受 以常见的 MP3 格式及 WAV 格式录音 支持 96kHz 24bit PCM 录音 声控录音功能 使用高速 USB 2 0 快速存取录音文件和数据 可作为大容量 的 USB 存储设备 确保最大的兼容性 ...

Page 6: ...缆 特别是插头处 小心 特别声明 使用本产品前请仔细阅读本说明书 如因人为 操作或不可抗力因素而导致数据丢失 本公司一概不予负 责 特别提醒用户小心操作 注意将资料另外备份 图像仅作参考 飞利浦保留更改颜色 外观 设计 参数 产品功能的权利 恕不另行通知 2 2 听力保护 使用耳机时请遵守下列原则 调整至合适的音量 切勿长时间使用耳机 特别需要注意 切勿将音量调至耳朵所能承受的范围之外 切勿将音量调至盖过周边环境的声音 在危险情况下请小心或暂停使用耳机 在驾驶汽车 骑自行车 玩滑板时 切勿使用耳机 否则会 导致交通意外 且违反相关法律法规 ...

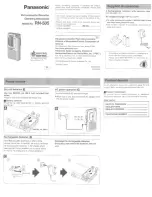
Page 7: ...ZH 7 中文 3 您的数码录音笔 3 1 供货范围 3 2 概览 ...

Page 8: ...孔 3 Line in 插孔 4 电源开 关 锁键 5 卡插座 6 内置中间麦克风 7 内置两边麦克风 8 指示灯 9 显示屏 播放 暂停 上一曲 快退 菜单项选择键 停止 音量加 菜单项选择键 10 11 12 音量减 菜单项选择键 14 13 下一曲 快进 菜单项选择键 USB接口 16 15 录音键 FOCUS键 18 17 书签 文件夹切换键 录音增益调节旋钮 20 19 降噪开关 变速播放键 22 21 删除键 喇叭 24 23 ...

Page 9: ...时 请对该机器充电三小时以确保机器有 电工作 开机 在关机状态下 把开关键向下拨至电源处约 2 秒 3 秒后 开机 开机显示飞利浦图标 关机 在开机状态下 把开关键拨至电源处约 2 秒 3 秒后关机 显示飞利浦图标后关机 开 关机如下图所示 开机后机器进入录音文件停止播放界面 如下图所示 在语音播放停止界面长按 菜单键 弹出设置菜单 按 或 可切换菜单 按 播放键 确认选择 在设 置界面中包含有四个主菜单 下面四张图片分别代表 文件菜单 录音设置 屏幕设置和设备设置 ...

Page 10: ... 当采用以上方法连接后 本机进入充电状态 电量指示标志 由空到满循环变化 表示本机现正处于充电状态 三个指 示灯全亮 一般情况下 充满电需要 3 小时左右 充满电时 电池符号显示满格 三灯全灭 注意 当录音笔与电脑连接时 对录音笔的手动操作将无效 4 3 按键锁定 HOLD 功能 1 将开关键向上推至锁定位置 锁定录音笔后 所有按键无效 然后屏幕上短暂显示锁图标后 随即消失 如下图所示 2 要解除按键锁定 请将开关键向下拨下解锁 4 4 连接电脑 录音笔可作为大容量的 USB 存储设备 并可方便地对文件进行 存储 备份和移动 可使用 USB 数据线将录音笔与电脑相连 且无须安装软件 连接电脑图标如下图所示 ...

Page 11: ...ZH 11 中文 提示 在文件移入或移出录音笔时 请不要断开录音笔与电脑的 连接 否则会损坏文件 ...

Page 12: ...克风对准音源 3 在录音状态下 按 录音 键暂停录音 红灯闪烁 显示 屏显示录音暂停图标 4 再次按下 录音 键 继续录音 5 在录音过程中 按下 FOCUS 键 界面会出现增益调节 旋转侧面的旋钮可实时调节录音增益 请把录音增益调到 合适的值以保证录音品质 6 在此界面再次按 FOCUS 键取消录音增益调节 7 在录音状态下按 键插入录音书签 支持 10 个书签 文件 8 按下 停止 键结束录音 并回到当前录音文件的停止播 放界面 录音参考界面如下如所示 录音界面说明 注意 电池符号显示空格时 表明低电 低电时机器会自动关机 如果正在录音 机器自动保存录音文件后再关机 电量不 足时 请及时充电 低电时提示的参考图标如下所示 ...

Page 13: ...个文件 99 文件 4 目录 当录音时间超过录音笔可用容量或达到最大 396 个文件数 量的上限时 录音停止 请删除部分录音或将其移至电脑 录音时请勿断电 否则这会导致录音信息丢失和文件损坏 如果需要长时间录音 请在录音前充电 如果选择 TF 卡存储 机器录音文件将存到卡里 注意 当 选择录音品质为 96K 24bit 和 96k 16bit 时 录音默认存 到内置 FLASH 5 1 远距离录音 当需要对较远范围的音源 10 米范围 进行录音时 可以把录 音场景设置为远距离录音 选择远距离录音 进行录音时 请 将咪头对准音源 在录音过程中 当检测到外置麦克风或 LINE IN 插入 远距离录音将无效 机器将默认为外置麦克风或 LINE IN 录音 注意 远距离的录音类型默认为 48khz 1536kbps 远距离录音模式不适合在嘈杂环境下使用 5 2 降噪录音 在吵杂的环境中 可以使用降...

Page 14: ...过程中 当检测到外置麦克风或 LINE IN 插入 降噪录音将无效 机器将默认为外置麦克风或 LINE IN 录音 5 3 外置麦克风录音 使用外置麦克风录音时 请先将麦克风插入外置麦克风插座 再按录音键进行录音 插入外置麦克风后 内置麦克风将自动 关闭 注意 外置麦克风的接口一定要是双声道接口 不支持接入音箱 直录 录制外音源时 请把外音源音量调到适当值 再录音 具体操作如下 5 4 电话录音 将外接电话线及附送的电话连线分别接入电话录音转接器 操 作方式和使用麦克风录音相同 ...

Page 15: ...ZH 15 中文 ...

Page 16: ...中 长按 键 可直接切换到 MUSIC 文件夹 6 1 语音播放 1 在录音文件停止播放模式下 按 键 选择所需文件 夹 2 按 或 键 选择要播放的文件 3 按 MENU 键 选中文件列表图标 按 播放 键确认进 入文件列表浏览 按 键或 键 选择要播放的文件 按 播放 键确认 4 按 播放 键开始播放 机器指示灯将亮绿灯 5 使用 键或 键调节音量 6 按 停止 键结束播放 在停止播放状态下 按 MENU 键选中文件列表图标后再 或 选中菜单图标 按 播放 键确认进入菜单列表 7 停止播放状态下 按 停止 键 显示文件名 采样率和 文件大小等文件信息 8 播放过程中 按播放键暂停播放 再次按下播放键 将继 ...

Page 17: ...况下 8 秒后此功能将会自动取消 1 Append 在一个文件的尾部插入一段录音 2 Insert 在一个文件当前的播放点之间插入一段录音 3 Divide 把一个文件从当前播放点分成两个文件 4 Cut 按 FOCUS 键设置开始点 按 播放 键确认结束点 把文件的开始点和结束点的中间段裁剪掉 未按 FOCUS 键设置开始点 按 播放 键 则在当前播放文件的当前 播放点把文件后半部分裁剪掉 6 3 变速播放 此操作请参照音乐文件的变速播放部分 6 4 复读模式 在播放过程中 长按菜单键将进入复读模式 A B 复读的具体 操作请参考 音乐播放 部分的 A B 复读操作部份 6 5 书签 此操作请参照音乐文件的书签部分 6 6 文件保护 在播放录音停止界面 按 FOCUS 键 将会弹出文件保护菜单 按 播放 键 进入 锁 和 开锁 选择项 参考图片如下图 ...

Page 18: ...18 ZH 选择 锁 确认锁定文件 选择 开锁 确认解除锁定 文件 锁定后 选择删除文件将会提示 文件被锁 需解除锁定才 能被删除 6 7 删除文件 在播放录音停止界面 按删除键 将会显示如下第一张图所示 界面 下面为执行删除操作的相关参考图片 在删除列表界面 按 键或 键选择删除单个文件或 所有文件 在删除文件界面 按 键或 键选择 是 确认删除 选择 否 退出删除界面 按播放键执行命令 ...

Page 19: ... 192KHZ 24bit 以上比特率不支持 FLAC 96KHZ 24bit 和 192KHZ 24bit 以上比特率不支持 WMA 48KHZ 24bit 和 96KHZ 24bit 以上比特率不支持 APE 192KHZ 24bit 不支持 ALAC 不支持 ACC 不支持 音乐文件只能放在 MUSIC 文件夹里面进行播放 音乐播放界 面说明 7 1 播放模式 在播放音乐界面按 和 选择上一曲 下一曲 按 菜单键选中文件列表图标 按 播放 键确认进入文件列表浏览 按 键和 键选择要播放的文件 按 播放 确认 7 2 变速播放 在播放过程中短按 SPEED 键 键入播放速度调节界面 参考 ...

Page 20: ...再短按 键 设置复读终点 B 此时显示 显示 A B 当复读图标固定 A B 开始 AB 点间的反 复播放 到达设定的次数后 闪烁图标 A B 中的 A 等待确定起点 A 这时播放返回正常播放 如不再需要设定 复读 可通过以下方式退出复读模式 取消复读 短按 播放 键 将之前设置 AB 复读取消 并 暂停播放 短按 停止 键 将之前设置 AB 复读取消 并 停止播放 短按 菜单 键 将之前设置 AB 复读取消 并 返回正常播放状态 7 4 书签 在播放过程中 短按 键插入书签 支持 10 个书签文件 在播放过程中 长按 键 将弹出书签操作菜单 包括 转入书签播放和删除书签 按 键和 键选择 转入书 签播放 菜单 按 播放 键确认进入播放书签选择列表 参 考界面如下图 按 键和 键 选择要播放的书签点 按 播放 键确认进入书签点播放 删除书签操作和播放书签类似 ...

Page 21: ...ZH 21 中文 提示 在播放停止状态下 按停止键可查看文件信息 包括 文 件名 作者 采样率和文件大小等 7 5 删除文件 此操作请参照语音文件的删除文件部分 歌词同步显示产品支持 lrc 歌词文件 实现歌词与歌曲同 步播放 注意 歌词文件的名称与歌曲文件的名称需保持一致 ...

Page 22: ...在语音或音乐模式下长按 菜单键 进入文件菜单界面 按上 下曲选择系统设置 界面相关参考图片如下图所示 包括 文 件菜单 录音设置 屏幕设置和设备设置 8 1 文件菜单 文件菜单栏包括 均衡器和播放模式 可根据自己喜好做相应 设置 8 1 1 均衡器 在文件菜单栏中选择 均衡器 菜单 再按 播放 键将进入 均衡器 均衡器包括以下音效 关 摇滚 流行 柔和 爵士 古典 重低音 参考界面如下图所示 在均衡器中 你可以使用 键和 键选择相应模式 再按 播 放 键确认 ...

Page 23: ...停止播放 随机 随机播放当前文件夹的文件 文件夹 循环播放当前文件夹的文件 文件 单曲循环播放当前文件 8 2 录音设置 录音设置栏包括 录音品质 录音场景 自动切分 定时器和 声控 可根据相关应用做相应设置 8 2 1 录音品质 录 音 品 质 包 括 PCM 96KHz 24bit PCM 96KHz 16bit PCM 48KHz 16bit PCM 32KHz 16bit MP3 192kbps MP3 128kbps 等 多种录音类型选择 参考界面如下图所示 8 2 2 录音场景 录音场景选择包括 日记模式 采访模式 会议模式 教学模式 远距离模式 可满足大部分应用场合 参考界面如下图所示 ...

Page 24: ...注意 不管选择那个录音类型 当插入外置麦克风 Line in 时 优先录制外置麦克风 Line in 远距离录音模式无耳机监 听功能 远距离录音模式不适合嘈杂环境使用 在进行录 音时请将咪头对准音源 8 2 3 自动切分 自动切分包括 30 分钟和 60 分钟和关 自动切分功能参考界面 如下图所示 8 2 4 定时器 定时器 先预设一个时间 当系统时间到达预设时间时 系统 将会自动录音 在功能菜单中 选择 定时器 菜单 再按 播 放 键进入定时录音设置菜单 参考界面如下图所示 设置开始 设定日期和设置时间 设置参考界面如下图所示 为期 设置定时录音的录音时长 可设置 30 分钟 60 分钟 120 分钟 没有限制 设置参考界面如下 ...

Page 25: ... 中文 注意 设定定时录音时 请先检查电池电量是否充足 8 2 5 声控 声控功能一旦被启用 录音过程中 当机器检测到有声音时 录音笔会自动开始录音 当未检测到声音时 录音笔将自动暂 停录音 再次检测到声音时 录音笔又会自动开始录音 声控 设置参考界面图片如下 8 3 屏幕设置 屏幕设置包括 语言和和背光 8 3 1 语言 在语言选择菜单中 有 English 简体中文 繁體中文三种语言 语言选择参考界面如下 ...

Page 26: ...内没对机器做任何操作 背光将会自动灭 如果选择 恒 亮 背光将会常亮 8 4 设备设置 设备设置栏包括 日期 时间 自动关闭 格式化设备 录音 指示灯 设备声音 内存选择 信息和恢复出厂设置 8 4 1 日期 时间 系统时间设置界面 参考图片如下 在此界面下 可以设置系统的当前时间和系统时间显示格式 例如 选择时间格式 设置时间格式 菜单 将会显示如下参 考界面 此界面下有两种时间显示格式可供选择 12 小时制和 24 小时制 系统默认的是 12 小时制 例如 选择 设定日期 菜单 将会显示如下参考界面 ...

Page 27: ... 日 按 或 改变相应位置数值 选择 设置时间 菜单 将会显示如下参考界面 在此界面下 按 或 与 和 可以设置实 时时间 按 和 选择时 分 按 或 改 变相应位置数值 8 4 2 自动关闭 在设定的时间内没对机器做任何操作 系统将会自动关机 自 动关机设置参考界面如下 8 4 3 格式化设备 格式化本机内存 外置卡 8 4 4 录音指示灯 打开录音灯 录音时录音指示灯将会亮 关闭时 录音指示灯 不亮 8 4 5 设备声音 打开设备声音时 按键操作有按键音 关闭时 按键操作无声音 ...

Page 28: ...28 ZH 8 4 6 内存选择 本机内存或外置卡内存 8 4 7 信息 信息菜单中包括 磁盘信息 卡信息和固件版本 磁盘信息 查看本机内存大小和剩余空间信息 卡信息 查看卡内存大小和剩余空间信息 固件版本 查看固件版本信息 8 4 8 恢复出厂设置 重置机器的设置选项 ...

Page 29: ...此处列举了常见问题的解答 可帮助解决录音笔出现的简单问 题 如果故障仍无法排除 请咨询经销商或访问我们的官方网站 www philips com support 9 1 无法启动录音笔 电池电量已耗尽请及时充电 9 2 录音笔无法录音 超出录音笔允许的最大文件数量或录音笔存储空间已满 请删 除部分录音或将其移至外部存储设备 9 3 录音笔无法播放录音 录音笔可能处于锁定模式 HOLD 将 锁定 开关拨下解锁 电池电量已耗尽 请充电 ...

Page 30: ...存储器 PC 是 存储卡 是 10 2 尺寸和重量 宽 高 深 126 59 5 21 5 mm 重量 含电池 179g 10 3 系统要求 操作系统 Windows 7 8 10 Vista XP 2000 Mac OS X Linux 接口 USB 接口 10 4 录音 PCM 96KHz 24bit 比特率为 4608kbps 格式为 WAV PCM 96KHz 16bit 比特率为 3072kbps 格式为 WAV PCM 48KHz 16bit 比特率为 1536kbps 格式为 WAV PCM 32KHz 16bit 比特率为 1024kbps 格式为 WAV MP3 44KHz 比特率为 192kbps 格式为 MP3 MP3 44KHz 比特率为 128kbps 格式为 MP3 10 5 运行条件 温度 5 45 空气湿度 10 90 不凝结 ...

Page 31: ...educing recording 43 5 3 External microphone recording 43 5 4 Telephone recording 44 6 Voice Mode 45 6 1 Voice play 46 6 2 File editing 46 6 3 Variable playback 47 6 4 Repetition mode 47 6 5 Bookmark 47 6 6 File protection 47 6 7 Delete file 47 7 Music Mode 49 7 1 Playback mode 50 7 2 Variable playback 50 7 3 Repetition mode 50 7 4 Bookmark 51 7 5 Delete file 51 8 System Settings 52 8 1 File menu ...

Page 32: ...32 EN 10 Technical Parameters 60 10 1 Memory 60 10 2 Dimensions weight 60 10 3 System requirements 60 10 4 Recording 60 10 5 Operational conditions 60 ...

Page 33: ... to save recorded clips Supports long distance recording Supports multi scene recording with multiple purposes Supports editing of the recorded files on the recorder HD speaker The high quality speaker we have chosen for you will make sure that you enjoy the recorded file or music file as if you were on the scene Recorded formats include the frequently seen MP3 and WAV with compatibility for 96kHz...

Page 34: ...he files in the device Images are for reference only Philips reserves the right to change the color appearance design parameters product functions without prior notice 2 2 Hearing protection When using the earphone please follow the instructions below Adjust the volume to an appropriate level and avoid excessive use of the earphone Special note Do not adjust the volume to a level beyond the bearab...

Page 35: ...EN 35 English ...

Page 36: ...36 EN 3 Your Digital Voice Recorder 3 1 What s in the box 3 2 Overview ...

Page 37: ...rding gain adjustment button 20 1 Earphone hole 2 External microphone hole 3 Line in 8 Indicator light 5 Card insertion hole 6 Imbedded middle microphone 7 Imbedded side microphone Decrease volume Menu selection 14 USB port 16 FOCUS button Stop 18 10 Play Pause 11 Increase volume Menu selection 12 Noise reduction switch 21 Delete button 23 Speaker Variable speed play button 22 24 ...

Page 38: ...2 3 seconds and then the device will be turned off showing the Philips logo before shutdown The turn On Off display is shown below When the device is turned on the display of pause the play of recorded clip is shown below On the PAUSE display press Menu to prop up the Settings menu and then press or to choose from the menu Press Play button to confirm selection In the Settings page there are four ...

Page 39: ...takes 3 hours to fully charge the device When the device is fully charged the power sign shows three bars and the three indicator lights will go off Note When the recorder is connected with the computer the manual operations on the recorder will become invalid 4 3 Press hold hold function 1 When the ON OFF button is pushed to a locked position the recorder will be locked and all button pressing wi...

Page 40: ...ftware to connect the recorder with the computer via a USB cable as shown below Reminder When importing or exporting files from the recorder please do not disconnect the recorder and the computer Otherwise the file will be damaged ...

Page 41: ...o resume recording 5 During the recording process press FOCUS button to show the gain adjustment button You can turn around the button to adjust recording gain Please adjust recording gain to appropriate level to ensure recording quality 6 Press FOCUS button again to cancel the recording gain adjustment 7 During the recording mode press button to insert the recording bookmark A total of 10 bookmar...

Page 42: ...When one folder has stored 99 files the system will auto store the recorded clip in the next folder If all folders are full and you want to continue recording please delete some of the unnecessary files Please do a recording test to ensure that the settings of your recorder are correctly set Each folder can store 99 files which means a total of 396 files can be stored When the recorded hours excee...

Page 43: ...ironment 5 2 Noise reducing recording In an environment of noise you can use the noise reducing mode for recording high resolution clips Turn on the noise reduction button and press Record to enter the recording pause interface and then press Record button to enter the noise reduction mode Note The recording type for noise reduction mode is by default 12khz 384kbps During the recording process if ...

Page 44: ...recording When recording please adjust the external volume to an appropriate level before recording Details steps are shown below 5 4Telephone recording Insert the telephone cable and accessory telephone con nection line into the recording converter The method of operation is the same as using the microphone for recording ...

Page 45: ...8 Equalizer 9 Recording scene mode 3 Play mode 4 Play status 5 Play progress bar File list icon 6 Total duration File information icon 14 15 10 11 Current duration Battery indicator 12 13 Information icon 16 17 7 Note In the STOP mode press button to switch among the five folders of A B C D and MUSIC In folders of A B C and D you can directly switch to MUSIC folder by pressing button ...

Page 46: ...ause press the PLAY button again to resume the play 9 Press or button to quickly play backward or forward the current file Reminder When the earphone is inserted into the hole the record er speaker will stop working 6 2 File editing In the process of playing the recorded file short press the MENU button to switch the editing function and confirm the selection by pressing PLAY button Function icons...

Page 47: ...ion 6 5 Bookmark Refer to bookmark section of music file for this operation 6 6 File protection In the STOP interface of playing recording press the FOCUS button will pop up the file protection menu Press the PLAY button to enter the LOCK and UNLOCK options Reference pictures are as follows Select LOCK to lock the file and UNLOCK to unlock After the file is locked select DELETE FILE will prompt a ...

Page 48: ...e button or button to select deleting a single file or all files on the deletion file interface press the button or button to select YES to confirm deletion select NO to exit the deletion interface and press the play button to execute the command ...

Page 49: ...it rate above 96KHZ 24bit and 192KHZ 24bit is not supported WMA bit rate above 48KHZ 24bit and 96KHZ 24bit is not supported APE 192KHZ 24bit is not supported ALAC Not supported ACC Not supported Music files can only be played in the MUSIC folder Illustra tion of music play interface 8 File name 1 Music icon 2 PLAY sate 9 Equalizer 3 PLAY mode 10 11 5 Current duration of play List icon Battery indi...

Page 50: ...ers until the start point A of repetition is confirmed and short press to confirm the start point A of repetition Set the end point of repetition After setting the start point A the B of A B flickers on the screen then short press to set the end point B of repetition A B will display on the screen When the repetition icon shows A B the repetition between A and B points starts After reaching the se...

Page 51: ...rface is as follows Press the button and button to select the bookmark point to play Press the PLAY button to enter bookmark playback Operation of deleting bookmarks is similar to that of playing bookmarks Reminder During Stop mode press Stop button to check file information including file name author sampling rate and file size 7 5 Delete file Please refer to the section on Delete Audio File The ...

Page 52: ...enu recording settings screen settings and device settings 8 1 File menu File menu bar includes equalizer and playback mode which can be set according to personal preferences 8 1 1 Equalizer In the file menu bar select the equalizer menu and press the PLAY button to enter the equalizer The equalizer includes sound effects of off rock pop soft jazz classical bass The reference interface is as follo...

Page 53: ...2 Recording settings Recording settings bar includes recording quality recording scenario automatic segmentation timer and voice control Corresponding settings can be made according to relevant applications 8 2 1 Recording quality Recording quality includes multiple recording types such as PCM 96KHz 24bit PCM 96KHz 16bit PCM 48KHz 16bit PCM 32KHz 16bit MP3 192kbps MP3 128kbps The refer ence interf...

Page 54: ...stance recording mode has no earphone monitoring function and is not applicable to noisy environment so please align your microphone with the sound source when recording 8 2 3 Automatic segmentation Automatic segmentation includes 30 minutes 60 minutes and Off The reference interface of automatic segmentation function is as follows 8 2 4Timer Timer Preset a time first When the system time reaches ...

Page 55: ...e timing recording 8 2 5Voice control Once the voice control function is enabled the recorder will automatically start recording when the device detects sound when no sound is detected the recorder will automatically stop recording when sound is detected again the recorder will automatically start recording The reference interface pictures of the voice control settings are as follows 8 3 Screen se...

Page 56: ... ON are available for back light duration Without any action on the device within the set time the back light will automatically go off If you choose Always ON the back light will be always on 8 4 Device settings The device settings bar includes Date Time Automatic Shut down Format Device Recording Indicator Device Sound Memory Selection Information and Restore Factory Settings 8 4 1 Date Time Ref...

Page 57: ...eference interface will be displayed Under this interface press or and or to set the real time date Press and to choose year month and day Press or to change the corresponding position value Selecting the Set Time menu the following reference inter face will display Under this interface press or and or to set the real time time Press and to choose hour and minute Press or to change the correspondi...

Page 58: ...tone in the key operation When turning off the key operation is silent 8 4 6 Memory selection Native memory or external card memory 8 4 7 Information The information menu includes disk information card infor mation and firmware version Disk information used to view local memory size and re maining space information Card information used to view the card memory size and the remaining space informat...

Page 59: ... philips com support 9 1 Failure to start the recorder The batter has run out and you need to charge your device 9 2 Failure to record If the recorder has exceeded the maximum file limit or the maximum volume please delete some of the recorded clips or transfer them to external memory devices 9 3 Failure to play recorded clip The recorder might be in a HOLD mode Unlock the HOLD button If the batte...

Page 60: ...ble Storage Device PC Yes Memory Card Yes 10 2 Dimensions weight Width Height Depth 126 59 5 21 5 mm Weight including Battery 176g 10 3 System requirements Operating System Windows 7 8 10 Vista XP 2000 Mac OS X Linux Port USB 10 4 Recording PCM 96KHz 24bit bit rate 4608kbps WAV PCM format 96KHz 16bit bit rate 3072kbps WAV PCM format PCM 48KHz 16bit bit rate 1536kbps WAV format PCM 32KHz 16bit bit ...

Page 61: ...EN 61 English ...

Page 62: ...62 EN VTR7800 ...

Page 63: ...EN 63 ...

Page 64: ...版权所有文档版本 1 0 2019 08 23 2019 Speech Processing Solutions GmbH www philips com welcome Register your product and get support at ...

Reviews: