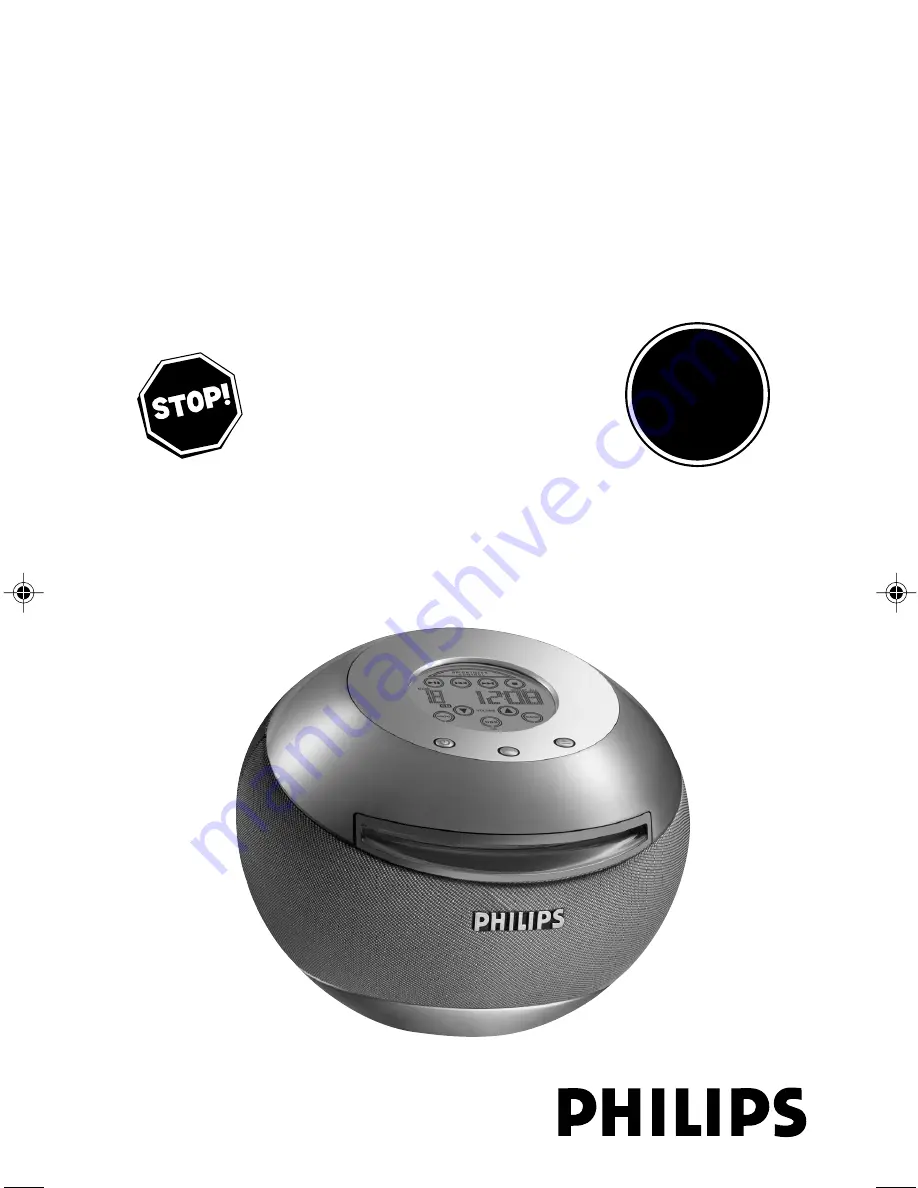
background image

PSS010

Portable Sound System

S

E

E

W HY INS

I D

E

IM

PO

RTAN

T

!

Return 

your Warranty

Registration Card

within 10 days

Need help? Call us!

Philips representatives are ready to help you with 
any questions about your new product.  We can guide you 
through Connections, First-time Setup, or any of the Features.
We want you to start enjoying your new product right away!

CALL US BEFORE YOU CONSIDER
RETURNING THE PRODUCT!

1-800-531-0039

             or

Visit us on the web at www.philips.com

User manual

Manuel d'utilisation

Manual del usuario

Summary of Contents for PSS010

Page 1: ...re ready to help you with any questions about your new product We can guide you through Connections First time Setup or any of the Features We want you to start enjoying your new product right away CALL US BEFORE YOU CONSIDER RETURNING THE PRODUCT 1 800 531 0039 or Visit us on the web at www philips com User manual Manuel d utilisation Manual del usuario ...

Page 2: ...ecucción de métodos que no sean los aquí descritos puede ocasionar peligro de exposición a radiación CAUTION INVISIBLE LASER RADIATION WHEN OPEN DO NOT STARE INTO BEAM DANGER INVISIBLE LASER RADIATIONWHEN OPEN AVOID DIRECT EXPOSURETO BEAM DANGER Invisible laser radiation when open AVOID DIRECT EXPOSURETO BEAM or This warning label is located on the rearside and inside this laser product This syste...

Page 3: ...3 ...

Page 4: ...cluding special money sav ing offers Know these safetysymbols This bolt of lightning indicates uninsulated material within your unit may cause an electrical shock For the safety of everyone in your household please do not remove product covering The exclamation point calls attention to features for which you should read the enclosed literature closely to prevent operating and maintenance problems ...

Page 5: ...itled to protection by one of the most comprehensive warranties and outstanding serv ice networks in the industry What s more your purchase guaran tees you ll receive all the information and special offers for which you qualify plus easy access to accessories from our convenient home shopping network Most importantly you can count on our uncompromising commit ment to your total satisfaction All of...

Page 6: ...6 IMPORTANT SAFETY INSTRUCTIONS Class II equipment symbol This symbol indicates that the unit has a double insulation system Clean only with a piece of dry cloth materials ...

Page 7: ...7 English Français Español Index English 8 Français 24 Español 40 ...

Page 8: ...ume 13 Sound control 13 CD Operations Discs for playback 14 Loading the disc 14 Inserting the disc 14 Ejecting the disc 14 Playing a CD 15 Switching to CD mode 15 Starting Interrupting Resuming playback 15 Programming track numbers 15 Searching backward forward 16 Selecting a desired track 16 Stopping playback Ejecting the disc 16 Repeat playback 16 Stopping repeat playback 16 Shuffle playback 16 ...

Page 9: ...ssive heat caused by heating equipment or direct sunlight Safety information Place the system on a flat hard and stable surface Place the system in a location with adequate ventilation to prevent internal heat build up in your system Allow at least 10 cm 4 inches clearance from the rear and the top of the unit and 5 cm 2 inches from each side The ventilation should not be impeded by covering the v...

Page 10: ...10 English Connections FM wire antenna AC power cord MUTE DBB CD TUNER PROGRAM SHUFFLE REPEAT BRIGHTNESS TUNG TRACK VOLUME PRESET Power adapter 11V DC Headphone not supplied ...

Page 11: ...he left 2 Pull out the battery compartment B 3 Replace with a new battery and fully insert the battery compartment back into the original position CAUTION Batteries contain chemical substances so they should be disposed of properly Placing the power adapter Place the power adapter as close as possible to the power supply Do not place this unit in closed spaces cover it or block the air vents Do no...

Page 12: ...ct half or full brightness or switch off the backlight for the LCD Notes When the LCD is dark pressing any contact key will activate the full brightness The LCD will go dark again in 10 seconds TIME SET Press y to enter the clock mode Press TIME SET to enter the clock setting mode HOUR Press HOUR to set the hours MINUTE Press MINUTE to set the minutes CD ÉÅ Press ÉÅ to start or interrupt playback ...

Page 13: ...ram RADIO S T Press S T to tune to a radio station PROGRAM PROG Press PROGRAM PROG to start manual preset programming Press and hold PROGRAM PROG to start automatic preset programming Volume VOLUME 3 4 Press VOLUME 3 4 to increase decease the volume MUTE on the remote control Press MUTE to mute or restore the volume Sound control DBB Press DBB to activate or deactivate the DBB function Introductio...

Page 14: ...rs immediately is displayed followed by and the total number of tracks and playing time Notes Load the disc with the label side facing up Loading the disc in the radio mode will switch to the CD mode Ejecting the disc Press 0 Playback stops The disc is ejected is displayed Notes If you don t remove the disc it will be taken into the disc loader again All programmed tracks will be erased WARNING Do...

Page 15: ... desired track number 2 Press PROG twice to confirm the track number to be stored During the program playback the track number is displayed PROG and the elapsed time are also displayed alternately 3 Repeat steps 1 2 to select and store all desired tracks Display FULL is displayed if you try to program more than 20 tracks 4 To start playback of your disc program press ÉÅ Note During normal playback...

Page 16: ... In the stop mode press 0 to eject the disc Repeat playback Press MODE repeatedly or REPEAT on the remote control Repeat the current track REPEAT lights up Repeat all tracks REPEAT ALL lights up Stopping repeat playback Press REPEAT repeatedly until REPEAT ALL disappears from the display Notes If the program mode is active the programmed tracks will be repeated or shuffled After the disc is ejecte...

Page 17: ...CE RADIO FM TUNER CD RADIO FM CD SOURCE MUTE DBB CD TUNER PROGRAM SHUFFLE REPEAT BRIGHTNESS TUNG TRACK VOLUME PRESET 2 Press PROG for 4 seconds or more to activate auto store programming Display AUTO is shown and available stations are programmed The first preset station will then be played after all stations are stored automatically Manual programming 1 Tune to your desired station 2 Press PROG t...

Page 18: ...hours Press MINUTE to set the minutes Note If you press and hold HOUR or MINUTE the number will increase fast Clock In the standby mode HOUR TIME B R I G H T N E S S C O N T R O L MINUTE TIME SET HOUR TIME B R I G H T N E S S C O N T R O L MINUTE TIME SET HOUR TIME B R I G H T N E S S C O N T R O L MINUTE TIME SET ...

Page 19: ... when buttons are pressed Sound cannot be heard or is of poor quality The remote control does not function properly The CLOCK is not working If the signal is too weak adjust the antenna Increase the distance between the system and yourTV power adapter or VCR etc Remove and reconnect the AC power plug and switch on the system again Adjust the volume Disconnect the headphones Select the source CD or...

Page 20: ...ident unauthorized repair or other cause not within the control of Philips Damage occurring to product during shipping when improp erly packaged or cost associated with packaging A product that requires modification or adaptation to enable it to operate in any country other than the country for which it was designed manufactured approved and or authorized or repair of products damaged by these mod...

Reviews: