Philips FW-C720, User Manual
The Philips FW-C720 is a high-quality audio system that guarantees an immersive music experience. To enhance your understanding of its features and operation, download the free user manual from manualshive.com and unlock the full potential of this exceptional product.
Share
Download


Reviews:
No comments
Related manuals for FW-C720

30 Series
Brand: Gale Pages: 16

SC-HT1000
Brand: Panasonic Pages: 56

SDS-P3042
Brand: Samsung Pages: 11

CHT-420
Brand: Samsung Pages: 32

HT-DB1750
Brand: Samsung Pages: 34

ABICAR 1200 PRO
Brand: Abicor Binzel Pages: 64
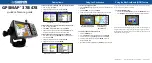
GPSMAP 378 - Marine GPS Receiver
Brand: Garmin Pages: 2

GPSMAP 5215
Brand: Garmin Pages: 4
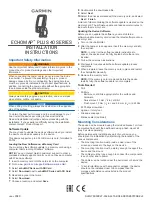
Echomap Plus 40 series
Brand: Garmin Pages: 6

T 100
Brand: Gardena Pages: 3

iSF-26
Brand: iHome Pages: 3

IA100
Brand: iHome Pages: 17

MAS65
Brand: Magnavox Pages: 24

MAS-85
Brand: Magnavox Pages: 22

MAS-85
Brand: Magnavox Pages: 21

Magnavox FW 750C
Brand: Magnavox Pages: 28

Magnavox FW 2012
Brand: Magnavox Pages: 16

MRD430B
Brand: Magnavox Pages: 2


