


VIDEO
S-VIDEO
L
AUDIO
L
R
INPUT-AV 1
ANTENNA IN 75
Ω
TO TV
CABLE
IN
OUTPUT
CH
3 4
1
3
Back of Cable Box
(example only)
Cable TV
Signal
NOTE: Be sure to allow a free flow of air to and from the perfo-
rated back cover of the set.
hot—for example, in direct sunlight or near a
heating appliance.
magnetic field s
is no picture dis
VIDEO
S-VIDEO
L
Pb
Pr
VIDEO
AUDIO
L
R
AUDIO
L
R
OUTPUT
INPUT-AV 1
Y
ANTENNA IN 75
Ω
1
VIDEO
S-VIDEO
L
Pb
Pr
VIDEO
S-VIDEO
L
AUDIO
L
R
AUDIO
L
R
G/Y
R/Pr
B/Pb
V
H
SYNC
L
R
AUDIO
L
R
AUDIO
HD INPUT-AV 4
HD INPUT-AV 5
INPUT-AV 2
OUTPUT
INPUT-AV 1
Y
ANTENNA IN 75
Ω
DVI
C
ABLE
TV
C
ABLE
B
OX WITH
RF IN/OUT
C
ABLE
B
OX WITH
A/V O
UTPUTS
VIDEO
S-VIDEO
L
Pb
Pr
VIDEO
S-VIDEO
L
AUDIO
L
R
AUDIO
L
R
G/Y
R/Pr
B/Pb
V
H
SYNC
L
R
AUDIO
L
R
AUDIO
HD INPUT-AV 4
HD INPUT-AV 5
INPUT-AV 2
OUTPUT
INPUT-AV 1
Y
ANTENNA IN 75
Ω
DVI
CABLE
IN
TO
TV
VIDEO
OUT
L
R
AUDIO
OUT
3 4
OUTPUT
CH
4
3
1
2
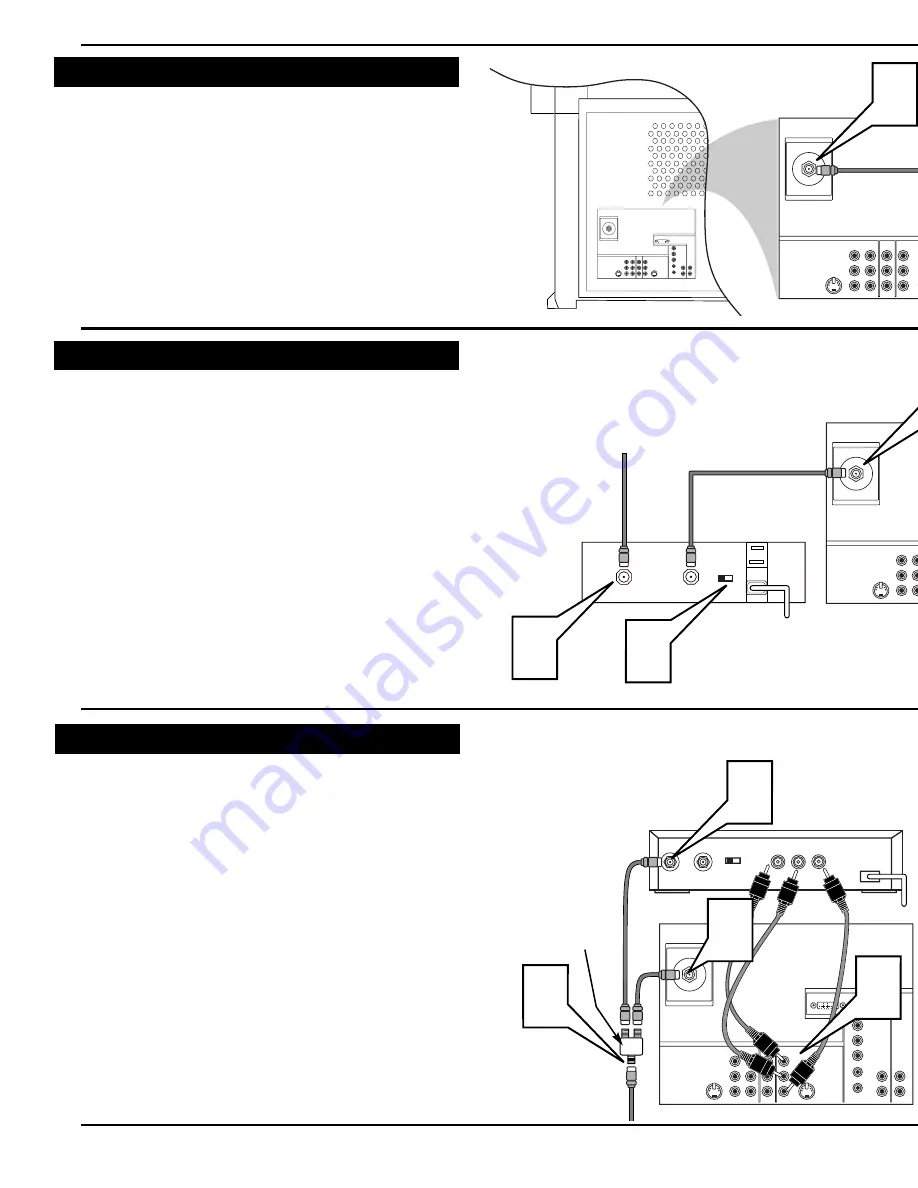
Cable TV Signal
T
his connection WILL supply Stereo sound to the TV.
1
Connect the cable TV signal to the ANTENNA IN 75
Ω
jack on the back of the TV.
NOTE: Refer to the sections on TUNER MODE and AUTO
PROGRAM on pages 4 and 5 of this guide. Set TUNER
MODE to the CABLE option. Run AUTO PROGRAM to
store all available cable channels in the TV’s memory.
T
his is for example purposes only. The back of your cable box
may be labeled somewhat differently.
This connection WILL NOT supply stereo sound to the TV.
1
Connect the cable TV signal to the CABLE IN jack on
the back of the cable box.
2
Connect a coaxial cable (not supplied) to the TO TV
jack on the back of the cable box and to the ANTENNA
IN 75
Ω
jack on the back of the TV.
3
Be sure to set the Output Channel switch on the back of
the cable box to CH 3 or 4, then tune the cable box on
the TV to the corresponding channel. Once tuned,
change channels at the cable box, not the TV.
NOTE: Refer to the sections on TUNER MODE and AUTO
PROGRAM on pages 4 and 5 of this guide. Set TUNER
MODE to the CABLE option. Run AUTO PROGRAM to
store all available cable channels in the TV’s memory.
Back of TV
Back of Cable Box
(example only)
T
his is for example purposes only. The back of your cable box
may be labeled somewhat differently.
This connection MIGHT supply stereo sound to the TV. Check
with your cable TV company.
1
Connect the incoming cable TV signal to a signal splitter.
2
Connect a coaxial cable to a connector on the signal split-
ter and to the ANTENNA IN 75
Ω
jack on the back of the
TV.
3
Connect a coaxial cable to a connector on the signal split-
ter and to the CABLE IN jack on the back of the cable
box.
4
Connect A/V cables to the VIDEO and AUDIO L and R
outputs on the back of the cable box and to the AV2
VIDEO and corresponding AUDIO L and R jacks on the
back of the TV.
5
To view programs from your cable box, plug in the TV,
turn it on, and then press the AV button on the remote
control as many times as necessary to select the AV2
input source.
Signal
Splitter


