background image

Operating Instructions

Color Television

Summary of Contents for 29PT5342

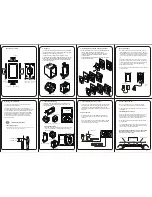
Page 1: ...Operating Instructions Color Television ...

Page 2: ...fulTips 3 Before Calling Service 4 Basic Installation Functions Hooking UpYour TV Basic Connection 5 Use Care of remote Control 5 Connecting the Audio Video Sockets Playback 6 Connecting the Audio Video Sockets Recording 8 Functions of Remote Control 9 Functions of TV Controls 11 TV Installation Selecting the Menu Language 12 Automatic Tuning of Channels 13 Manual Tuning of Channels 14 Selecting t...

Page 3: ...et under direct sunlight or heat Leave at least 5 cm around each side ofTV set to allow for proper ventilation Avoid placing your set e g near the window where it is likely to be exposed to rain or water No objects filled with liquids should be placed on top theTV so as to avoid dripping or splashing of liquids on the set UsefulTips Do not leave your set on standby mode for a prolonged period of t...

Page 4: ...ction at the rear of theTV Possible TV station problem Try another channel Good picture Try increasing the volume but no sound Check that the sound is not muted If it is muted press the Mute button on the remote control to restore sound Good sound but poor Try increasing the contrast and brightness setting colour or no picture Snowish picture and Check antenna connection at the rear of theTV noise...

Page 5: ...ins supply is different Note This diagram is not representative of the actual plug and socket Switching on the Set Press the main power button to switch on off theTV If the set is on standby indicator is red press the Power button on the remote control to switch on set HOOKING UPYOUR TV BASIC CONNECTION USE CARE OF REMOTE CONTROL Insert the correct type of batteries into the compartment Ensure the...

Page 6: ...nection Connect the S VIDEO socket on the rear of theTV to the S VHS OUT socket on a S VHS VCR Connect the AUDIO IN sockets from the rear of theTV to the AUDIO OUT sockets on theVCR Note You need not connect the VIDEO IN socket of theTV if S VIDEO IN socket is connected CONNECTING THE AUDIO VIDEO SOCKETS PLAYBACK ANTENNA OUT IN OUT IN AUDIO R L VIDEO IN OUT L Mono R S VIDEO VIDEO AUDIO AV1 in AV2 ...

Page 7: ... rear of theTV Connect the Y Pb and the Pr INPUT sockets on theTV to the Y Pb and Pr OUTPUT sockets on the DVD to view playback of DVD discs AV sockets on rear ofTV Back of DVD DVD Equipped with Y Pb and Pr and Output sockets OUT AUDIO Y L OUT R Pb Pr L Mono R S VIDEO VIDEO AUDIO AV1 in AV2 in Monitor out COMPONENT VIDEO INPUT Y Pb Pr ...

Page 8: ...ch you wish to record from to the corresponding sockets at either AV1 orAV2 Connect the sockets of the receiving VCR to the MONITOR OUTPUT sockets on the rear of the TV ANTENNA OUT IN OUT IN AUDIO R L VIDEO IN OUT L Mono R S VIDEO VIDEO AUDIO AV1 in AV2 in Monitor out COMPONENT VIDEO INPUT Y Pb Pr ANTENNA OUT IN OUT IN AUDIO R L VIDEO IN OUT ANTENNA OUT IN OUT AUDIO R L VIDEO OUT L Mono R S VIDEO ...

Page 9: ...your personal preference channels in your Personal Preference list For detailed description of functions refer to section on Using your Personal Zapping feature Smart Sound Button Press the Smart Sound button repeatedly to access 4 different types of sound settings and choose your desired setting è Menu Button Displays the main menu Also exits menu from screen Cursor Up Button Allows you to select...

Page 10: ...n Allows you to select the next item on the menu 9 Channel Buttons Allows you to select channels in ascending or descending order 20 Mute Button Mutes sound To restore sound press button again 21 Teletext Button Refer to section on Using the Teletext 22 OSD button Allows you to display the current channel number It also allows to exit menu from the screen after control adjustments 23 Digit 0 9 But...

Page 11: ...set is aimed at it Volume button Adjust sound volume softer 5 Adjust sound volume louder Programme Select channel in ascending order Select channel in descending order Note You can enter the main menu by pressing both the Volume buttons at the same time Press the Programme or button to select the next item on the menu Press the Volume button to access the sub menus and adjust the settings Volume b...

Page 12: ...on your remote control to select an AV channel The Language feature allows you to set the TV s on screen menu to be shown in your desired language SELECTING THE MENU LANGUAGE Enter main menu Select Install Enter the Install menu Press button repeatedly to cycle through the language list and select the language of your choice Exit menu from screen Main o Picture π Brightness Sound Colour Features C...

Page 13: ...ed exit menu from screen Main o Picture π Brightness Sound Colour Features Contrast Install Sharpness Colour Temp More œ Main o Picture Language Sound Auto Store Features Manual Store Install π Channel Edit œ Install o Language π English Auto Store Manual store Channel Edit œ Install o Language Auto Store π Manual store Channel Edit œ Auto Store Channel 1 TV 142 MHz π Install o Language Auto Store...

Page 14: ...until Search is selected MANUAL TUNING OF Main o Picture π Brightness Sound Colour Features Contrast Install Sharpness Colour Temp More œ Main o Picture Language Sound Auto Store Features Manual Store Install π Channel Edit œ Install o Language π English Auto Store Manual Store Channel Edit œ Install o Language Colour System Auto Store Sound System Manual Store π Search Channel Edit Channel Fine T...

Page 15: ...ne Tune Store Stored œ 12 Start manual searching Searching stops once a transmitting signal is found Select Channel Key in the channel number Press button repeatedly until Store is selected Store tuned channel Note If you want to continue searching for another transmitting channel repeat steps 7 to 11 Exit menu from screen Manual Store o Colour System Sound System Search 128 MHz π Channel Fine Tun...

Page 16: ... selected system Proceed to select Sound System Select the desired sound system Auto BG I DK or M Press button repeatedly until STORE is selected Store selected system Exit menu from screen Manual Store o Colour System Auto π Sound System Search Channel Fine Tune Store œ Manual Store o Colour System PAL π Sound System Search Channel Fine Tune Store œ or Manual Store o Colour System Sound System Se...

Page 17: ...s Exit menu from screen Main o Picture π Brightness Sound Color Features Contrast Install Sharpness Colour Temp More œ Main o Picture Language Sound Auto Store Features Manual Store Install π Channel Edit œ 9 Install o Language Colour System Auto Store Sound System Manual Store π Search Channel Edit Channel Fine Tune Store œ Manual Storeo Colour System Sound System Search Channel Fine Tune p π Sto...

Page 18: ...nu Press button repeatedly until Install is selected Enter install menu Press button repeatedly until Channel Edit is selected Enter Channel Edit menu Key in the channel number to be skipped Select Skipped Select On to skip channel Exit menu from screen Channel Edit o Channel 2 π Skipped œ 9 HOW TO RESTORE SKIPPED CHANNELS Repeat Steps 1 to 5 as in Editing of Channels Key in the channel number to ...

Page 19: ...menu items Activities Brightness Increase or decrease brightness level Colour Increase or decrease color level Contrast Increase or decrease contrast level Sharpness Increase or decrease sharpness level to improve detail in picture Colour temperature Choose from 3 settings Normal Warm or Cool NR Noise Reduction Select On to reduce noisy picture little dots on picture due to weak signal Contrast Se...

Page 20: ...l Sharpness Colour Temp More œ Main o Picture Treble Boost Sound π Bass Boost Features AVL Install œ Sound o Treble Boost On Bass Boost AVL œ or or Sound menu items Activities Treble Boost Switch on or off high frequency level Bass Boost Switch on or off low frequency level AVL AutoVolume Leveller Select On to enable volume to remain at a pre determined level should there be a sudden change in vol...

Page 21: ... desired format Exit menu from screen When to use the Screen Formats 4 3 format Select the 4 3 format if you want to display the 4 3 picture using the full surface of the screen Expand 4 3 format Select the Expand 4 3 format if you want to expand movie images recorded in the letterbox format When this format is selected the black horizontal bars at the top and bottom are expanded thus filling up t...

Page 22: ...he screen whenever you switch channel Display the main menu on screen Press button repeatedly until Signal Strength is selected Press the button to select On option to activate the Signal Strength mode Main o Picture Format Sound Signal Strength Features π Install œ Feature o Format Signal strength Off Active Control œ MENU Step Press button Result on screen Feature o Format Signal strength On œ ...

Page 23: ...edly to cycle through the 5 settings namely Personal DVD VCD Rich Natural and Soft and select your desired picture setting Exit menu from screen Personal Defintion of Picture Settings Personal Picture settings are set to your preference DVD VCD For optimal picture setting whenever the source is connected to DVD VCD player select DVD VCD setting for AV mode Rich Emphasize very vibrant colours This ...

Page 24: ...e Each Smart Sound setting is preset at the factory to automatically adjust theTV sTreble and Bass levels Press botton repeatedly to cycle through the 4 settings namely Personal Theatre Music and Voice and select your desired sound setting Exit menu from screen Personal Definition of Sound Settings Personal Sound settings are set to your preference Theatre Emphasize sensation to action Bass and Tr...

Page 25: ...ps 1 to 3 to add and store your avourite channels to the list Exit menu from screen To view through the favourite list 8 Deleting Channels from the Favourite list 8 8 Remove Item Press 8 Select List 8 Added m m 5 1 3 2 4 6 7 9 8 0 Step Press button Result on screen Press the colour button that you have selected Press button repeatedly to cycle through your favourite list and view your favourite ch...

Page 26: ...exit teletext mode é Selecting a Key in the required teletext page teletext page 3 digits The page number is displayed at the top left hand corner of the screen When the teletext page is located the counter stops searching If the counter keeps searching it means that the page is not available for selection If you make a mistake in keying the page number you have to complete keying the 3 digit numb...

Page 27: ...A selected page sometimes contains a few sub pages The sub page will automatically move to the next sub page after about 20 seconds The total number of sub pages are indicated at the top right hand corner of the screen Press the button once to hold page and the second time to release holding of page ç Reveal Press the button once to reveal Conceal hidden information solutions to puzzles riddles et...

Page 28: ...ns PAL D K PAL I SECAM B G SECAM D K SECAM K1 0 6 L A P 3 4 4 C S T N 8 5 3 C S T N m e t s y S k c a b y a l P Set Dimensions 736 mm h t d i W 490 mm h t p e D 580 mm t h g i e H Net Weight of Set approximate 45 5 kg Note For OperatingVoltage Frequency Power Consumption andVersion Number refer to the type number at the rear of the set Speaker 2 x 5 W 29PT5221 2 x 10 W 29PT5342 ...

Page 29: ...29 313 9125 36802 ...

Reviews: