background image

1

3138 155 24191

Quick Use and Hookup Guide

Quick Use and Hookup Guide

C

ONTENTS

IMPORTANT

NOTE: This quick setup guide is used with several 

different LCD TV models. Not all features (and drawings) 

discussed in this manual will necessarily match those 

found with your LCD TV set. This is normal and does not 

require that you contact your dealer or request service.

WARNING: TO PREVENT FIRE OR SHOCK HAZARD 
DO NOT EXPOSE THIS UNIT TO RAIN OR EXCESSIVE.

I

NSTALLING

 LCD TV 

ON

 T

HE

 W

ALL

 . . 1

TV C

HANNEL

 I

NSTALLATION

 . . . . . . . . 2

P

RESENTATION


OF


THE

 LCD TV.. . . . .  2

A

CCESSORIES

. . . . . . . . . . . . . . . . . . . . 3

B

ATTERY

 I

NSTALLATION

 . . . . . . . . . . . . 3

R

EMOTE

 C

ONTROL

 O

PERATION

 . . . . . . 3

A

NTENNA

 TV . . . . . . . . . . . . . . . . . . 4 

B

ASIC

 C

ABLE

 TV C

ONNECTION

 . . . . . . . .  4

T

UNER

 M

ODE

 C

ONTROL

 . . . . . . . . . . . 5

A

UTO

 P

ROGRAM

 (S

ETTING

 U

P


C

HANNELS

 . . . . . . . . . . . . . . . . . . . . . 5

C

ABLE

 B

OX

 (

WITH

 RF I

N

/O

UTPUTS

) . . 6

C

ABLE

 B

OX

 (

WITH

 A

UDIO

/V

IDEO


O

UTPUTS

) . . . . . . . . . . . . . . . . . . . . . 6

VCR, DVD P

LAYER

OR


OTHER

 D

EVICES


WITH

 RCA C

ONNECTORS

 . . . . . . . . .  7

DVD P

LAYER


OR


OTHER

 V

IDEO

 D

EVICES


WITH

 C

OMPONENT

 V

IDEO


C

ONNECTORS

 . . . . . . . . . . . . . . . . . .  7

D

IGITAL

 TV R

ECEIVER

OR


A

 D

IGITAL


S

ATELLITE

 R

ECEIVER


WITH

 HD (H

IGH


D

EFINITION

) O

UTPUT

 . . . . . . . . . . . . . 8

PC (M

ONITOR

) C

ONNECTIONS

  . . . . . 8

D

IGITAL

 S

ATELLITE

 R

ECEIVER


WITH

 DVI 

C

ONNECTOR

 . . . . . . . . . . . . . . . . . . . 9

AV O

UTPUT

 . . . . . . . . . . . . . . . . . . .10

I

NSTALLING

 LCD TV 

ON

 T

HE

 W

ALL

English

Arabic

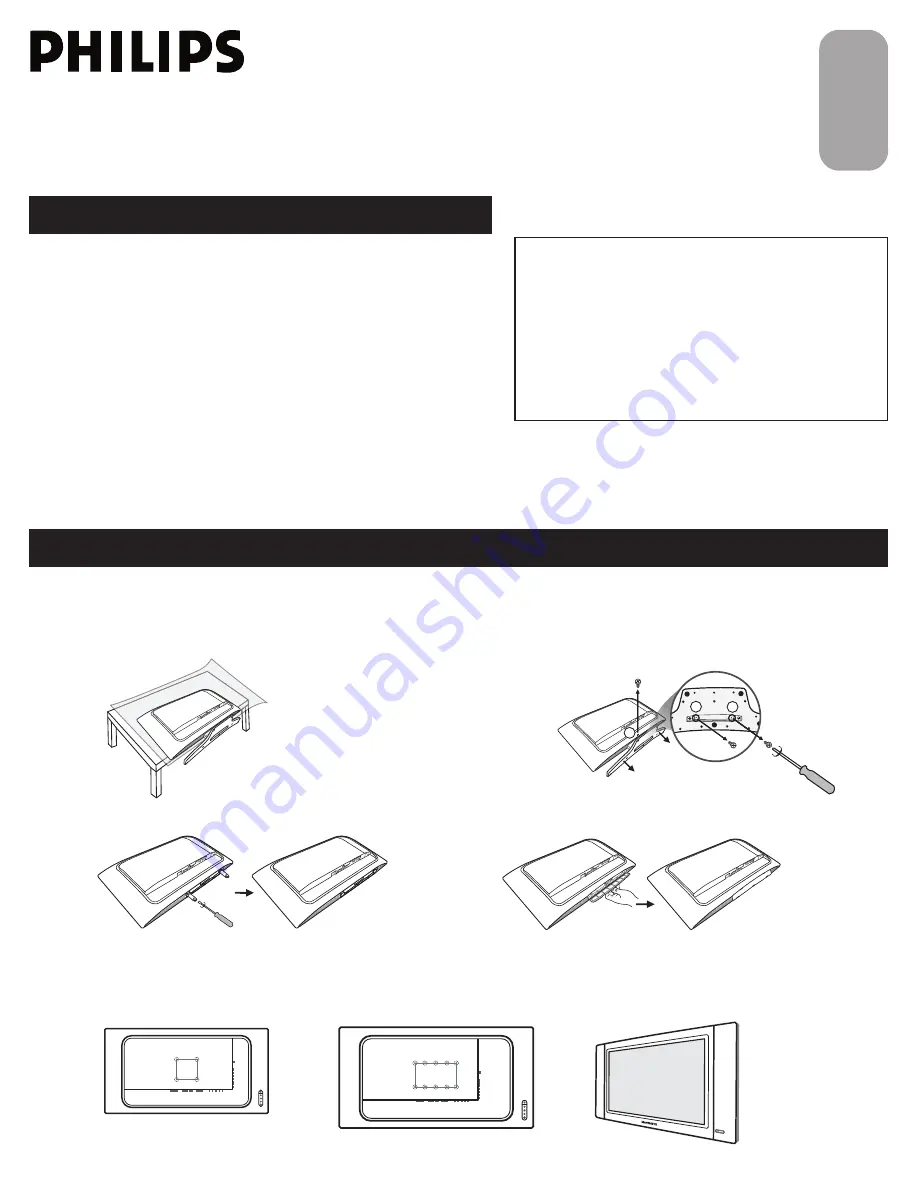
Before you can install your LCD TV on the wall, you must fi rst remove the base using the steps below:

Place the set facing down on a fl at surface with a 
protective sheet or cloth beneath the TV.

Remove the 2 metal pins.

1

3

Attach the supplied base cover. Your LCD TV is 
now ready for wall mounting.

4

Remove 3 screws from base. 
Grasp the base and pull it out.

2

1

2

3

When installing the LCD TV on the wall, please consult a professional technician for proper installing. 

The manufacture accepts no liability for installations not performed by professional technician.

26"

100x100mm

32"

200x100mm

Summary of Contents for 26TA1000/93

Page 1: ...IO VIDEO OUTPUTS 6 VCR DVD PLAYER OR OTHER DEVICES WITH RCA CONNECTORS 7 DVD PLAYER OR OTHER VIDEO DEVICES WITH COMPONENT VIDEO CONNECTORS 7 DIGITAL TV RECEIVER OR A DIGITAL SATELLITE RECEIVER WITH HD HIGH DEFINITION OUTPUT 8 PC MONITOR CONNECTIONS 8 DIGITAL SATELLITE RECEIVER WITH DVI CONNECTOR 9 AV OUTPUT 10 INSTALLING LCDTV ON THE WALL English Arabic 中文 Before you can install your LCD TV on the...

Page 2: ...just sound level CHANNEL To select programs MENU To access or close onscreen menu Power button LED light and infrared sensor To switch the TV on or off Aim remote control at infrared sensors to activate TV controls Rear connectors Remove the cable cover to access the connectors at the rear of the LCD TV Bottom connectors Located at the bottom of the set Please follow these steps to install TV chan...

Page 3: ...t select and adjust items on the TV s on screen menu Volume button Press to increase or decrease the sound level Mute button Press to eliminate or restore the LCD TV sound Mute will appear on the screen when the sound is muted Information button Press to see the current channel number on the TV screen Unused key Picture Format button Press the FORMAT button repeatedly to toggle among the six scree...

Page 4: ...els available in your area If you do not run the auto program function to set up the channels your television may not operate properly 1 2 3 4 Remember an antenna or cable TV signal must first be connected to your LCD TV Please make sure that you have selected the TV mode with AV key on your remote control before installing TV channels HELPFUL HINT Your Cable TV input into your home may be a single...

Page 5: ...nscreen menu Press the CURSOR DOWN button to highlight the INSTALL menu then press CURSOR RIGHT to enter Select the MANUAL STORE then press the CURSOR RIGHT button to activate auto search channel frequence or press number button to show your desired channel frequence After the channel frequence confirmed select PROGRAM NO by pressing CURSOR DOWN Press the number button or CURSOR RIGHT LEFT to give ...

Page 6: ...rly Please make sure that you have selected the TV mode with AV key on your remote control before installing TV channels HELPFUL HINT This connection will supply stereo sound to the LCD TV Connect the Cable TV signal to the IN jack or RF IN or CABLE IN on the Cable Box Using an RCA type video cable not supplied connect one end of the video cable to the Video Out jack of the Cable Box Connect the o...

Page 7: ...e S Video cable to connect the VCR s S Video Out jacks to the TV s S Video In jacks 2 When you watch programs using VCR it s recommended to select SOFT Mode via Auto picture 3 You can also use the Video and Audio jacks in AV IN 2 and AV IN 3 located on the rear of the TV to connect your VCR or other Video Devices 4 If your DVD Player is equipped with Component Y Pb Pr Output Jacks please refer to ...

Page 8: ... the power cable into AC inlet on LCD TV set Plug the power cable into an outlet and switch TV set on Use AV button on the remote control to select HD to watch DVD Note The Y Pb Pr jacks do not provide audio so audio cables must be connected to provide sound Computer 1 2 Wall outlet 3 A CH AV i 4 PC MONITOR CONNECTIONS This LCD TV can be used as a PC monitor Your computer will have to equipped wit...

Page 9: ...ny connections DVI is a specific digital input allowing encrypted transmission of uncompressed HD content DVI includes HDCP High Bandwidth Digital Content Protection which is supported by Hollywood satellite providers and most of the consumer electronics industry DVI is gaining monumentum and quickly becoming an industry standard for the consumer to view high definition material while keeping conten...

Page 10: ... to the AUDIO IN jack on the VCR Turn the VCR on insert a blank VHS tape and it s ready to record what s being viewed on the TV screen Note The Program recording is only possible when the input signal is TV AV1 AV2 AV3 T he AV Audio Video out jacks are great for recording with a VCR or used to connect an external audio system for better audio 1 2 For VCR Connection Recorder 3 2 1 3 VCR Disconnect ...

Reviews: