background image

3138 155 23902

1

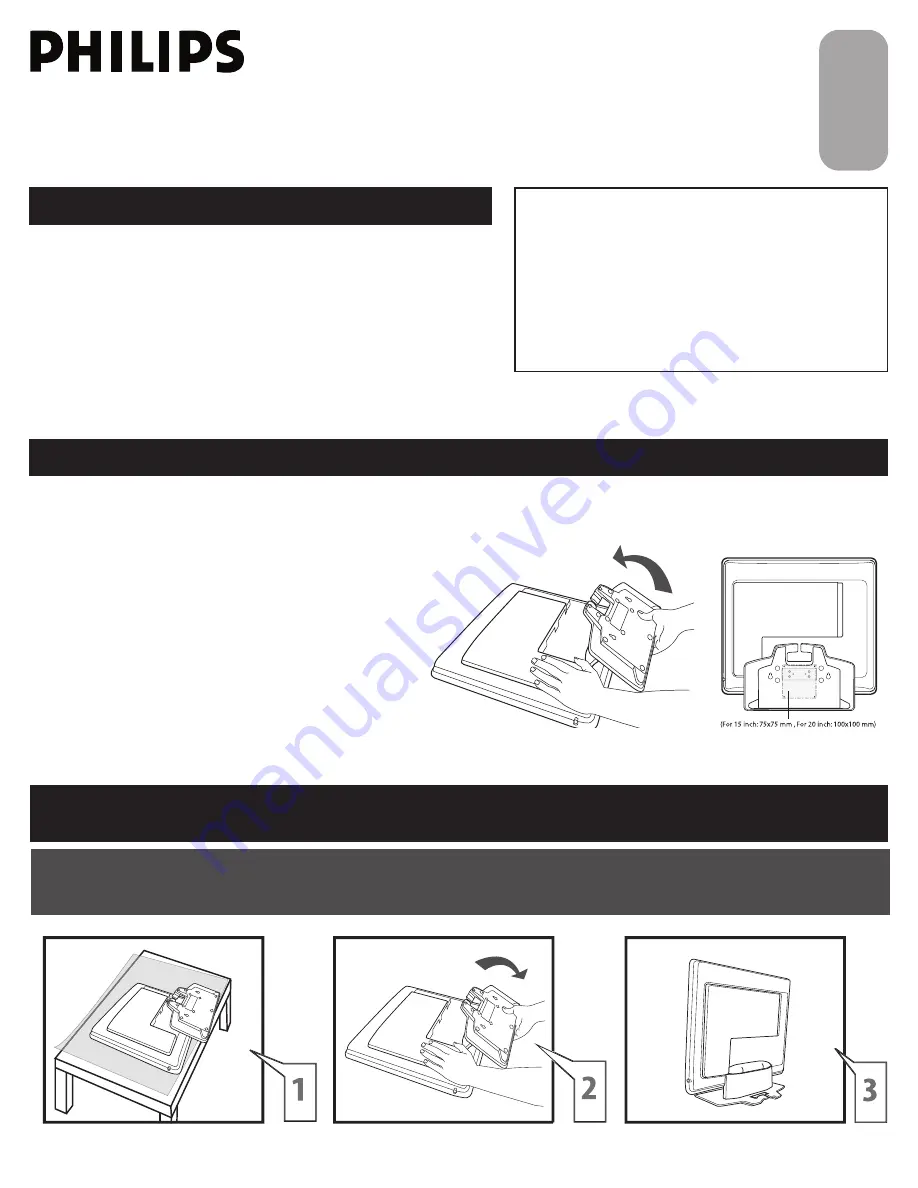
Expanding the base requires a degree of force; please use sufficient force to unfold the base. 
When unfolding the base, place the TV on a flat, sturdy surface before expanding the base.

U

NFOLD


THE

 B

ASE

Quick Use and Hookup Guide

Quick Use and Hookup Guide

C

ONTENTS

IMPORTANT

NOTE: This quick setup guide is used with several 

different LCD TV models. Not all features (and drawings) 

discussed in this manual will necessarily match those 

found with your LCD TV set. This is normal and does not 

require that you contact your dealer or request service.

WARNING: TO PREVENT FIRE OR SHOCK HAZARD 
DO NOT EXPOSE THIS UNIT TO RAIN OR EXCESSIVE.

I

NSTALLING

 LCD TV 

ON

 T

HE

 W

ALL

 . . 1

U

NFOLD


THE

 B

ASE

. . . . . . . . . . . . . . .  1

TV C

HANNEL

 I

NSTALLATION

 . . . . . . . . 2

P

RESENTATION


OF


THE

 LCD TV . . . . . 2

A

CCESSORIES

. . . . . . . . . . . . . . . . . . . . 3

B

ATTERY

 I

NSTALLATION

 . . . . . . . . . . . . 3

R

EMOTE

 C

ONTROL

 O

PERATION

 . . . . . . 3

A

NTENNA

 TV . . . . . . . . . . . . . . . . . .  4

B

ASIC

 C

ABLE

 TV C

ONNECTION

 . . . . .  4 

T

UNER

 M

ODE

 C

ONTROL

 . . . . . . . . . . . . . 5

A

UTO

 P

ROGRAM

 (S

ETTING

 U

P


C

HANNELS

) . . . . . . . . . . . . . . . . . . . . 5

C

ABLE

 B

OX

 (

WITH

 RF I

N

/O

UTPUTS

) . . 6

C

ABLE

 B

OX

 (

WITH

 A

UDIO

/V

IDEO


O

UTPUTS

) . . . . . . . . . . . . . . . . . . . . . 6

S-V

IDEO

 C

ONNECTIONS

 . . . . . . . . . . . 7

C

OMPONENT

 (HD) C

ONNECTIONS

 . . . 7

PC (M

ONITOR

) I

NPUTS

 . . . . . . . . . . .  8

I

NSTALLING

 LCD TV 

ON

 T

HE

 W

ALL

The stand of your LCD TV complies with the VESA standard, if you intend to install the LCD TV on the wall, 
please consult a professional technician for proper installing. 

Wall Mounting of your LCD TV : 

Put your LCD TV set on a safe and fl at surface, then

fold the base backward.
Note: To fold the base requires a degree fo force.

Use for the TV set a Vesa compliant wall mount (not included).   
(For 15 inch: 75x75 mm , For 20 inch: 100x100 mm) 

Use for installation by a professional technician.

Note: The manufacture accepts no liability, ensure installation is 

done by a professional technician. 

1

2

3

E

n

gl

is

h

S

im

p

lif

ie

d

C

h

in

es

e

A

ra

b

ic

Summary of Contents for 20PF5120/93

Page 1: ...V 2 ACCESSORIES 3 BATTERY INSTALLATION 3 REMOTE CONTROL OPERATION 3 ANTENNA TV 4 BASIC CABLE TV CONNECTION 4 TUNER MODE CONTROL 5 AUTO PROGRAM SETTING UP CHANNELS 5 CABLE BOX WITH RF IN OUTPUTS 6 CABLE BOX WITH AUDIO VIDEO OUTPUTS 6 S VIDEO CONNECTIONS 7 COMPONENT HD CONNECTIONS 7 PC MONITOR INPUTS 8 INSTALLING LCDTV ON THE WALL The stand of your LCD TV complies with the VESA standard if you inten...

Page 2: ...Y MHZ MANUAL STORE CHANNEL SETTING LANGUAGE AUTO PROGRAM FACTORY RESET MANUAL STORE CHANNEL SETTING FACTORY RESET 2 3 4 1 3 5 1 Please follow these steps to install TV channels Select a TV source via AV button on your remote control Press the CURSOR RIGHT button to confirm Press MENU button on your remote control to open the onscreen menu Press CURSOR DOWN to move to INSTALL press CURSOR RIGHT on y...

Page 3: ...ursor Buttons Left Right Up Down Press these buttons to highlight select and adjust items on the TV s on screen menu Volume button Press to increase or decrease the sound level Number buttons Press the number buttons for direct access to the TV channels For a 2 digit channel enter the 2nd digit after enter 1st digit Information Button Press to see the current channel number on the TV screen Power ...

Page 4: ...IN AUDIO IN DVI HDCP PC ANALOG Your Cable TV input into your home may be a single 75 ohm cable or use a cable box decoder In either case the connection is very simple Follow the steps below to connect your cable signal to your new television Direct cable connections Connect the Cable TV signal to one end of the supplied L Adapter as shown and connect the other end of the adapter to the TV jack on ...

Page 5: ...ble TV signal must first be connected to your LCD TV HELPFUL HINT 5 You can also choose to tune your TV channels Manual tuning allows you to store each programme manually MANUAL STORE OF TV CHANNEL Press the MENU button on the remote control to show the onscreen menu Press the CURSOR DOWN button to highlight the INSTALL menu then press CURSOR RIGHT to enter Select the MANUAL STORE then press the CU...

Page 6: ...s of the Cable Box Connect the other end of that cable to the Audio jack on the side of the LCD TV Audio cables are usually marked with red and white and are available from Philips or electronics retailers The right audio jack is red and the left audio jack is white Match the cable colors to the jack colors Plug the DC adapter into the DC IN 16V jack on the LCD TV Plug the power cable into an outl...

Page 7: ...an provide you with better picture detail and clarity for the playback of accessory sources such as DBS digital broadcast satellite DVD digital video discs video games and VHS VCR video cassette recorder tapes than the normal antenna picture connections Connect an S Video cable to the S VIDEO jack of the other equipment DVD Player Camcorder etc and to the S VIDEO jack on the rear of the LCD TV Con...

Page 8: ...V can reproduce the computers audio out by an AUDIO ADAPTER to the Audio output jack on the computer if available while connecting the other ends of the Audio cables to the PC AUDIO Jacks on the bottom of the TV Plug the DC Adapter into the DC IN 16V jack on the LCD TV Plug the power cable into an outlet Turn on the LCD TV and PC Press the AV button until PC MODE appears on the screen 1 2 3 3 3 DV...

Reviews: