Perlegear PGPILFK1, Installation Instructions Manual
The Perlegear PGPILFK1 is an innovative product that enhances your home audio system. To ensure a hassle-free installation process, we provide a comprehensive Installation Instructions Manual that you can conveniently download for free from our website. Get the most out of your purchase with our user-friendly manual.
Share
Download


Reviews:
No comments
Related manuals for PGPILFK1

EGLF1
Brand: Echogear Pages: 36

CGR1
Brand: Clarke Pages: 4

RS-BASSO-L
Brand: Idea Pages: 3

LCT100S
Brand: peerless-AV Pages: 8

HIX-L
Brand: ORION PLUS Pages: 8

LIZANNE SINGLE
Brand: ETC Pages: 3

PM 47
Brand: PEERLESS Pages: 4

Gale Force Stand
Brand: Dry Air Pages: 2

0-65857-15049-0
Brand: Dorel Asia Pages: 11

RAVCB15
Brand: Vericom Pages: 20

BS64AI
Brand: Walker Edison Pages: 8

H-2953
Brand: U-Line Pages: 3
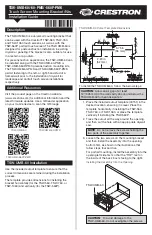
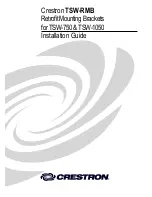
TSW-UMB-60
Brand: Crestron Pages: 2

TSW-UMB-70-BBI
Brand: Crestron Pages: 3

TSW-560-TTK
Brand: Crestron Pages: 2
TSW-RMB
Brand: Crestron Pages: 16

SCETASBN
Brand: CONEN Pages: 6

ASB15
Brand: arkitect Pages: 10


