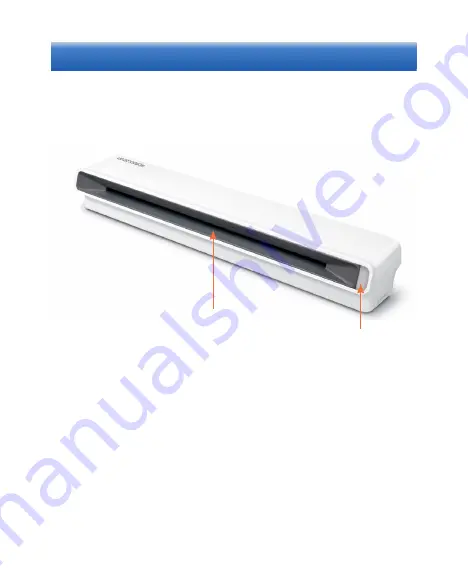
background image

1. Introduction

Feed Paper Here

Scan status light

1.1 Hardware Introduction 

8

 Scan Directions 

Whether the scanner is lain on the table or mounted on the wall, 

please follow the scan directions below to feed the paper into the 
scanner. 


1. Put the paper face-down.
2. Align the paper to the right side of the scanner slot. 
3. Feed the front of the paper first.

Summary of Contents for WorldocScan 410

Page 1: ... 8 Scan Directions Whether the scanner is lain on the table or mounted on the wall please follow the scan directions below to feed the paper into the scanner 1 Put the paper face down 2 Align the paper to the right side of the scanner slot 3 Feed the front of the paper first ...

Page 2: ...attached on metal objects such as cubicle partition and the like The magnet is removable If you want to scanner simply lain on the table please gently lift the edge of the magnet to remove the magnet from the scanner as the arrows pointing out in the diagram below Note Do not lift the center of the magnet as this will damage the magnet ...

Page 3: ...on wizard on the screen Please click Next and follow the instructions to install WorldocScan X 4 When the installation is completed click Finish to exit and restart the computer 1 3 Connect Hardware After installation please re plug the scanner into the USB port of your computer Note If the scanner is not working properly or not recognized by the computer please connect the scanner to an extra pow...

Page 4: ...ce the blank side of the calibration sheet with face down in the scanner and then click the Calibrate button The scanner calibration will begin 3 Click the OK button when the calibration process is finished 2 Getting Started Tips 1 If you f ind the scans are consistently too dark or have poor color quality please go to the Settings menu and choose Calibrate Scanner to launch the calibration proces...

Page 5: ... so on 2 Menu File Edit View Mode Settings and Help 3 Current Category Show which category you are currently operating 4 Toolbar Scan Import Print E mail Sort Zoom In Out and Search 5 Switch View Mode Switch between Thumbnails Mode and List Mode 6 Status bar View the total number of f iles and scanner connection status 7 Files Pane Display f iles in the current targeted category here 3 Workspace O...

Page 6: ...le Page Scan button in the toolbar or choose File Scan Single Page Scan The scan guide appears to guide you through the scanning process Step 3 Choose the appropriate settings The basic settings are usually enough to create the scanned file you want However you can adjust More Settings if required Step 4 Once all settings have been set click on the Scan button to start scanning the document If you...

Page 7: ...p 6 Click Convert to generate the scan into a PDF BMP JPG or TIFF file depending on the file format you have chosen Step 7 Once the file is created it will be saved to the current targeted category and displayed on the screen for you to view and edit If you have not specify a file name for this file the file name will be the creation date by default You can rename the file name later ...

Page 8: ... files into WorldocScan X Step1 Choose File Import File Step2 Choose the file that you wish to import into WorldocScan X The files will be imported into WorldocScan X immediately You can assign these files into any category rename these files or so on ...

Page 9: ...xcel button on the toolbar Please refer to Section 5 2 in the user manual for how to Convert to Word Excel files 6 Convert Files 7 Search for Files WorldocScan X provides many ways to help you find the files quickly Sorting Click the Sort button in the toolbar to sort the files by file name size type or creation date so that you can quick pick out the files you want Keyword Search WorldocScan X pr...

Page 10: ...ile information including note annota tions file size file page creation date and so on Email Files Select the files and click the Email button in the toolbar Your email programs opens and the selected files are attached to an email message Print Files Select the file that you want to print out and click the Print button in the toolbar or right click this file and select Print from the menu This f...

Reviews: