PELI
TM
INSTRUCTION MANUAL
THE WORLD’S BRIGHTEST COMPACT
XENON TORCH --- BUILT FOR POLICE,
MILITARY, SECURITY FORCES, EMERGENCY
SERVICES AND OTHER PROFESSIONALS.
INTRODUCTION
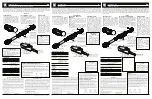
This compact torch produces an ultra bright
light beam by using a Xenon bulb powered
by (2) two 3 volt CR-123A lithium batteries.
The M6 torch is designed for easy use with
one hand operation and has a dual-switch
mode for constant-on and momentary-on.
The M6 torch body is made by high precision
CNC machines from aircraft-grade aluminum
alloy for the most durable construction.
The M6 torch is water resistant.
TO INSERT BATTERIES
1.
Remove the tail cap by turning
counter-clockwise.
2.
Install (2) two CR-123A lithium batteries
with + terminal facing to the head assembly.
3.
Replace the tail cap onto the torch by
turning clockwise.
OPERATION
1.
CONSTANT-ON ---- Turn the tail cap
clockwise until light is ON.
2.
LIGHT-OFF ---- Turn the tail cap counter-
clockwise slightly until the light is OFF.
3.
MOMENTARY ---- Turn the tail cap so that
the torch turns off. Rotate the tail cap an
additional 45˚ to place the tail cap in the
momentary operation zone. Depress the
rubber button switch on the rear of the tail
cap to light and take your finger off the
switch to turn off.
STORING
If the M6 torch will not be used for a long period
of time, turn the tail cap counter-clockwise until
the rubber push-button switch does not function.
LAMP MODULE REPLACEMENT
1.
Be sure the tail cap is turned to the
OFF position.
2.
Grip the faceted head with one hand
and unscrew the circular lens bezel
with the other hand.
3.
Remove the old lamp module and
insert the new assembly.
4.
Replace the circular bezel and tighten.
5.
Check to ensure that the faceted head is
screwed down tight.
TO CHANGE BATTERIES
1.
Remove the tail cap by turning
counter-clockwise until it comes off
the rear of the M6 torch.
2.
Remove the (2) two used batteries
from the M6 torch.
3.
Install the (2) two new CR123A or DL-123A
with + terminal facing to the head assembly.
4.
Replace the tail cap by turning clockwise.
GENERAL CARE AND MAINTENANCE
1.
Clean o-rings with a soft clean cloth to insure
that sealing area is free of dirt that will
destroy the o-ring seal.
2.
Apply a light coat of clear silicone grease
on the o-rings occasionally if turning action
becomes too difficult.
3.
Remove the tail cap and wipe the rear threads
of the M6 torch body and inside of the tail
cap with a soft clean cloth occasionally to
avoid intermittent torch operation.
M6 2320
All trademarks and logos displayed herein are registered and
unregistered Trademarks of Peli Products, S.A. or Pelican Products, Inc.
UNCONDITIONAL GUARANTEE
GARANTIA INCONDICIONAL
GARANTIE INCONDITIONELLE
BEDINGUNGSLOSE QUALITäTSGARANTIE
PELI
TM
PRODUCTS USA
23215 Early Ave. • Torrance, CA 90505 • 310.326.4700 • FAX 310.326.3311
c/ Casp, 33-B Pral. • 08010 • Barcelona, Spain
Tel (+34) 93.467.4999 • FAX (+34) 93.487.7393 • www.peli.com
AUSWECHSELN DER BATTERIEN
1.
Die untere Kappe durch Drehen gegen den
Uhrzeigersinn lösen und vom unteren Ende
der M6-Taschenlampe entfernen.
2.
Die zwei (2) verbrauchten Batterien aus der
M6-Taschenlampe entfernen.
3.
Die zwei(2) neuen CR123A- oder DL-123A-
Batterien einlegen, wobei das + Zeichen
zum Kopf der Taschenlampe weist.
4.
Die untere Kappe durch Drehen im
Uhrzeigersinn wieder aufsetzen.
ALLGEMEINE PFLEGE
UND WARTUNG
1.
Die O-Ringe und die Rillen der O-Ringe mit
einem weichen, sauberen Tuch reinigen, um
sicherzustellen, dass an der Dichtungsfläche
keine Schmutzreste zurückbleiben, die den
O-Ring beschädigen.
2.
Die O-Ringe gelegentlich mit etwas klarem
Silikonfett einschmieren, wenn sich die
Drehverbindungen nur schwer lösen und
festschrauben lassen.
3.
Die Endkappe abnehmen und die hinteren
Gewindegänge des M6 Taschenlampen
gehäuses sowie die Endkappe innen gele-
gentlich mit einem weichen, sauberen Tuch
reinigen, um intermittierendes Leuchten der
Taschenlampe zu verhindern.
WARNUNG
Es besteht die Gefahr, dass Lithium-Batterien
explodieren, wenn diese kurzgeschlossen, ausein-
andergenommen, wiederaufgeladen, ins Feuer
geworfen oder hohen Temperaturen ausgesetzt
werden. Bitte mit Vorsicht handhaben.
VORSICHT
Die Batterie herausnehmen oder die Endkappe
gegen die Uhrzeigerrichtung drehen, bis der
Gummidruckschalter nichtfunktioniert, um zu
verhindern, dass die M6-Taschenlampe bei der
Aufbewahrung versehentlich eingeschaltet wird.
Wenn die M6-Taschenlampe eingeschaltet wird,
während sie sich in einem Behälter befindet,
besteht die Gefahr, dass die Taschenlampe
überhitzt und durch die Eigenhitze beschädigt
wird oder umgebendes Material beschädigt.
RÜCKSENDUNGEN UNTER
PRODUKTGARANTIE
Für Auskünfte zur Rücksendung von Produkten,
die von der Garantie abgedeckt sind, wenden Sie
sich bitte an die Vertretung oder den Fachhändler
in Ihrer Nähe.
TECHNISCHE DATEN
BIRNE:
Xenon
BATTERIELEBENSDAUER:
1 Stunde
BATTERIE:
Zwei (2) 3-Volt
CR-123A, DL-123A
oder gleichwertige
Lithium-Batterien
Für Auskünfte zum Erwerb von Zubehör für
Peli-Produkte wenden Sie sich bitte an Ihren
Fachhändler.
ERSATZTEILE
BIESTELL-NR.
BESCHREIBUNG
2324
Lamp Module
ENGLISH
WARNING
Lithium Batteries can explode or cause burns
if shorted, disassembled, recharged or exposed
to fire or high temperatures. Please handle
with care.
CAUTION
To prevent the M6 torch coming on acciden-
tally when the torch is stored, remove the
battery or turn the tail cap counter-clockwise
until the rubber push button switch does not
function. If the M6 torch is turned on while it
is in a container, the torch can overheat and
damage the torch or the material of the sur-
rounding area.
WARRANTY RETURN POLICY
Please contact your local distributor or
retailer for information on how to handle
your warranty items.
SPECIFICATIONS
BULB:
Xenon
BATTERY LIFE:
1 hour
BATTERY:
(2) Two 3 volt CR-123A,
DL-123A or other equivalent
lithium batteries
Please contact your local retailer on how to
obtain accessories for all Peli Products.
REPLACEMENT PARTS
CAT. #
DESCRIPTION
2324
Lamp Module
M6 2320
MANUAL DE INSTRUCCIONES
PARA LA LINTERNA M6
LA LINTERNA COMPACTA DE XENÓN
MÁS BRILLANTE DEL MUNDO, HECHA
PARA FUERZAS DE POLICÍA, MILITARES,
DE SEGURIDAD, SERVICIOS DE
EMERGENCIA Y OTROS PROFESIONALES.
INTRODUCCIÓN
Esta linterna compacta produce un haz de luz
ultrabrillante, usando una bombilla de xenón
iluminada por (2) dos pilas de litio CR-123A de
3 voltios. La linterna M6 está diseñada para el
uso fácil, haciéndola funcionar con una sola
mano, y tiene un modo de interruptor doble
para encendido constante y encendido momen-
táneo. El bastidor de la linterna M6 fue hecho
por máquinas CNC de alta precisión, utilizando
una aleación de aluminio del tipo para aviones
a fin de dar la construcción más duradera. La
linterna M6 es resistente al agua.
PARA PONER LAS PILAS
1.
Quite la tapa trasera girando en sentido
contrario a las agujas del reloj.
2.
Instale (2) dos pilas de litio CR-123A
con su te dando hacia el
ensamblaje del cabezal.
3.
Vuelva a poner la tapa trasera en la
linterna, girando en el sentido de las
agujas del reloj.
FUNCIONAMIENTO
1.
ENCENDIDO CONSTANTE Dé vuelta a la tapa
trasera, girando hacia el sentido de
las agujas del reloj, hasta que la luz esté
ENCENDIDA.
2.
LUZ APAGADA Dé vuelta a la tapa trasera,
girando levemente hacia el sentido
contrario a las agujas el reloj, hasta
que la luz esté APAGADA.
3.
MOMENTÁNEA- Haga girar la tapa posterior
para que se apague la linterna. Haga girar la
tapa posterior 45º adicionales hasta que la
tapa quede en la zona de operación
momentánea. Apriete el interruptor en
forma de botón de caucho en la parte
trasera de la tapa posterior para encenderla
y quite el dedo del interruptor para apagarla.
Cat. #2320
ESPAñOL