ASSEMBLY INSTRUCTION
ITEM CODE: CS62671
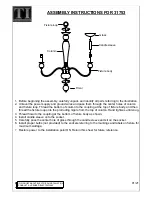
2 seat outdoor swing
For any assistance with assembly or for missing parts please Contact with us
Email: [email protected]
Web: www.lhgst.com
Adress:NO.99 South Heyang Road,Dayang Street, Linhai,zhejiang,China
Page 1
Summary of Contents for CS62671
Page 3: ...PARTS LIST Page 3 ...
Page 13: ...Assembly is complete Page 13 ...
Page 14: ...Page 14 ...