5115 Hadley Ave. N., St. Paul, MN 55128 (USA) www.parktool.com
PARK TOOL CO.
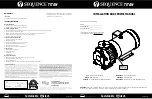
DT-5.2 Disc Brake Mount Facing Set
The Park Tool DT-5.2 Disc Brake Mount Facing Set is a precision tool system
engineered and built to machine frame and fork disc brake mounts so they
are precisely aligned to the brake rotor.
• Faces any IS Mount, Post Mount or Flat Mount, including low clearance,
chainstay mounts
• Telescoping axle adapters allow use with any configuration of open or
thru axle dropouts and dropout widths
• Use of the DT-5.2 helps ensure proper disc brake setup and performance
INSTRUCTIONS:
Read instructions completely before using the DT-5.2 Disc Brake
Mount Facing Set. Contact the frame/ fork manufacturer for specific
recommendations, cautions, or warranty issues before facing disc brake
mounts. Video instructions for using the DT-5.2 can be found at www.
parktool.com.
Always wear safety glasses when using the DT-5.2.
NOTES:
The DT-5.2 is precision tool and should be used and stored with care.
Components should be kept clean and the cutter should be wiped with an oily
cloth or rust inhibitor after use. Store the DT-5.2 in its original packaging or in
another safe location.
The DT-5.2 ’s cutter should be periodically replaced or sharpened by a
qualified technician. Park Tool offers a sharpening service that returns
cutters to factory specifications. For more information: www.parktool.com.
Facing Disc Brake IS Mounts
A. Determine axle type, axle size and dropout width of frame/fork. Assemble
DT-5.2 as shown. Using pinch bolt in axle collar (#29), adjust axle width to
match the width of the frame or fork.
B. Install axle of assembled DT-5.2 securely into frame or fork dropouts.
C. Loosen pivot bolt (#6) then slide, pivot and rotate arm (#10) as needed to
insert pilot of cutter into hole on lower mount. Tighten pivot bolt to lock
position.
D. Install knob (#9) on arm (#10). Turn knob clockwise while applying hand
pressure to face lower mount. Use appropriate cutting fluid (such as Park
Tool CF-2 Cutting Fluid) and cut only the minimum necessary for a flat
mounting surface. NOTE: For speed, a ratcheting wrench with an 8mm
hex bit or a Park Tool PH-8 Hex Wrench can be used to turn the knob.
E. With teeth of cutter contacting face of lower mount, move stop collar
(#3) until it contacts slider (#11). Tighten pinch bolt in stop collar to lock
position. This sets the height of the cutter and prevents further cutting.
F. Move arm (#10) and slider (#11) on axle to pull cutter from lower mount.
G. Slightly loosen pivot bolt (#6). Slide, pivot and rotate arm (#10) as needed
to insert pilot of cutter into hole on upper mount. Tighten pivot bolt to lock
position.
H. Note position of teeth on cutter.If teeth of cutter contact the upper
mount and there is a gap between the stop collar (#3) and the slider (#11),
complete step I and stop.If stop collar (#3) contacts slider (#11) before
teeth of cutter contact the upper mount, skip step I and go straight to
steps J through N.
I. Turn knob (#9) clockwise while applying hand pressure to face surface of
upper mount. Continue facing mount until stop collar (#3) contacts slider
(#11). The facing process is complete. Remove DT-5.2 from frame/fork.
J. Loosen pinch bolt in stop collar (#3).
K. Turn knob (#9) clockwise while applying hand pressure to face surface of
upper mount.
L. With teeth of cutter contacting face of upper mount, move stop collar (#3)
until it contacts slider (#11). Tighten pinch bolt in stop collar to
lock position.
M. Slightly loosen pivot bolt (#6). Slide, pivot and rotate arm (#10) as needed
to insert pilot of cutter into hole on lower mount. Tighten pivot bolt
to lock position.
N. Turn knob (#9) clockwise while applying hand pressure to face surface
of lower mount. Continue facing mount until collar contacts slider. The
facing process is complete. Remove DT-5.2 from frame/fork.
Facing Disc Brake Post Mounts and Post Mount Adaptors
(mounted to IS mounts)
A. Determine axle type, axle size and dropout width of frame/fork. Assemble
DT-5.2 as shown. Using pinch bolt in axle collar (#29), adjust axle width to
match the width of the frame or fork.
B. Install axle of assembled DT-5.2 securely into frame or fork dropouts.
C. Loosen pivot bolt (#6), pinch bolt in body (#1) and pinch bolt in stop collar
(#3) just enough to allow parts to slide, pivot and rotate.
D. Adjust arm (#8) so the two “wings” simultaneously contact the two
mounts. Tighten pivot bolt (#6) to lock position. Then tighten pinch bolt in
body (#1) to lock position.
E. Install knob (#9) on arm (#8).
F. Loosen pivot bolt (#6) and lift arm (#8) and slider (#11) on shaft (#2). Then
pivot and rotate as needed to insert 5mm pilot (#28) into hole on lower
mount. Tighten pivot bolt (#6) to lock position. Note: Two pilot bolts are
included with the DT-5.2—one with a 5mm pilot (#28) and one with a
4mm pilot (#26). When facing post mounts, the pilot bolt with the 5mm
pilot (#28) should be installed.
G. Turn knob clockwise while applying hand pressure to face mount. Use
appropriate cutting fluid (such as Park Tool CF-2 Cutting Fluid) and cut
only the minimum necessary for a flat mounting surface. NOTE: For
speed, a ratcheting wrench with an 8mm hex bit or a Park Tool PH-8 Hex
Wrench can be used to turn the knob.
H. With teeth of cutter contacting face of lower mount, move stop collar
(#3) until it contacts slider (#11). Tighten pinch bolt in stop collar to lock
position. This sets the height of the cutter and prevents further cutting.
I. Slightly loosen pivot bolt (#6). Lift arm (#8) and slider (#11) on shaft (#2)
then pivot and rotate as needed to insert pilot of cutter into hole on upper
mount. Tighten pivot bolt to lock position.
J. Note position of teeth on cutter.If teeth of cutter contact the upper
mount and there is a gap between the stop collar (#3) and the slider (#11),
complete step K and stop.If the stop collar (#3) contacts the slider (#11)
before teeth of the cutter contact the upper mount, skip step K and go
straight to steps L through P.
K. Turn knob (#9) clockwise while applying hand pressure to face surface of
upper mount. Continue facing mount until stop collar (#3) contacts slider
(#11). The facing process is complete. Remove DT-5.2 from frame/fork.
L. Loosen pinch bolt in stop collar (#3)
M. Turn knob (#9) clockwise while applying hand pressure to face surface of
upper mount.
N. With teeth of cutter contacting face of upper mount, move stop collar
(#3) until it contacts slider (#11). Tighten pinch bolt in stop collar to lock
position.
O. Slightly loosen pivot bolt (#6). Lift arm (#8) and slider (#11) on shaft (#2)
then pivot and rotate as needed to insert pilot of cutter into hole on lower
mount. Tighten pivot bolt to lock position.
P. Turn knob (#9) clockwise while applying hand pressure to face surface of
lower mount. Continue facing mount until stop collar (#3) contacts slider
(#11). The facing process is complete. Remove DT-5.2 from frame/fork.
DT-5.2
Instructions