Parkinson Cowan Renown RG55GL, Operating And Installation Instructions
The Parkinson Cowan Renown RG55GL gas cooker is a top-of-the-line appliance for your kitchen. Ensure optimal performance by downloading the Owner's and Installation Manual for free from our website. This comprehensive manual will guide you through the setup and maintenance of your cooker for years to come.
Share
Download


Reviews:
No comments
Related manuals for Renown RG55GL

ProQ
Brand: Mac's BBQ Pages: 12

G760AX1-246148
Brand: Gorenje Pages: 16

HT45F0058
Brand: Holtek Pages: 19

Cucina GCJB-2011
Brand: Giani Pages: 7

NP-KAC10
Brand: Zojirushi Pages: 13

10548
Brand: Louisiana Grills Pages: 128

Preference SGM466
Brand: Dacor Pages: 20

SIC001
Brand: Salton Pages: 18

33567T
Brand: Hamilton Beach Pages: 48

Classic FX 90 Induction
Brand: Falcon Pages: 48

IO-HOB-1174
Brand: Fagor Pages: 60
FEC30C4HS
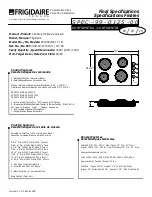
Brand: Frigidaire Pages: 2
FEC30S6AB - on 30" Smoothtop Electric Cooktop
Brand: Frigidaire Pages: 2

FEC30C4AB - Frig 30 Electric Cooktop
Brand: Frigidaire Pages: 1

FEC30S6ABA
Brand: Frigidaire Pages: 6

FEC30C4ACB
Brand: Frigidaire Pages: 6

FEC30S6A
Brand: Frigidaire Pages: 7

FEC30C4ABE
Brand: Frigidaire Pages: 20


