background image

6210 Bridge and

6211 Bridge/Router

User’s Guide

Document No. 6210-A2-GB23-00

January 2005

Summary of Contents for Hotwire 6210

Page 1: ...6210 Bridge and 6211 Bridge Router User s Guide Document No 6210 A2 GB23 00 January 2005 ...

Page 2: ...ocumentation training distributor locations or Paradyne worldwide office locations use one of the following methods Internet Visit the Paradyne World Wide Web site at www paradyne com Be sure to register your warranty at www paradyne com warranty Telephone Call our automated system to receive current information by fax or to speak with a company representative Within the U S A call 1 800 870 2221 ...

Page 3: ... this product must be provided by one of the following 1 a UL Listed CSA certified power source with a Class 2 or Limited Power Source LPS output for use in North America or 2 a certified transformer with a Safety Extra Low Voltage SELV output having a maximum of 240 VA available for use in the country of installation 9 In addition since the equipment is to be used with telecommunications circuits...

Page 4: ...d with this product It has been designed to be connected to a compatible modular jack that is also compliant The Ringer Equivalence Number or REN is used to determine the number of devices that may be connected to a telephone line Excessive RENs on a telephone line may result in the devices not ringing in response to an incoming call In most but not all areas the sum of RENs should not exceed five...

Page 5: ...irmed by the registration number The abbreviation IC before the registration number signifies that registration was performed based on a Declaration of Conformity indicating that Industry Canada technical specifications were met It does not imply that Industry Canada approved the equipment NOTICE The Ringer Equivalence Number REN for this terminal equipment is labeled on the equipment The REN assi...

Page 6: ...the standard of the Voluntary Control Council for Interference from Information Technology Equipment VCCI If this is used near a radio or television receiver in a domestic environment it may cause radio interference Install and use the equipment according to the instruction manual ...

Page 7: ...Panel 1 3 Packing List 1 4 2 Hardware Installation and PC Setup Overview 2 1 Connecting the Hardware 2 1 Configuring Your PC 2 3 Windows USB Driver Installation 2 3 Configuring Your PC s IP Address 2 6 Assigning an IP Address to your PC Automatically by DHCP 2 6 Windows XP 2 6 Windows 2000 2 8 Windows ME 2 9 Windows 95 98 2 10 Windows NT 4 0 2 11 3 Using the Web Interface Logging Into Your Modem 3...

Page 8: ... 17 Firewall NAT Services 3 18 Advanced 3 19 UPnP 6211 Only 3 19 SNTP 6211 Only 3 20 Port Forwarding 6211 Only 3 20 IP Filters 6211 Only 3 22 LAN Clients 6211 Only 3 23 LAN Isolation 3 23 Bridge Filters 3 24 Multicast 6211 Only 3 25 Static Routing 6211 Only 3 26 Dynamic Routing 6211 Only 3 27 Access Control 6211 Only 3 29 Log Out 3 29 Tools 3 30 System Commands 3 30 Remote Log 3 31 User Management...

Page 9: ...nts 6210 A2 GB23 00 January 2005 iii Status LED Continues to Blink 4 2 The Status Link LED is Always Off 4 2 A Terminology What is a Firewall A 1 What is NAT A 1 What is a DMZ A 1 What is a Router A 2 Index ...

Page 10: ...Contents iv January 2005 6210 A2 GB23 00 ...

Page 11: ...t Support Technical Manuals Technical Glossary Section Description Chapter 1 Introduction Describes the features of the modem Chapter 2 Hardware Installation and PC Setup Shows how to connect the modem and set up your PC to manage the modem Chapter 3 Using the Web Interface Explains how to use the web interface to configure and monitor the modem Chapter 4 Troubleshooting Contains tips on troublesh...

Page 12: ...oduct Related Documents Complete documentation for Paradyne products is available online at www paradyne com Select Support Technical Manuals To order a paper copy of a Paradyne document or to speak with a sales representative please call 1 727 530 2000 ...

Page 13: ...eam than it does for information going to the Internet from your PC upstream Both the 6210 and 6211 contain an ADSL2 modem so they often are referred to as modems in this manual Features of the 6210 Bridge and 6211 Bridge Router Your modem has the following features ADSL2 support 10 100BaseT Ethernet port USB port The ability to connect multiple PCs to the Internet with just one WAN IP Address whe...

Page 14: ...interface a web browser such as Internet Explorer Version 5 5 or later Ports and Buttons Back Panel POWER is where you connect the power supply RESET Button The RESET button is used to reset the modem to factory default settings Do not use the RESET button unless advised to by your service representative LAN Local Area Network port This is used to connect to Ethernet network devices such as a PC h...

Page 15: ...PP connection is established or the connection is not used Blinking a PPP connection is being attempted Solid green a PPP connection is established If the LED is flickering it is an indication of network activity LAN LED The LAN LED serves two purposes If the LED is continuously lit the Ethernet interface is successfully connected to a device through the LAN port If the LED is flickering it is an ...

Page 16: ...0 A2 GB23 00 Packing List Your modem is shipped with the following Power adapter Ethernet cable RJ45 straight through wiring Phone cable RJ11 USB cable CD ROM containing this manual and USB drivers 04 17511 USB LAN ACTIVITY STATUS POWER ...

Page 17: ...r phone jack 2 If you would like to use a phone in the vicinity of the modem connect it to the PHONE jack of the modem using the cord that came with your telephone The modem has an internal POTS filter so you do not need to install one here 3 Connect the USB port the LAN port or both If you are connecting the modem directly to a PC rather than to a LAN you can use either the USB port or the LAN po...

Page 18: ...r cable See the documentation for your hub or switch to be sure 4 Connect the cylindrical power plug into the POWER connector on the back of the device Next If you have a wall mount adapter plug the AC adapter into a wall outlet or a power strip If you have a table top adapter use the AC power cord to connect the adapter to a wall outlet or power strip The supplied power adapter may look different...

Page 19: ...s USB Driver Installation below If you used the USB cable on a PC running a Windows operation system install the provided USB driver Windows 95 and Windows NT 4 0 do not support USB without additional software not included with your modem If USB driver installation fails under those operating systems contact your service provider Windows USB Driver Installation As soon as you connect the USB cable...

Page 20: ...vers in the search where D is the letter you use for your CD drive Figure 2 3 Figure 2 3 New Hardware Installation Options 3 The Wizard will ask you to confirm the hardware installation Choose Continue Anyway Windows will then install the supplied USB driver on your PC Figure 2 4 and Figure 2 5 Figure 2 4 Hardware Installation Confirmation ...

Page 21: ...nstallation and PC Setup 6210 A2 GB23 00 January 2005 2 5 Figure 2 5 Hardware Installation 4 Click on Finish to close the Wizard at the completion page Figure 2 6 Figure 2 6 Completing the Found New Hardware Wizard ...

Page 22: ...automatically instead of Use the following IP address in the following procedures By default the LAN port IP address of the modem is 192 168 1 1 You can change this address or another address can be assigned by your ISP Windows XP To configure the IP address under Windows XP Procedure 1 In the Windows task bar click on the Start button and then click on Control Panel 2 Double click on the Network ...

Page 23: ...GB23 00 January 2005 2 7 4 Ensure that the check box to the left of the item labeled Internet Protocol TCP IP is checked and click on Properties Figure 2 7 Network Connections in Windows XP Figure 2 8 Local Area Connection Properties in Windows XP ...

Page 24: ...close the Control Panel Windows 2000 To configure the IP address under Windows 2000 Procedure 1 In the Windows task bar click on the Start button point to Settings and then select Control Panel 2 Double click on the Network and Dial up Connections icon 3 In the Network and Dial up Connections window right click on the Local Area Connection icon and then select Properties The Local Area Connection ...

Page 25: ...click in the radio button labeled Use the following IP address and type 192 168 1 x where x is any number between 2 and 254 in the IP Address field Type 255 255 255 0 in the Subnet Mask field 12 Click on OK twice to confirm and save your changes and then close the Control Panel Windows ME To configure the IP address under Windows ME Procedure 1 In the Windows task bar click on the Start button poi...

Page 26: ...he Windows task bar click on the Start button point to Settings and then click on Control Panel 2 Double click on the Network icon The Network dialog box is displayed with a list of currently installed network components If the list includes TCP IP the protocol has already been enabled in which case you can skip to Step 9 3 If TCP IP does not appear as an installed component click on Add The Selec...

Page 27: ...bled in which case you can skip to Step 9 4 If TCP IP does not appear as an installed component click on Add 5 In the Select Network Protocol dialog box select TCP IP and then click on OK You may be prompted to install files from your Windows NT installation CD or other media Follow the instructions to install the files After all files are installed a window displays to inform you that a TCP IP se...

Page 28: ...2 Hardware Installation and PC Setup 2 12 January 2005 6210 A2 GB23 00 ...

Page 29: ...er name is Admin and the password is Admin Both are case sensitive Note Before configuring your modem make sure you have followed the instructions in Chapter 2 Hardware Installation and PC Setup You should have your PCs configured for DHCP mode if your modem will be and have proxies disabled on your browser If you see a login redirection screen when you access the web interface verify that JavaScr...

Page 30: ...een you can configure the LAN and WAN connections configure the modem s security routing and filtering access debugging tools obtain the status of the modem and view the online help Figure 3 2 Home Page The footer displays modem status connection information and other useful information Click on Log Out to close the session or Refresh to update the status display ...

Page 31: ...ee a default WAN connection named WAN Bridge is already defined Local Area Network Connection On the other side of your modem are your own Local Area Network LAN connections This is where you plug in your local computers to the modem The modem can be configured to automatically provide all the PCs on your network with Internet addresses If you connected a PC rather than a hub or a switch directly ...

Page 32: ...L training mode default is MMODE If you use PPPoA or PPPoE you also need these values from your ISP Your username and password If you use multiprotocol encapsulation over ATM Adaptation Layer 5 as described in RFC 1483 you may need these values from your ISP Your DSL fixed Internet IP address Your subnet mask Your default gateway IP address Your primary DNS IP address Since multiple users can use ...

Page 33: ...ive your PPPoE connection a unique name The name must not have spaces and cannot begin with numbers 4 Select a PVC Sharing type of Disable Enable or VLAN 5 Select or enter a VPI and VCI as supplied by your DSL service provider or your ISP or click in Auto PVC Auto PVC causes the modem to perform automatic VPI VCI detection as defined in DSL forum TR 068 For VLAN specify a VLAN ID and priority 6 Se...

Page 34: ...server To ensure that the link is always active enter a zero in this field MTU The Maximum Transmission Unit the DSL connection can send It is a negotiated value The maximum specified value is 1500 although some DSL ISP providers require a larger value The minimum MTU value is 128 On Demand Enables on demand mode The connection will disconnect if no activity is detected after the specified idle ti...

Page 35: ... To configure the modem for PPPoA Procedure 1 Click on Setup and then click on New Connection The default PPPoE connection setup is displayed 2 At the Type field select PPPoA and the PPPoA connection setup page is displayed 3 Give your PPPoA connection a unique name The name must not have spaces and cannot begin with numbers 4 Select or enter a VPI and VCI as supplied by your DSL service provider ...

Page 36: ...nection from being shut down for inactivity by sending PPP LCP echoes to the PPP server To ensure that the link is always active enter a zero in this field MTU The Maximum Transmission Unit the DSL connection can send It is a negotiated value The maximum specified value is 1500 although some DSL ISP providers require a larger value The minimum MTU value is 128 On Demand Enables on demand mode The ...

Page 37: ... must not have spaces and cannot begin with numbers 4 Optionally enable Network Address Translation NAT and the Firewall options Firewall and NAT services must be enabled See Firewall NAT Services on page 3 18 5 Select a PVC Sharing type of Disable Enable or VLAN 6 Select or enter a VPI and VCI as supplied by your DSL service provider or your ISP or click in Auto PVC Auto PVC causes the modem to p...

Page 38: ...or to assignment To configure the modem for a DHCP connection Procedure 1 Click on Setup and then click on New Connection The default PPPoE connection setup is displayed 2 At the Type field select DHCP and the DHCP connection setup page is displayed 3 Give your DHCP connection a unique name The name must not have spaces and cannot begin with numbers 4 Select a PVC Sharing type of Disable Enable or...

Page 39: ...CDVT Cell Delay Variation Tolerance If your DSL line is connected and your DSL provider is supporting DHCP you can click on the Renew button and the CPE will retrieve an IP Address Subnet Mask and Default Gateway address At any time you can renew the DHCP address by clicking on the Renew button Figure 3 7 DHCP Connection Setup To complete the connection you must now click the Apply button The Appl...

Page 40: ...yed see Figure 3 8 3 Give your Bridge connection a unique name the name must not have spaces and cannot begin with numbers 4 Select a PVC Sharing type of Disable Enable or VLAN 5 Select or enter a VPI and VCI Your DSL service provider or your ISP will supply these For VLAN specify a VLAN ID and priority 6 Select the encapsulation type LLC or VC if you are not sure which to use just use the default...

Page 41: ...s are listed on the left by name If you delete a connection to make the change permanent Click on Tools at the top of the page and select System Commands At the System Commands page click on Save All Modem Setup To configure the DSL modulation type Procedure 1 From the Home screen click on Setup 2 Under WAN Setup select Modem Setup This will bring up the Modem Setup screen Leave the default values...

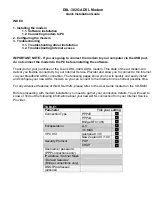
Page 42: ...3 Using the Web Interface 3 14 January 2005 6210 A2 GB23 00 Figure 3 9 Modem Setup ...

Page 43: ...may be removed from LAN Group 1 and added to LAN Group 2 for separate configuration Enable Disable DHCP By default the router has DHCP server LAN side disabled If you already have a DHCP server running on your network do not enable the router s DHCP server To enable DHCP Procedure 1 From the Home screen click on Setup 2 Under LAN Setup select LAN Configuration This will bring up the screen shown i...

Page 44: ... DHCP server runs out of DHCP addresses users will not get access to network resources Specify a Lease Time The Lease Time is the amount of time a network user will be allowed connection to the Router with their current dynamic IP address The amount of time is in units of seconds the default value is 3600 seconds 1 hour Note If you change the start or end values make sure the values are still with...

Page 45: ...Further remember that if you change your modem s IP address and you have DHCP enabled the DHCP configuration must reside within the same subnet The default gateway is the routing device used to forward all traffic that is not addressed to a station within the local subnet Your ISP will provide you with the default gateway address The Hostname can be any alphanumeric word beginning with a letter an...

Page 46: ...electing the Enable Firewall and NAT Services button the firewall and NAT services is disabled for all WAN connections Enabling Firewall NAT does not automatically apply it to connections Figure 3 12 Firewall NAT Services Screen The Apply button will temporarily save this setting To make the change permanent click on Tools at the top of the page and select System Commands At the System Commands pa...

Page 47: ...s one active DSL connection In the presence of multiple DSL connections select the one over which the incoming traffic will be present such as the default Internet connection To enable UPnP you must first have a WAN connection configured Once a WAN connection is configured Procedure 1 From the Home screen click on Advanced and under Advanced select UPnP The UPnP screen appears 2 Enable UPnP and th...

Page 48: ...ng page you can provide local services such as web hosting for people on the Internet When users send this type of request to your network via the Internet the modem will forward those requests to the appropriate PC Port forwarding can be used with DHCP assigned addresses but remember that a DHCP address is dynamic If you were configuring a Netmeeting server for example you would want to assign th...

Page 49: ... screen click on Advanced and under Advanced select Port Forwarding First select the IP address for your Netmeeting server Next select the Audio Video category and add Netmeeting to the Applied Rules box To view the management rules highlight Netmeeting and select view This will display the preconfigured protocols and ports that Netmeeting will use Now you can run Netmeeting from your server and c...

Page 50: ...lect the LAN Group from the drop down list that these changes will apply to 3 Select a LAN IP address from the LAN IP drop down list Click on New IP to add a new IP address to the list 4 Select available rules from the list or click on Custom IP Filters to create a new rule 5 Click on Apply The Apply button will temporarily save these settings To make the change permanent click on Tools and select...

Page 51: ...warding rules to this IP address 3 The Apply button will temporarily save these settings To make the change permanent click on Tools and select System Commands On the System Commands page click on Save All Figure 3 17 LAN Clients LAN Isolation Use the LAN Isolation screen to prohibit traffic between two LANs Procedure 1 From the Home screen click on Advanced and under Advanced select LAN Isolation...

Page 52: ...lters screen appears as shown in Figure 3 19 Bridge Filters The User Interface for Bridge Filter allows the user to add edit and delete as well as enable the filter rules To add rules define the source MAC address destination MAC address and frame type with the desired filtering action allow or deny and click on the Add button The MAC address must be in a xx xx xx xx xx xx format with 00 00 00 00 ...

Page 53: ...frames through the system The second rule allows all IPv4 frames with the destination MAC address of the modem to go through The third rule allows all IPv4 frames with the source MAC address of the modem to go through The Apply button will temporarily save these settings To make the change permanent click on Tools at the top of the page and select System Commands At the System Commands page click ...

Page 54: ...low different IP domain users to access the Internet through the modem To enable Static Routing Procedure 1 From the Home screen click on Advanced 2 Under Advanced select Static Routing 3 Specify the New Destination IP This is the address of the remote LAN network or host to which you want to assign a static route Enter the IP address of the host for which you wish to create a static route here Fo...

Page 55: ... protocol regularly broadcasts routing information to other routers on the network To enable Dynamic Routing Procedure 1 From the Home screen click on Advanced 2 Under Advanced select Dynamic Routing 3 Specify the Protocol The protocol is dependent upon the entire network Most networks support RIP v1 If RIP v1 is selected routing data will be sent in RIP v1 format If RIP v2 is selected routing dat...

Page 56: ...8 January 2005 6210 A2 GB23 00 5 The Apply button will temporarily save these settings To make the change permanent click on Tools and select System Commands On the System Commands page click on Save All Figure 3 22 Dynamic Routing ...

Page 57: ...onnection To enable any of the Access Control features Procedure 1 From the Home screen click on Advanced 2 Under Advanced select Access Control The Access Control screen appears All Access Control rules have precedence over rules that were added via the Port Forwarding page 3 The Apply button will temporarily save these settings To make the change permanent click on Tools and select System Comman...

Page 58: ...ation of the modem If you do restart the system without saving your configuration the CPE will revert back to the previously saved configuration Restart Use this button to restart the system If you have not saved your configurations the modem will revert to the previously saved configuration upon restarting Connectivity to the unit will be lost You can reconnect after the unit reboots Restore Defa...

Page 59: ...fy that the Debug box is checked on the PPPoA or PPPoE Connection Setup screen Table 3 1 defines the different severity levels To forward logging information click on Tools and select Remote Log Table 3 1 Severity Levels Severity Level Description Panic System panic or other condition that causes the modem to stop functioning Alert Conditions that require immediate correction such as a corrupted s...

Page 60: ...eout determines after how many minutes of inactivity the web interface is logged off The Apply button will temporarily save these settings To make the change permanent click on Tools at the top of the page and select System Commands At the System Commands page click on Save All If you forget your password you can press and hold the reset to factory defaults button for 10 seconds The modem will be ...

Page 61: ...se and find the firmware file to download Make sure this is the correct file 3 Click on upgrade firmware Once the upgrade is complete the CPE will reboot You will need to log back onto the CPE after the firmware upgrade is complete The firmware upgrade should take less that 5 minutes to complete If it takes longer than 5 minutes something has gone wrong Caution Do not remove power from the modem d...

Page 62: ...e the proper protocols configured you should be able to access the Internet To run a ping test Procedure 1 From the Home screen under the Tools title click on Ping Test 2 Specify the target IP Address that you want to ping Optionally specify Packet size Valid values are 36 to 65507 Number of echo requests Valid values are 1 to 9 3 Click on Test By default when you select ping test the router will ...

Page 63: ...end and segment tests The test may take a few seconds to complete To perform the test select your connection from the list select a Test Type and click on the Test button Before running this test make sure you have a valid DSL link if the DSL link is not connected this test will always fail Also the DSLAM must support this feature Not all DSLAMs have OAM F4 and F5 support Figure 3 28 Modem Test ...

Page 64: ...the Statistics of different interfaces Ethernet USB and DSL Figure 3 29 Network Statistics Connection Status Select to view the Status of different connections DHCP Clients Select to view the list of DHCP clients Modem Status Select to view the Status and Statistics of your broadband DSL connection Product Information Select to view the modem s driver and run time information as shown in Figure 3 ...

Page 65: ...GB23 00 January 2005 3 37 Figure 3 30 Product Information System Log Select to view all logged information Depending upon the severity level this logged information will generate log reports to a remote host if remote logging is enabled ...

Page 66: ...3 Using the Web Interface 3 38 January 2005 6210 A2 GB23 00 ...

Page 67: ... your protocols are configured correctly you should be able to ping the ISP s network If you cannot ping the ISP s network make sure you are using the correct protocols with the correct VPI VCI values 8 Make sure NAT is enabled if you are using private addresses on the LAN ports You Cannot Connect to the Modem 1 Check to see that the POWER LED is green and that the network cables are installed cor...

Page 68: ...re too far away from the central office Contact your DSL service provider for further assistance The Status Link LED is Always Off 1 Make sure you have DSL service You should receive notification from your ISP that DSL service is installed You can usually tell if the service is installed by listening to the phone line you will hear some high pitched noise If you do not hear high pitched noise cont...

Page 69: ...et with However you may have several machines on your local network that want to access the Internet at the same time The modem provides NAT functionality that converts your local network addresses to the single network address provided by your ISP It keeps track of all these connections and makes sure that the correct information gets to the correct local machine Occasionally there are certain pr...

Page 70: ...tation solves the problem of supporting a large number of stations but introduces the problem of getting traffic from one subnet to another To accomplish this devices called routers are placed between segments If a machine wishes to contact another device on the same segment it transmits to that station directly using a simple discovery technique If the target station does not exist on the same se...

Page 71: ...A 1 DoC D Document Feedback A Purpose and Intended Audience v Summary v Driver Installation 2 3 DSL Link LED Always Off 4 2 Continues to Blink 4 2 Dynamic Routing 3 27 E EMI Notice Canada D Japan E end to end test 3 35 F FCC Part 15 Declaration B Features 1 1 Filters IP 3 22 Firewall Enabling 3 18 Explained A 1 Firewall NAT Services 3 18 Firmware Upgrade 3 33 Found New Hardware Wizard 2 3 H Hardwa...

Page 72: ...ct Related Documents vi PVC Support 1 2 R Remote Log 3 31 Requirements 1 2 Reset Button 1 2 Router 1 1 Routing Dynamic 3 27 Static 3 26 S Saving changes 3 3 segment test 3 35 Setup 3 3 Severity Levels 3 31 Shipping List 1 3 Simple Network Time Protocol 3 20 SNMP 3 20 SNTP 3 20 Static Connection Setup 3 9 Routing 3 26 Status 3 36 LED 1 3 Supplier s Declaration of Conformity D System Commands 3 30 R...

Reviews: