Panasonic TX-47P950A, Operating Instructions Manual
The Panasonic TX-47P950A, a high-quality television, offers an exceptional viewing experience. To enhance your user experience, we provide an Operating Instructions Manual that you can easily download for free from our website. Ensure seamless setup and utilization of all features with our comprehensive manual.
Share
Download


Reviews:
No comments
Related manuals for TX-47P950A
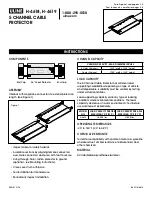
H-4618
Brand: U-Line Pages: 6

GMRAVPB301
Brand: Radiola Pages: 51

REFLECTION CL-510
Brand: Runco Pages: 36

SCR-10IN-LCD-1080P-12V
Brand: Larson Electronics Pages: 2

Buffalo Pro U7
Brand: Yaber Pages: 29

TW695UT-3D
Brand: Optoma Pages: 2

LH890USTD
Brand: BenQ Pages: 75

P1200 Series
Brand: Acer Pages: 75

EB-1970W
Brand: Epson Pages: 200

EB-1830
Brand: Epson Pages: 159

EB-1780W
Brand: Epson Pages: 183

EB-2040
Brand: Epson Pages: 217

EB-1930
Brand: Epson Pages: 146

EB-1965
Brand: Epson Pages: 2

PT-AX200
Brand: Panasonic Pages: 4

PT-AX100
Brand: Panasonic Pages: 7

PT-AX100U
Brand: Panasonic Pages: 12

PT-AX100E
Brand: Panasonic Pages: 12


