background image

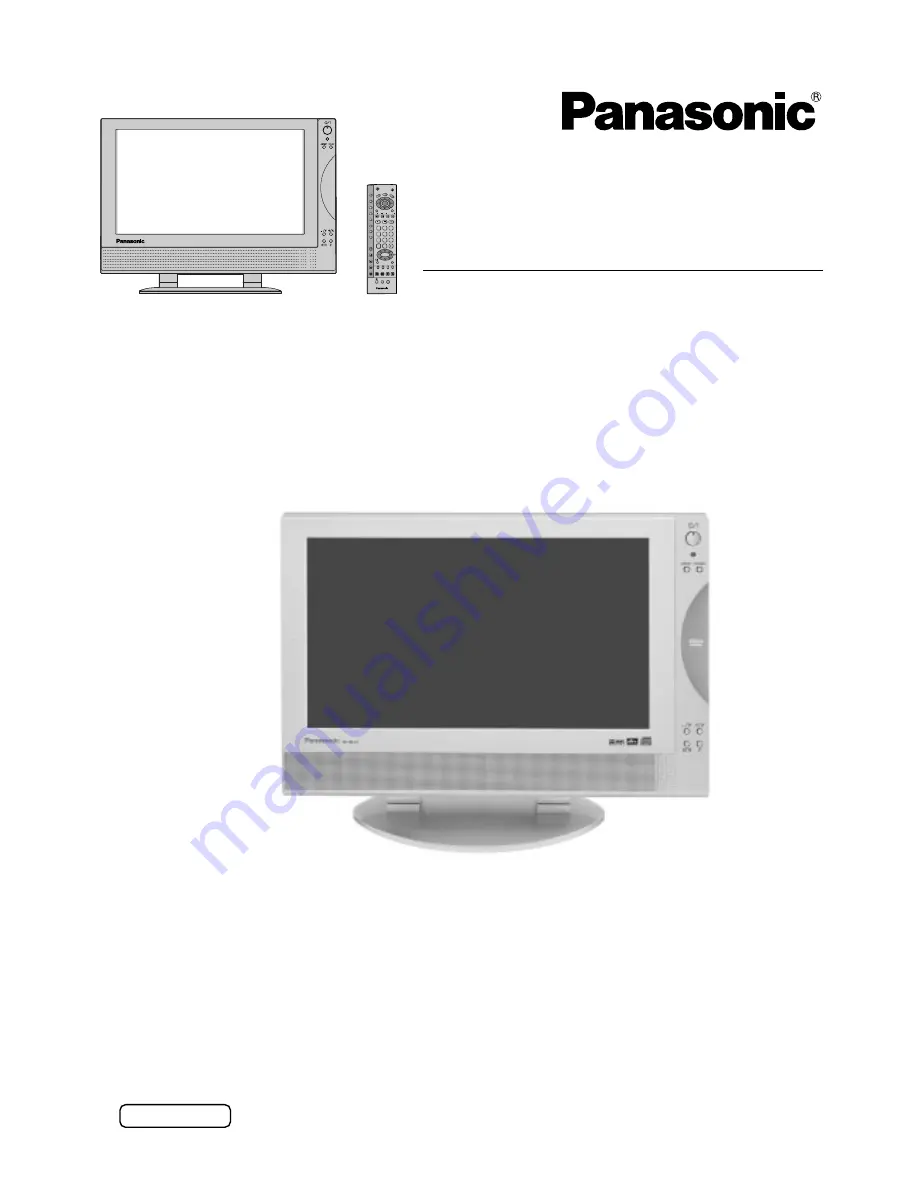
Combination 15.2˝ Diagonal

LCD TV/DVD Player

Operating Instructions

TX-15LV1F

Model No.

TQBC0490

Please read these instructions before operating your set and retain them for future reference.

0

C

7

8

9

4

5

6

1

2

3

STR

N

TV/ DVD

INDEX

F.P.

TV/ TEXT

HOLD

TV/AV

VCR

SKIP

RETURN

EJECT

SLOW/ SEARCH

ASPECT

SET UP

SOUND

PICTURE

CANCEL

DVD
SURROUND

DVD
SET UP

PLAY MODE

A-B REPEAT

REPEATMODE

ANGLE

SUBTITLE

AUDIO

STOP

PAUSE

PLAY

T

O

P

ME

NU

DVD DISPLAY

DVD

M

EN

ENTER

English

Summary of Contents for TX-15LV1F

Page 1: ...re operating your set and retain them for future reference 0 C 7 8 9 4 5 6 1 2 3 STR N TV DVD INDEX F P TV TEXT HOLD TV AV VCR SKIP RETURN EJECT SLOW SEARCH ASPECT SET UP SOUND PICTURE CANCEL DVD SURROUND DVD SET UP PLAY MODE A B REPEAT REPEATMODE ANGLE SUBTITLE AUDIO STOP PAUSE PLAY T O P MENU DVD DISPLAY DVD M E N ENTER English ...

Page 2: ...eration panel 39 Basic play 40 To play 40 Stopping play 41 Skipping chapters or tracks 42 Still picture Pause 42 Rapid advance Rapid reverse 42 Frame advance Frame reverse DVD Video CD 43 Slow motion play DVD Video CD 43 Using a TOP MENU DVD 43 Using a DVD MENU DVD 43 Random play CD 44 Selecting sound field 44 Repeat play 45 A B repeat play 45 Changing audio soundtrack language DVD 46 Changing sub...

Page 3: ...r images teletext and images displayed in 4 3 mode This type of LCD panel damage is not an operating defect and as such is not covered by the Panasonic warranty The On Off switch on this model does not fully disconnect the TV from the mains supply Remove the mains plug from the wall socket when the TV set is not used for a prolonged period of time Note If the set is not switched off when the TV st...

Page 4: ... CD player is plugged to the wall outlet do not place your eyes close to the opening of the disc tray and other openings to look into the inside of this player Use of controls or adjustments or performance of procedures other than those specified herein may result in hazardous radiation exposure Do not open covers and do not repair yourself Refer servicing to qualified personnel CLASS1 LASER PRODU...

Page 5: ...OUND PICTURE CANCEL DVD SURROUND DVD SET UP PLAY MODE A B REPEAT REPEATMODE ANGLE SUBTITLE AUDIO STOP PAUSE PLAY T O P MENU DVD DISPLAY DVD M E N U ENTER Warranty Card Slide off the battery cover Insert batteries note correct polarity and Replace the cover Make sure that the batteries are fitted the correct way round Do not mix old batteries with new batteries Remove old exhausted batteries immedi...

Page 6: ...onents require Also determine the length of cable you ll need For optimum quality picture When the LCD is exposed to light from outdoors or lighting fixtures high contrast pictures may not be displayed clearly Turn off florescent lamps near the LCD and place in a location not exposed to outdoor light How to use the LCD stand Adjust the stand to your desired angle The stand angle can be adjusted be...

Page 7: ...the TV Aerial socket Scart Connections The VCR can also be connected to the TV using a Scart cable Connect AV1 of the VCR to AV1 Scart socket of this set Notes Additional equipment and cables are not supplied Further details of audio video satellite receiver connections can be found on pages 33 and 34 Using the Cable Cover 4 Installing the cable cover 3 Connect the antenna cable to RF in terminal ...

Page 8: ...r 3 Switch TV ON Press the switch on the LCD TV to turn the set on IMPORTANT NOTES There are two ways to switch the TV set to stand by mode A Press the switch on the LCD TV and check that the red LED is light OR B Press the Stand by button on the remote control The TV also turns on if you press the programme number up down but tons on the front panel Programmes will appear immediately if your deal...

Page 9: ...LE AUDIO STOP PAUSE PLAY T O P MENU DVD DISPLAY DVD ME N U ENTER Sound mute see page 10 Programme Number Up and Down Volume Up and Down see page 12 TV AV mode selection see page 10 Programme Channel change buttons 0 9 and Teletext page buttons see page 10 30 Coloured buttons used for Aspect functions see page 27 Programme edit functions see page 19 Teletext functions see page 30 AV selection see p...

Page 10: ...und completely The Mute symbol will appear Press the button once again to restore the previous sound level and cancel the mute Sound is also reactivated when power is turned off or volume level is changed 3 TV AV Mode Selection Press the TV AV button to select TV AV1 AV2 AV2S input signal modes DVD CD sequentially Remote control Press the TV AV menu button Press the relevant on screen selector key...

Page 11: ...following adjustments can be accessed directly Notes Tint Displayed when receiving NTSC signals Tuning mode Not displayed during AV mode F Volume Backlight Contrast Brightness Colour Tuning mode Balance Treble Bass Tint Sharpness Basic controls 6 5 0 C 7 8 9 4 5 6 1 2 3 STR N TV DVD INDEX F P TV TEXT HOLD TV AV VCR SKIP RETURN EJECT SLOW SEARCH ASPECT SET UP SOUND PICTURE CANCEL DVD SURROUND DVD S...

Page 12: ...ch keys on the remote control are used to navigate the menu shown see above for descriptions of button functions Picture menu Contrast Brightness Colour Sharpness Comb filter On Colour balance Normal AI Backlight Mode Dynamic On Sound menu Bass Treble Headphone volume MPX No service Mode Music Ambience Off Volume Balance Off Setup menu Teletext Off timer Off OSD language Off Text language West Tun...

Page 13: ...TV the picture hue can be adjusted to suit your taste Notes When the TV is receiving NTSC Signals Tint is displayed and level adjustment is possible Only Contrast and Backlight will be displayed during TEXT mode Colour balance AIlows you to set the overall colour tone of the picture Press or to switch between modes Item Function Effect Colour Less More Backlight Darker Brighter Contrast Darker Bri...

Page 14: ...ic Backlight Mode Function Dynamic Normal Cinema Displays a bright screen with maximum contrast Displays standard image Ideal for watching movies in a darkened room Contrast Brightness Colour Sharpness Comb filter On Colour balance Normal AI Backlight Picture menu Mode Dynamic On Reduces colour noise Not displayed during RGB Video input S Video input mode and DVD CD mode You can change the level o...

Page 15: ...ce Left SP Right SP Volume Less More Bass Less More Headphone volume Less More Treble Less More Adjusts the sound level difference between left and right speakers Adjust Headphone volume Adjusts lower deeper sounds Adjusts higher sharper sounds Adjusts output volume MPX Usually set to stereo to provide the best reproduction but if reception deteriorates or if the service is not available then swit...

Page 16: ... No service Mode Music Ambience Off Volume Balance Music Sound menu Bass Treble Headphone volume MPX No service Mode Music Ambience Off Volume Balance On Sound quality can be improved when watching music or speech by selecting the appropriate Music or Speech mode Press or to select Mode Music Speech To enjoy a concert hall effect turn Ambience to on Not displayed during DVD CD mode Press or to swi...

Page 17: ...volume each time you change the input mode Setup menu Teletext Off timer Text language Tuning menu OSD language Volume correc tion TOP List OFF 60 75 90 30 15 45 Teletext Off timer Off OSD language Off Text language West Tuning menu TOP Setup menu Setup menu Teletext Off timer Off OSD language Off Colour system Auto Text language Wast Volume correction TOP 0 C STR N TV DVD INDEX F P TV TEXT HOLD T...

Page 18: ...page 23 Use to make small adjustments to the tuning of an individual station useful for example when weather conditions are affecting reception quality of a program Lets you select the correct transmission standard for the transmission signal being received Controls the gain of the received signal which can differ between stations Press STR after adjusting a setting to replace the factory with you...

Page 19: ...on Prog Chan Name Lock Sys Function of keys Moves the Programme position Red Green Yellow and Blue Bars are displayed at the bottom of the screen These have the same functions as the Red Green Yellow and Blue keys on the remote control see next page Sets the number of channels to be displayed The characters that can be input are displayed at the bottom of the screen Select the characters required ...

Page 20: ...e Return Programme edit 1 Off SC1 2 Off SC1 3 Off SC1 4 Off SC1 5 Off CH41 SC1 Prog Chan Name Lock Sys Delete Add Move TV AV STR Button Stare E x i t Select option Change programme Return Programme edit 1 Off SC1 2 Off SC1 3 Off SC1 4 Off SC1 5 Off CH41 XYZ ZXY CH44 SC1 Prog Chan Name Lock Sys Delete Add Move TV AV STR Button Stare E x i t Select option Change programme Return Programme edit 1 Off...

Page 21: ...ve to the Lock column Choose between Lock On or Lock Off Press STR to store the new setting Note When a programme position is locked Direct Channel Access using the C and numeric buttons on the remote control is not available Changing a TV System Move to the Sys column Choose the reguired sound system SC1 PAL B G H SECAM B G SC2 PAL I SC3 PAL D K SECAM D K F SECAM L L Press STR to store the new se...

Page 22: ...e new settings can be stored If an auto setup process is aborted midway all channels that have been set up to that point will be saved to memory Press TV AV at any time to go back to watching TV please read the Notes in step 6 Tuning menu 0 C STR N TV DVD INDEX F P TV TEXT HOLD TV AV VCR ASPECT SET UP SOUND PICTURE Setup menu Teletext Off timer Off OSD language Off Text language West Access Tuning...

Page 23: ...s or to access Tuning mode 3 Press so the programme number frashes then press or to select the position you want to tune 4 Press so the channel number flashes then press or to start the search Change of TV System can be performed by this manual tuning Via front panel Press sothe TV System frashes the press or to select TV system 5 Press when you find the station Repeat to store other stations Pres...

Page 24: ...mme edit Auto Colour system Volume correc Tuning menu How to Cancel the Fine Tuning Cancelling previously adjusted manually fine tuning means re activating the AFT Automatic Fine Tuning Re activating the Automatic Fine Tuning means allowing the set to automatically tune to the optimum tuning position for that programme Number 1 Select the Programme Number which you d like to return to Automatic Fi...

Page 25: ...gion use differing systems If a clear picture with correct colours cannot be obtained when a Broadcast or AV signal is received 0 C STR N TV DVD INDEX F P TV TEXT HOLD TV AV VCR ASPECT SET UP SOUND PICTURE AUTO M NTSC SECAM PAL AUTO M NTSC NTSC PAL SECAM Notes PAL SECAM and NTSC are different colour signal broadcast transmission systems applicable to differing countries M NTSC is a trick playback ...

Page 26: ...he other stations means you can avoid having to adjust the volume each time you change channels Volume correction 1 Proceed to the tuning menu 2 Select the Volume correction by using or 3 Adjust the Volume level by using or 4 Press STR to exit The Volume correction is automatically memorised 0 C STR N TV DVD INDEX F P TV TEXT HOLD TV AV VCR ASPECT SET UP SOUND PICTURE Fine tuning Manual tuning Aut...

Page 27: ...widescreen identification signal WSS is found or a signal is found through a Scart socket Panasonic Auto switches to the appropriate 16 9 widescreen ratio Panasonic Auto appears in the top left of the screen if black stripes above and below the picture are detected Panasonic Auto chooses the best ratio and expands the picture to fill the screen This process can take several minutes depending how d...

Page 28: ...n of the picture Press the yellow or blue buttons to move the picture vertically useful when there are subtitles positioned below the picture 16 9 16 9 will display the picture at its maximum size but with slight stretching Aspect Controls Blue button has been pressed to move picture upwards Yellow button has been pressed to move picture downwards Zoom Zoom V POS V POS Zoom V POS V POS 16 9 16 9 4...

Page 29: ...sert and play a pre recorded tape with known content 1 Press SET UP 2 Move to Tuning menu option by using or 3 Access Tuning menu by using or 4 Move to Manual tuning by using or 5 Access Manual tuning by using or 6 Select programme position 0 VCR by using or 7 Start searching for the VCR playback by using or When the VCR playback is found press STR to store Press TV AV to exit Notes If picture pat...

Page 30: ...oloured button This facility enables fast access to information on the subjects shown Note When watching TV in 4 3 or zoom mode pressing TV TEXT button will display teletext page momentarily in that aspect before switching to normal teletext picture size TV Teletext mode Press TV TEXT to switch between the current programme and teletext mode Page Selection Pages can be selected in two ways a Press...

Page 31: ...ess SET UP to display special functions followed by the Yellow button to view the TV picture whilst searching for a Teletext page When found the screen will display the page number at the top left Press the Yellow button to view the page Press TV TEXT again to return to normal TV operation News Flash When a news flash page has been selected press SET UP Yellow to view the TV picture When an update...

Page 32: ...he top of the page is there to indicate that the broadcaster has updated the page s contents there are no sub pages Press SET UP followed by the Blue button T will be displayed at the top right of the screen Enter desired sub page number before the T disappears To select page 6 enter 0 0 0 and 6 If in List mode a T will appear in the current box at the bottom Press the Yellow button to view a norm...

Page 33: ...tenna Lead Connections How to connect the input terminals Connect VCRs and other peripheral equipment Notes Additional equipment and cables shown are not supplied When a monaural VCR is used connect the monaural audio cable to the AUDIO L Left terminal Do not connect a computer with TTL output 5V to this set Select the desired VIDEO input position by pushing the TV AV button see page 10 For Scart ...

Page 34: ...s earphones as follows Optional Not supplied 3 5 mm stereo plug Notes The volume level of the headphones can be adjusted by selecting Headphone Volume from the Sound menu Additional equipment and cables shown are not supplied How to connect the DVD Audio Optical out Terminals The AUDIO OUT terminal provides a fixed level output only The menu settings and remote control volume controls have no effe...

Page 35: ...35 DVD CD Operation Guide ...

Page 36: ... Versatile DVD features Multi audio function See pages 46 49 52 The audio soundtrack can be heard in up to 8 languages The number of languages depends on the software Multi subtitle function See pages 47 49 53 Subtitles may be displayed in one of 32 languages The number of languages depends on the software Multi angle function See pages 47 49 This function allows you to choose the camera angle of ...

Page 37: ...t Caution for the optional digital audio output connector Do not connect to the digital audio input of an amplifier that does not have Dolby Digital dts MPEG audio decoder If such an amplifier should be connected to the player with Bitstream any attempt to play DVDs or CDs recorded in dts may cause such a high level of noise that it may be harmful to your ears and damage your speakers Video CDs an...

Page 38: ...rds or backwards or slow play See page 42 Plays the disc See page 40 Used to select menus songs set time and input passwords Turns the power ON and OFF when the power on the TV is ON Audio information See page 51 Subtitle information See page 51 Displays the menu for discs with several titles recorded See page 41 43 Switches angles when scenes taken from several angles are being played See page 47...

Page 39: ...or connection Orange Stand by Red Power ON No colour No lit See page 8 Advances chapter track forward and back See page 42 Stops operation of disc See page 41 Pauses or stops play of DVD CD discs See page 42 EJECT button Plays DVD CD discs See page 40 LCD display 15 2 inch wide screen ...

Page 40: ...to select DVD CD When a menu screen appears on the TV In the case of many movie DVDs an interactive DVD or a Video CD with playback control a title screen appears on the TV Perform step 5 to start play Insert disc Place the disc in the disc slot with the label side to be played facing frontwards If the disc has a label Hold the disc without touching either of its surfaces Example of DVD When you i...

Page 41: ...enu is displayed even after the player has finished playing a particular item When no further selections are to be played be sure to press STOP to clear the menu display For your reference When appears on the screen when a button is pressed the operation is prohibited by the player or disc Press STOP during play RESUME function The player records the point where STOP was pressed during play Press ...

Page 42: ...utton is pressed When SKIP is pressed during menu play of Video CDs with playback control a menu screen may sometimes be recalled Reverse Forward Reverse Forward Example For your reference When SLOW SEARCH is used during menu play of Video CDs with playback control a menu screen may sometimes be recalled For DVDs and Video CDs audio will be heard during scanning forward direction only at the initi...

Page 43: ...on it pressing TOP MENU shows the title menu screen The details of operation depend on the disc used Press TOP MENU during play A list of the titles on the disc is now displayed 1 Using a TOP MENU DVD 2 Press SELECT button to select the item and press ENTER or PLAY Example The selected title now starts playing Example Pressing TITLE again resumes play from the scene when TITLE was first pressed So...

Page 44: ...4 5 6 1 2 3 STR N TV DVD INDEX F P TV TEXT HOLD TV AV VCR SKIP RETURN EJECT SLOW SEARCH ASPECT SET UP SOUND PICTURE CANCEL DVD SURROUND DVD SET UP PLAY MODE A B REPEAT REPEATMODE ANGLE SUBTITLE AUDIO STOP PAUSE PLAY T O P MENU DVD DISPLAY DVD ME N U ENTER These are two ways to change the Sound field Using GUI screen Selecting sound field Press DVD DISPLAY button and display sound field screen Pres...

Page 45: ...o CD with playback control To return to normal play Press REPEAT MODE until is displayed 2 Press A B REPEAT at the point where repeat play is to be concluded B Repeat play of the section between points A and B starts To return to normal play Press A B REPEAT until is displayed Notes A B repeat play does not work with an interactive DVD Some subtitles recorded around point A or B may fail to appear...

Page 46: ... language heard is the one selected at the initial settings If this language is not recorded on the disc only the available language on the disc will be heard Press DISPLAYto clear the display Press SELECT to select the language Pressing the numeric buttons also changes the audio soundtrack language 3 2 01 12 01 05 00 00 00 2FRA 2 0 Bonjour 0 C 7 8 9 4 5 6 1 2 3 STR N TV DVD INDEX F P TV TEXT HOLD...

Page 47: ...he preferred language is not selected even after pressing the SELECT several times it means that language is not available on the disc When the power is turned on or the disc is removed the language heard is the one selected at the initial settings If this language is not recorded on the disc only the available language on the disc will be heard 3Press SELECT to select the language Pressing the nu...

Page 48: ...en is cleared Some functions cannot be accessed from the stop mode Press the SELECT button to select the setting For some functions the setting will be registered immediately for others ENTER or PLAY must be pressed When numbers are displayed e g title No the numeric buttons are also effective for setting instead of the SELECT button When numbers are entered with numeric buttons press ENTER to reg...

Page 49: ...playback to store location A and press ENTER again to store location B Repeat play between the two locations starts Press ENTER again to return to normal play A B repeat play See page 45 The GUI screen display indicates the number of channels recorded on the disc Select the mode during play with the SELECT button Repeat play See page 45 OFF C T Normal play Chapter repeat play Title repeat play DVD...

Page 50: ... Select the random play setting menu 2 Press the SELECT button to select and press ENTER button Random play See page 44 Press ENTER during playback to store location A and press ENTER again to store location B Repeat play between the two locations starts Press ENTER again to return to normal play A B repeat play See page 45 CD VIDEO CD OFF Menu play is off ON Menu play is on P l a y b a c k contro...

Page 51: ...back is seen from that angle Repeat playback between A and B Repeat playback Playback is repeated between the designated 2 points Each time Set is pressed during playback the setting cycles are as indicated below This is only possible in the same chapter same title if there are no chapter divisions DVD or the same track video CD music CD If the chapter title track ends before the end point B is de...

Page 52: ... MENU See pages 52 to 54 See page 55 See page 56 See pages 56 57 Common procedures These settings allow you to choose the languages used when a DVD is played If the language selected is not available on the disc the language designated by each disc will be selected Press the SELECT button to select DISC menu ENGLISH ENGLISH ENGLISH LEVEL 8 RETURN ENTER SETUP DISC SOUND SUBTITLE MENUS RATINGS 16 9 ...

Page 53: ...he language is selected FRENCH GERMAN OTHER 0 Another language can be selected Refer to the language codes on page 58 1 2 RETURN ENTER SETUP SUBTITLE AUTOMATIC ENGLISH FRENCH GERMAN OTHER 0 Selecting MENUS DVD Press the SELECT button to select MENUS and press ENTER button Press the SELECT button to select item and press ENTER Notes If the language selected is not available on the disc the language...

Page 54: ...ssword Note If you forget the password it can be reset by putting the unit into factory setting condition 1111 See page 61 1 RETURN ENTER SETUP RATINGS ENTER A 4 DIGIT THEN PRESS ENTER PASSWORD Press the SELECT button to select the level and press ENTER button Setting is finished and the initial settings screen is displayed The rating is locked Any discs with a higher rating than the setting canno...

Page 55: ... with an aspect ratio like 16 9 is played back on the screen with either both sides or one side cut off If Pan Scan or Letterbox is designated beforehand on the disc side the disc designation takes priority 16 9 WIDE RETURN ENTER SETUP PICTURE TV ASPECT NTSC DISC OUTPUT NTSC RETURN ENTER SETUP TV ASPECT 16 9 WIDE 4 3 LETTERBOX 4 3 PAN SCAN RETURN ENTER SETUP Setting NTSC DISC OUTPUT Choose whether...

Page 56: ... connection OFF Optical digital output is not compatible in this case When BITSTREAM or LPCM is selected downsampling to 48 kHz is done for both optical digital output and analogue output CAUTION When performing digital connection with equipment without a built in Dolby digital decoder or DTS decoder or MPEG decorder be sure to set to LPCM If setting is not done correctly noise will be generated a...

Page 57: ...t this to listen with a range equivalent to a normal television Press return to the previous screen press RETURN button Previous page Setting volume during fast forward This sets whether or not to output audio during fast forward 2x speed of DVDs and video CDs ON Audio is output during fast forward 2x speed OFF Audio is not output during fast forward 2x speed With a music CD audio is output at all...

Page 58: ... Interlingua Indonesian lcelandic Italian Hebrew Japanese Yiddish Javanese Georgian Latin Kirghiz Korean Kurdish Kashmiri Kannada Cambodian Greenlandic Kazakh Code 7678 7679 7684 7686 7771 7773 7775 7776 7778 7779 7782 7783 7784 7789 7865 7876 7869 7879 7982 8065 8076 8083 8084 8185 8277 8279 8285 8365 8368 8372 8373 Language Lingala Laotian Lithuanian Latvian Lettish Malagasy Maori Macedonian Mal...

Page 59: ...e either at both sides or one side of the screen is automatically eliminated so that the picture fills the whole screen Type of software Type of TV set ASPECT mode 4 3 16 9 FULL mode 16 9 ZOOM mode 16 9 AUTO mode Wide screen pan and scan format Software 4 3 Software 4 3 Letterbox Letterbox with black bands at top and bottom Screen horizontally enlarged with black bands at top and bottom Full scree...

Page 60: ...al appliances Cars Motorcycles Fluorescent lights Volume level Sound mute switched on TV set to AV mode Not plugged into A C outlet Not switched on Picture Sound controls set at minimum levels Check if in stand by mode Colour Controls set at minimum levels Retune Channel s Sound reception may have deteriorated Switch MPX setting Sound menu to Off until reception improves This is a characteristic o...

Page 61: ...tings will return to the default values Troubleshooting For DVD operation Symptoms When the playback button is pressed playback does not begin or it stops quickly No sound or sound is strange Buttons cannot be operated Screen messages do not appear GUI screen display is cut off The picture is disturbed during search Playback does not start even when a title is selected The disc is hot when it is r...

Page 62: ...recautions Hold the disc by the edges so the surface will not be soiled with fingerprints Fingerprints dirt and scratches can cause skipping and distortion Do not write on the label side Do not use record cleaning sprays benzine thinner static electricity prevention liquids or any other solvent Be careful not to drop or bend the disc Do not install more than 1 disc Store the disc in its case when ...

Page 63: ... 12 cm disc 8 cm disc Connection terminals AV1 21 Pin socket Audio Video in Audio Video Out RGB in AV2 VIDEO RCA PIN Type S Video Mini DIN 4 pin Audio L R PIN Type 2 DVD OUT S Video Mini Din 4 pin 3 5 mm Stereo Jack Common Audio L R Analog Optical Digital Operating Conditions Temperature 42 F 95 F 5 C 35 C Humidity 20 80 RH non condensing Dimensions W x H x D Including TV Stand 424 mm 319 mm 180 m...

Page 64: ...Matsushita Electric Industrial Co Ltd Web Site http www panasonic co jp global Printed in Japan MBS0902 1092 This product incorporates copyright protection technology that is protected by method claims of certain U S patents and other intellectual property rights owned by Macrovision Corporation and other rights owners Use of this copyright protection technology must be authorized by Macrovision C...

Reviews: