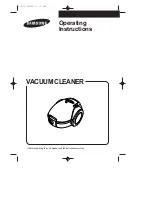
background image

VACUUM CLEANER

MODEL NO.

MC-E4051/E4053

Operating Instructions

We would advise that you carefully study these Operating Instructions before attempting
to operate the unit and that you note the Important Safety Instructions.
Please keep in a safe place with your Authorised Dealer Service booklet.
This product complies with the European directive 73/23/EEC and 89/336/EEC and with the Australian
Standards AS 3350.2.2 (1995) and Australian EMC requirements for the C-Tick Mark.

Summary of Contents for MC-E4051

Page 1: ...ore attempting to operate the unit and that you note the Important Safety Instructions Please keep in a safe place with your Authorised Dealer Service booklet This product complies with the European directive 73 23 EEC and 89 336 EEC and with the Australian Standards AS 3350 2 2 1995 and Australian EMC requirements for the C Tick Mark ...

Page 2: ... must not be used until a replacement cover is obtained A replacement fuse cover can be purchased from your local Panasonic Dealer IF THE FITTED MOULDED PLUG IS UNSUITABLE FOR THE SOCKET OUTLET IN YOUR HOME THEN THE FUSE SHOULD BE REMOVED AND THE PLUG CUT OFF AND DISPOSED OF SAFELY THERE IS A DANGER OF SEVERE ELECTRICAL SHOCK IF THE CUT OFF PLUG IS INSERTED INTO ANY 13 AMP SOCKET If a new plug is ...

Page 3: ...s that may become so or use in areas where they may be present This appliance should be serviced by an authorised Panasonic Service Centre and only genuine Panasonic spare parts should be used Use extra care when cleaning on stairs Keep hold of the handle to prevent the cleaner from falling To prevent damaging carpeted floors tiled floors Linoleum etc Do not leave the beater bar rotating in the sa...

Page 4: ...hould hear a noticeable click sound when handle reaches the storage position Never pull the cleaner with the handle in the storage position The handle will drag on the floor Always lift the cleaner by the carrying handle when transporting to storage 4 To release the handle press the han dle release button as shown With the release button depressed rotate the handle clockwise to the operating posi ...

Page 5: ...leaner push the switch button to I to turn ON and to O to turn OFF NOTE After use unplug from the socket and store the cleaner in the upright position 1 1 Quick Release Cord Hook 1 2 On Off Switch 1 1 1 2 E HOW TO USE THE ACCESSORIES CAUTION While using the accessories hold the handle with one hand to avoid pulling the cleaner over Lift out accessories needed To prevent damage to carpeted floors w...

Page 6: ...ching on the cleaner The motor protector will not reset if the cleaner is not turned off even if the cleaner has cooled down F MOTOR PROTECTOR Motor Protector This cleaner has a motor protector by pass valve which automatically opens to provide cooling air to the motor when a clog prevents the normal flow of air to the motor If the by pass valve opens to prevent motor overheating and possible dama...

Page 7: ...jury or damage To rotate the handle to the storage position when the cleaner is not in use press handle release button and rotate handle counter clockwise for easy storage NOTE You should hear a noticeable click sound when handle reaches the storage position B CLEANING EXTERIOR AND ATTACHMENTS CAUTION Do not use attachments if they are wet Attachments used in dirty areas such as under a refrigerat...

Page 8: ...ift the release lever up and push the bin in place then push the lever down to lock the bin securely in place Lid Unlock Locked 1 5 1 6 C DUST BIN CLEANING TO REMOVE DUST BIN Remove dust bin assembly from clean er by lifting the release lever as shown Remove dust bin from cleaner by tilting out as shown CAUTION Electrical Shock And Personal Injury Hazard Always disconnect the cleaner from mains ou...

Page 9: ...firm surface CAUTION Make sure dust bin is empty before fil ter is removed After every 5th cleaning cycle rinse filter exterior with water under a faucet Once the filter is rinsed clean damp dry with a cloth and let air dry for 24 hours CAUTION Rinse with water only do not use detergent or soap Allow filter to dry 24 hours before putting it back into the dust bin When the cleaning of the filter no...

Page 10: ... out to remove MC E4051 Electrostatic Filter When replacing or reinstalling the electrostatic filter make sure the gray side of the filter is facing the vacuum cleaner Reinstall exhaust filter cover by snapping into place MC E4053 HEPA Filter Ensure foam edge of the filter is facing towards the vacuum cleaner when placing filter into filter compartment Push only on filter frame Reinstall exhaust f...

Page 11: ...Retainers 1 1 Agitator Belt 1 2 WARNING Personal Injury Hazard Always unplug the vacuum cleaner before cleaning the brush area as agitator may suddenly restart Failure to do so can result in personal injury Carefully remove any residue that may exist in the belt area TO REMOVE BELT CLEAN AGITATOR Position hands on the agitator If the belt is still attached to the agitator there will be tension on ...

Page 12: ...y on the right end of agitator Pull right end of agitator forward and seat it into nozzle base Agitator Belt 1 6 Press firmly checking to see that each end is completely inserted Check to see that the belt is centered on the belt pulley and that the agitator turns freely Nozzle Cover Nozzle Cover Retainer 1 7 Make sure the nozzle cover retainers are in the UNLOCK position Hook the front of the noz...

Page 13: ...To remove hose coupling 1 Depress and rotate tab A as shown 2 Once tab A is clear of the vacuum cleaner inlet depress and rotate tab B as shown To re install hose coupling Reverse steps above Check suction inlet and secondary filter screen for clogs Disconnect wand from connector pipe and nozzle hose check the wand and hose Plug in vacuum cleaner and turn on Disconnect wand and stretch hose in and...

Page 14: ...pe inlet Check dust accumulated on primary Remove dust accumulated or replace the filters filter see FILTER CARE Exhaust filter If exhaust filter is full of dust clean or replace it see FILTER CARE Dust compartment inlet is blocked If there is a blockage remove it see BLOCKAGES Beater bar does not Clogged by a large object in If there is any obstruction remove it rotate the beater bar housing Belt...

Page 15: ...WER 1600w 1800w MOTOR PROTECTION YES YES DUST BIN CAPACITY 2 4 litres 2 4 litres EXHAUST FILTER ELECTROSTATIC HEPA DIMENSIONS W x L x H 360x375x1110 360x375x1110 NET WEIGHT 7 3 kg 7 3 kg DUSTING BRUSH YES YES PIPE YES YES CREVICE NOZZLE YES YES CLEANING WIDTH 355mm 355mm SPECIFICATIONS ...

Page 16: ...lt Part number Part number AC28SJPZØØ AC28SJPZØØ Beater bar ass y Part number Part number AC92SCNZZUØØ AC92SCNZZUØØ Hose Part number Part number AC84PBXZZVØ6 AC84PBXZZVØ6 Note Specifications are subject to change without notice Sales and Support Information Customer Care Centre For UK customer 0870 900 9043 For Republic of Ireland customers 01 289 8333 Visit out website for product information E m...

Page 17: ... 17 ...

Page 18: ...Matsushita Electric Industrial Co Ltd http www panasonic co jp global Printed in P R C Part No CØ1ZCNZØØEØØ Service No ACØ1ZCNZØEØØ ...

Reviews: