Panasonic HC-V110, Owner'S Manual
The Panasonic HC-V110 operating instruction manual is available for free download on our website. Easily access this detailed manual to set up and operate your HC-V110 camcorder efficiently. Follow the provided link to manualshive.com and enhance your user experience with this exceptional Panasonic product.
Share
Download


Reviews:
No comments
Related manuals for HC-V110
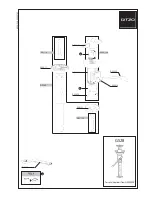
4/5 Series G528 Compact G528 G528
Brand: Gitzo Pages: 1

HDC-SD800
Brand: Panasonic Pages: 28

HDC-SDX1P
Brand: Panasonic Pages: 51

HDC-SD41
Brand: Panasonic Pages: 116

HDC-SD9D
Brand: Panasonic Pages: 128

HDC-TM80
Brand: Panasonic Pages: 148

HDC-SD5BNDL
Brand: Panasonic Pages: 144

HDC-SDT750PP
Brand: Panasonic Pages: 93

DXG-590V
Brand: DXG Pages: 1

Z9
Brand: Zetta Pages: 2

GZ MG330 - Everio 30GB Hard Drive HDD 35x Optical Zoom Digital Camcorder BigVALUEInc
Brand: JVC Pages: 2

GZ MG155 - Everio Camcorder - 1.07 MP
Brand: JVC Pages: 2

GZ HD5 - Everio Camcorder - 1080i
Brand: JVC Pages: 12

GYHD110U - Camcorder - 720p
Brand: JVC Pages: 2

GZ-E100BUA
Brand: JVC Pages: 37

GY-HM100
Brand: JVC Pages: 2

GZ-E105
Brand: JVC Pages: 80

GZ MG37u - Everio Gseries Hard Disk Camcorder
Brand: JVC Pages: 72


