CAUTION:
PLEASE FOLLOW THIS INSTRUCTION MANUAL CAREFULLY TO
PREVENT ANY INJURIES OR COMPLICATIONS THAT MAY ARISE.
WARNING:
Before installing or maintaining the luminary, make sure all power is
TURNED OFF
.
Verify that supply voltage is correct by comparing it with the label information on all
fixtures.
Make all connections in accordance with the NEC requirements, and make sure all
luminaries are properly secured to prevent any wire complications. This luminary is
to always be installed with the lens facing down and its not to exceed the maximum
ambient temperature rating noted on the specification sheet.
USHIBAYLxxxWPL Series LED Highbays
LED DRIVER
V(-)
[BLACK]
V(+)
[RED]
TO LOAD
[LED BOARD]
[WHITE]
ACN [BLUE/WHITE]
ACL [BROWN/BLACK]
GROUND [GREEN]
NEUTRAL [WHITE]
GROUND [GREEN]
HOT [BLACK]
INPUT
OUTPUT
INSIDE BACK-BOX or
J-BOX
PRE-CONNECTED
(DO NOT DISCONNECT)
[BLACK]
WIRING DIAGRAM: Connect the ACL and the ACN from the driver to the conduit with the AC Power Supply cords.Follow the Wiring Diagram provided.
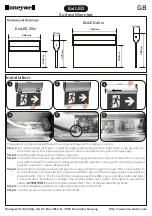
Step 2-
Wrap two pieces
of chain (optional) across
a ceiling beam and extend
down to the required
mounting height.
Step 3-
Install a Junction
Box (not included) on the
ceiling beam and run down
the AC Power Supply cables
inside a flexible conduit to
approximately the same
height as the chains.
PART NO.
IMAGE
DESCRIPTION
QTY
FLHA-VH
V-Hook used to mount the Linear
!
High
Bay to a variety of mounting options.
2
AC-LHA-CHN
(not included)
40 in. chain pair used to hang the
Linear High
Bay on Various Mounting Beams.
1
(pair)
Step 4-
Remove the cover plate in order to access
wires required for installation. Have an AC Power
Supply Conduit with a J-Box attacked to the ceiling
come down to approximately the same height of
the chains. Use the Wiring Diagram provided above
to properly wire the luminaire to the power supply.
All wiring connections must be made either inside a
Junction Box or the back housing of the luminaire.
Step 1-
Install the V Hook to
!
the fixture. All fixtures have
[4]
slot openings at the top
( 2 of each side), use
the slotted holes to
install the V Hook to the
!
luminaire.
DIM
GRAY (-)
)
Installation Guide
Junction Box for
housing all wire
connections
Step 5-
After installation, This
is how the fixture should look.
(Optional)
Step 5-
Remove the cover plate in
order to access wires required for
installation. Have an AC Power
Supply Conduit with a J-Box
attacked to the ceiling come down
to approximately the same height
of the chains. Use the Wiring
Diagram provided above to
properly wire the luminaire to the
power supply. All wiring
connections must be made either
inside a Junction Box or the back
housing of the luminaire.