background image

210618-28    

             ALT 12 

    5055.7298-A

INSTALLATION 
AND OPERATING 
INSTRUCTIONS

SAFETY NOTICE

If this stove is not properly installed, a 
house fire may result.  For your safety,  
follow the installation instructions.  
Contact local building or fire officials 
about restrictions and installation 
inspection requirements in your area.

IMPORTANT:
THESE INSTRUCTIONS ARE TO 
REMAIN WITH THE HOMEOWNER

SERIAL #

TESTED and LISTED to CAN/ULC S627 
AND UL 1482
Meets the Environmental Protection 
Agency's May 2015 Particulate Emission 
Standards

MODEL: ALT 1.2

Summary of Contents for ALT 1.2

Page 1: ... follow the installation instructions Contact local building or fire officials about restrictions and installation inspection requirements in your area IMPORTANT THESE INSTRUCTIONS ARE TO REMAIN WITH THE HOMEOWNER SERIAL TESTED and LISTED to CAN ULC S627 AND UL 1482 Meets the Environmental Protection Agency s May 2015 Particulate Emission Standards MODEL ALT 1 2 ...

Page 2: ...ring 7 Proper Draft 7 Ash Removal 7 Maintenance 8 Disposal of Ashes 8 Baffle Removal 9 Maintenance Checks 9 Weekly 9 Monthly 9 When Cleaning the Chimney System 9 Blower 9 Assembly 10 Converting the Cast Legs 10 Removing stove from crate 10 Flue collar conversion 11 Optional Blower 13 Floor Protection 13 Installation 14 Clearances 14 Chimney and Connector 15 Double Wall Connector 15 Single Wall Con...

Page 3: ...Weighted Average Lower Heating Value LHV efficiency as tested using CSA B415 Performance testing of solid fuel burning heating appliances LHV assumes the moisture is already in a vapour state so there is no loss of energy 2 Weighted Average Higher Heating Value HHV efficiency as tested using CSA B415 Performance testing of solid fuel burning heating appliances HHV includes the energy required to v...

Page 4: ...e laden smoke cools the chimney compounding the problem by offering the smoke the ideal place to condense 3 In summary a certain amount of creosote is inevitable and must be lived with Regular inspection and cleaning is the solution The use of dry seasoned wood and ample combustion air will help to minimize annoying smoke emissions and creosote buildup Chimney Fires The result of excessive creosot...

Page 5: ...natural wood only Higher efficiency and lower emissions generally result when burning air dried seasoned hardwoods as compared to softwoods or to green or freshly cut hardwoods Wood should be properly air dried seasoned for six months or more Wet or undried wood will cause the fire to smoul der and produce large amounts of smoke and creosote Wet wood also produces very little heat and tends to go ...

Page 6: ... This wood heater has a manufacturer set minimum low burn rate that must not be altered It is against federal regulations to alter this setting or otherwise operate this wood heater in a manner inconsistent with the operating instructions in this manual 1 Set air control to a desired setting If smoke pours down across the glass waterfall effect this indicates you have shut the control down too soo...

Page 7: ...heater design specifications can result in permanent damage to the heater and chimney Over firing can be caused by operating the unit with the door open damage to door gaskets allowing excess air to enter the firebox the use of kiln dried lumber mill ends or paper waste and prolonged or continual use on a high burn setting Proper Draft Operation with the door open can cause excessive smoke Do not ...

Page 8: ... seals and replace if necessary Follow instructions included in the WODC DG58 kit obtainable from your nearest Pacific Energy Dealer 5 DOOR GLASS Do not slam loading door or otherwise impact glass When closing door make sure that no logs protrude to impact the glass If the glass gets cracked or broken it must be replaced before using the stove Re placement glass can be obtained from your dealer Us...

Page 9: ...r be sure to plug the top of the baffle tube in the back of the firebox before sweeping or cleaning Failure to prevent ash or soot from falling into the baffle tube will cause incorrect operation and will lead to premature burn out of the tube or baffle Check the following parts for damage such as cracks excessive corrosion burned out sections and excessive warping See website for descriptions and...

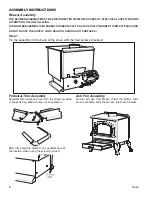
Page 10: ...tight Removing stove from crate Carefully remove wood top and supports Remove plastic cover Using a 7 16 12mm wrench remove lag bolts that secure hold down brackets to bottom pallet Slide the hold down brackets away from the stove Dimensions Assembly 25 1 2in 646mm 26 1 2in 675mm 24 1 2in 624mm 1 1 2in 36mm 23 1 8in 588mm 14 7 8in 378mm 25 1 8in 639mm 27 1 2in 698mm Shown with standard 6 in Short ...

Page 11: ... the two bolts holding the top to the front crown bracket under front edge of top on each side Pull the top forward to release it from the mounting brackets Carefully lift up and remove the cast top Figure 4 3 Remove the bolts and flue collar from the top of the unit Figure 6 Careful do not damage the gasket Air Jacket Flue Panel mounting screws x4 Knockout Figure 3 Flue Conversion Step 1 Top Moun...

Page 12: ...against the stove Reinstall the collar using the nuts and bolts that were removed from the back Figure 6 Install the back cover Figure 7 Flue Conversion Step 4 Figure 8 Flue Conversion Step 5 7 Re install the Top by engaging the two front bolts into the mounting brackets and install the machine screws thru the back shield into the top Center the top to the front side casting then tighten the front...

Page 13: ...eat output range Manual To manually operate the blower set the rocker switch to Man and set the speed control to desired setting This will bypass the sensing device and allow full control of the blower Switching from Auto to Man or selecting speed may be done anytime Floor Protector The stove may be installed on a combustible floor provided noncombustible ember protection is used This protection m...

Page 14: ...CTOR AND ULC S 629 LISTED CHIMNEY IN USA UL 103 HT LISTED CONNECTOR AND CHIMNEY Clearances This heater may be installed using a single wall connector smoke pipe or listed double wall connector see Mobile Home installation 1 Clearances to combustible surfaces and materials using single wall connector are shown in Figure 14 Clearances may be reduced with various heat insulating materials Consult loc...

Page 15: ...llation requirements Single Wall Connector Smoke pipe must be As short and straight as possible use six inch diameter 24 gauge black pipe that is clean and in new condition Secured at every joint and collar with 3 sheet metal screws Installed with the crimped or male ends pointing down This will carry any liquid creosote or condensation back into the stove The chimney connector shall not pass thro...

Page 16: ... mounted to the framing 5 Install all components to the chimney manufacturer s installation requirements Outside combustion air may be required consult local building codes See Combustion Air on page 19 Unit may be harder to start Please provide as much vertical length for the first section of pipe as possible Combustible Wall Ceiling Installation Chimney Storm collar Spark arrestor Rain cap Radia...

Page 17: ...g joints between ceiling and roof Brace chimney as required by Chimney Manufactures instructions Install radiation shield 10 Assemble flashing and storm collar and be sure to maintain the vapour barrier at this point Seal securely Attach rain cap and check flashing for leaks Fireclay Flue liner Concrete cap Chimney Approved Through Wall Installation As per local and Federal codes Minimum 7 2 1m Ce...

Page 18: ...val NOTE Install all components to the connector or chimney manufacturer s installation requirements Consult your chim ney supplier for installation advice CAUTION THE STRUCTURAL INTEGRITY OF THE MOBILE HOME FLOOR WALL AND CEILING ROOF MUST BE MAINTAINED The services of a competent or certified installer certified by the Wood Energy Technical Training program WETT in Canada Hearth Education Founda...

Page 19: ...must get its air from a ventilated crawl space or be extended with duct to the outdoors Figure 16 and Figure 17 The use of outside combustion air for residential installation requires the unit to be secured to the structure to prevent dislodging of the air duct To draw outside air from behind the stove Cut or drill a 3 102mm hole through a wall behind the unit Use an appropriate household 3 or 4 1...

Page 20: ...asket leakage Replace gasket Check latch Excessive Creosote Buildup See 1 2 3 above Low Heat Output 1 Wood is wet Use dry wood 2 Fire too small Build a larger fire 3 Draft too low Chimney plugged or restricted inspect and clean Stove Won t Burn 1 Combustion air supply blocked Check outside air supply for obstruction Check that room air cover is removed 2 Draft too low Chimney plugged or restricted...

Page 21: ... C 8 7 8 X 4 3 8 X 1 1 4 225 mm x 111 mm x 32 mm D 4 3 8 X 5 3 4 X 1 1 4 111 mm x 146 mm x 32 mm This package contains 6 full size firebricks as well as 6 various cut size bricks ITEM Part Number ALDERLEA 1 2 Firebrick Installation Instructions C B B A D D Figure 20 ALT 1 2 Firebricks 210618 28_ALT 1 2 21 5055 7298 A ...

Page 22: ...o that they butt up against the center post Continue by moving the two outer bricks in towards the inside bricks This will eliminate any gap between the center post and bricks Rear brick retainers Figure 21 Rear wall brick retainers Figure 22 Full sized brick C against rear wall Figure 23 2nd full sized brick C against rear wall Push bricks in towards center post Figure 24 Rear wall bricks C in pl...

Page 23: ...to another component located behind the brick rail causing there to be a gap between the small and large brick 5 The four floor bricks consist of two different sizes One A brick and one D brick Figure 27 should occupy each half of the floor space After that there is no particular order with which they must be arranged Figure 25 Full sized brick C on side wall Small brick laying flat on top of larg...

Page 24: ... 2 All parts may be ordered from your nearest Pacific Energy dealer Contact Pacific Energy for the location of the dealer nearest you 2 1 1 15 16 20 14 10 11 12 13 6 19 7 21 8 4 5 17 3 9 19 18 210618 28_ALT 1 2 24 5055 7298 A ...

Page 25: ...2 Wood Replacement 16 80000841 Control Neo1 6 2 5 Wood Replacement 1 7 80000838 Control Neo1 6 2 5 Wood Replacement 19A 11130013 Legs Alt 1 2 Wood Leg 6 Met Black 11130011 Legs Alt 1 2 Wood Leg 6 Antique White 11130012 Legs Alt 1 2 Wood Leg 6 Majolica Brown 11130014 Legs Alt 1 2 Wood Leg 6 Sunset Red 19B 11130017 Legs Alt 1 2 Wood Leg 8 Met Black 11130015 Legs Alt 1 2 Wood Leg 8 Antique White 1113...

Page 26: ...210618 28_ALT 1 2 26 5055 7298 A ...

Page 27: ...210618 28_ALT 1 2 27 5055 7298 A ...

Page 28: ...chnical support please contact your retailer Web site http www pacificenergy net Printed in Canada 2016 Copyright Pacific Energy Fireplace Products LTD Reproduction adaptation or translation without prior written permission is prohibited except as allowed under the copyright laws ...

Reviews: