QUALITY YOU CAN SEE FEEL AND TRUST
BRAMPTON DOME
TENT INSTRUCTIONS
1. Select a dry level area and clear the ground of any sharp or dangerous objects.
2. Spread out the floor of the inner tent and peg out the four corners ensuring that the tent is pulled out firm and square
(be careful not to make it too taut)
. Peg out the
remaining pegging points. The adjustable straps on some of the peg loops should be set approximately in their middle position (not pulled up tight). Adjusting all these
straps up tight may over stress the inner tent and cause some seams to start separating.
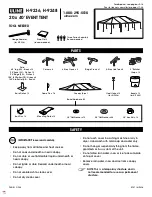
3. Assemble all the fibreglass poles. There will be 8 black poles and a ridge pole (a grey pole with two cross pieces in the middle).
4. Above the door at each end there is a T piece that will be wrapped in a bag. Remove the protective bags. Insert the ends of the ridge pole into the T pieces. Wrap the
Velcro tie around the Cross pieces in the middle of the tent. (Make sure that the reinforcing wire on the cross pieces are facing down towards the tent inner.)
5. Slide the short end of the black poles through the sleeves and insert the poles into the cross pieces in the middle and into the T piece at one end only.
6. Stand up the poles at the end and then the middle. The bottom of the poles slide over a pin on the base of the tent. Two thirds of the tent should now be up.
7. Slide the remaining two black poles through the sleeves and insert the poles into the T piece. Once both sides are in stand up the poles and slide the ends over the pins.
You will have better access if you open the bottom of the door and stand just inside the tent.
8. Attach all tent clips to the upright poles. The inner tent is now complete and you are ready to fit the fly.
9. Position the fly over the tent and align it into place. Tie off the inside of the fly at the elbow at the top of the pole. Attach the Velcro tabs on the inside of the fly to the
poles.
10. With the doors of the fly zipped up peg out the fly ensuring an adequate gap between the fly and the inner. (Take care not to peg the fly too far out from the base as you
may distort the shape of the tent)
11. Peg out all the guy ropes.
12. Finally, fine tune the fly so it remains firm and positioned correctly over the tent. The adjustment straps at some peg points can be used for small adjustments but make
sure that the tent is not too tight as the tent seams can be damaged.
13. The Fly doors at each end of the tent can be erected as an awning. 3 adjustable poles are supplied for this purpose. When erected the awning tensioner strap near the
top of the door can be done up and tightened to take out the sag in the awning. (Do not to over tighten this strap.) Ensure that the centre pole is higher than the sides
which will allow some pitch for run off in light rain.
14. The three side wall panels can be set up as an awning either individually or together as one awning.
*****
REVERSE THESE PROCEDURES TO LOWER THE TENT
*****
Packing Instructions
:
1. Make sure the inner tent and fly are COMPLETELY DRY and CLEAN before packing away.
2. Wrap the T pieces in their protective bags and foam. Pack the poles and pegs in their bags.
3. Fold the fly in half lengthwise and fold the ends in to form a rectangle. Then fold each end into the middle and continue folding until you have a long rectangle approx
80cm wide and 250cm long. The bottom of the fly should be at one end when folded.
4. Fold the inner tent into quarters lengthwise by folding both sides into the centre, then one half over the other.
5. Lay the fly and poles on top of the inner and tightly roll up the tent (rolling towards the bottom edge of the fly which helps to push the air out).
6. Secure the rolled up tent with the supplied ties.
7. Place in carry bag with the pegs.