57114, 57161,
57162, 57242,
91046, 91054,
94122, 94124,
94126
WT2X
version
Installation Manual /
User’s Manual
Sprinkler Timers by Orbit
®
Thank you for selecting an Orbit
®
sprinkler Timer. Orbit
®
designers have
combined the simplicity of mechanical switches with the accuracy of
digital electronics to give you a Timer that is both easy to program and
extremely versatile. The Orbit
®
Timer provides convenience and flexibili-
ty, letting you run a fully automatic, semi-automatic, or a manual water-
ing program for all your watering needs.
Please read this manual completely before you begin to program and use
the controller. A few of the most notable design features include:
At-a-Glance Simplicity
By turning the rotary dial to one of nine settings you can review pro-
gramming or easily make changes.
Arm Chair Programmable
By inserting two AA alkaline batteries you can program the Timer prior
to installing it in its permanent location.
Fuse
The 0.75 amp slow-blow fuse provides circuit protection. For replace-
ment, use WaterMaster 0.75 amp fuse or equivalent.
Lexan Language Covers
Available in English, French, Spanish, Italian, German.
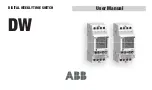
1. Digital Display
A large LCD (Liquid Crystal
Display) shows the time of day
and indicates many of the pro-
gramming settings. The display is
completely interactive with all
other controls.
2. Programming Keys
The Timer has seven push button
keys for setup and program entry.
Working in conjunction with the
rotary selector, the keys are used
to set the time of day, watering time, watering days, start times, and
other functions.
3. Selector Dial
This large dial makes it easy to see which function is currently selected
and/or in which mode the Timer is set to operate.
4. Reset Button
The reset button clears the time, date and user-defined programming but
does not remove the factory installed fail-safe program. To prevent an acci-
dental reset, the button is recessed into the panel and must be pressed with a
small pointed object such as a pen or pencil tip.
Weak or missing batteries can cause the time and date to be erased
after a power failure.
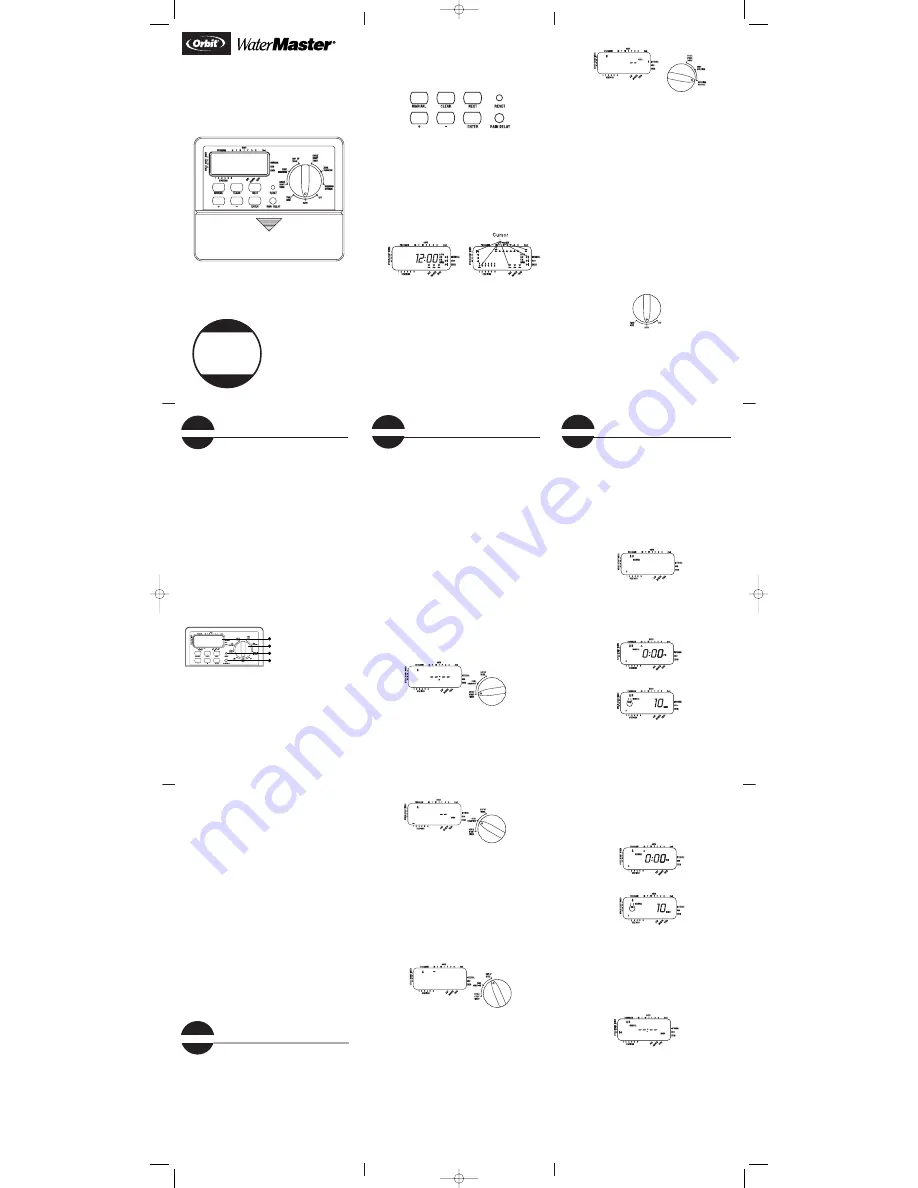
Set the Time of Day and Date
If this is the first time the Timer has been programmed, you should
press the small recessed button labeled
RESET
. Pressing
RESET
does not
affect the factory installed fail-safe program
[See Figure 2].
FIGURE 2: Programming Keys
Turn the rotary dial to the
TIME
/
DATE
position
[See Figure 3].
12:00 AM
will appear in the display with three arrows pointing to
the year, month, and day.
Use the + and - keys to set the correct time of day. When the cor-
rect time of day is reached, press the
ENTER
key to lock in the time.
To increase or decrease more rapidly, hold down either the
+
or
–
keys until the display goes into rapid advance mode.
A blinking cursor will appear below the arrow for the year, month,
and date when programming
[See Figure 3].
Use the
+
and
–
keys to set the correct year, then press
ENTER
.
Use the
+
and
–
keys to set the correct month, then press
ENTER
.
Use the
+
and
–
keys to set the correct date, then press
ENTER
.
FIGURE 3: LCD Display with Surrounding Information
Caution:
If a watering schedule is not entered into the Timer, the factory
installed fail-safe program will turn on each station every day for 10 min-
utes.
To avoid accidental valve activation, either turn the rotary dial to
OFF
or
enter a watering schedule.
Establish a Watering Schedule
To help you visualize how best to program the Timer, it might be
helpful to make a watering plan on paper. This will help you establish
which days and times you want to water.
Notable Programming Features
Two Watering Programs—Summary
The Timer gives you the option of using one or both of the independent
programs. Note that each station can independently be set to either A or
B or both A and B programs.
Program–A
This program lets you schedule selected stations to water on specific
days of the week or to water every 2nd day. Program A repeats itself
continuously in successive weeks.
Program–B
Provides two options: One for odd or even day watering or for intervals
ranging from everyday to every 28th day. This feature is designed to
meet the growing needs and restrictions imposed by local governments
and to conserve water. The Timer automatically calculates odd and even
days (by date) for each month and makes adjustments for leap years to
provide true odd and even watering through the year 2100.
Start-Time Stacking
The Timer has the intelligence to “stack” start times that overlap.
If you enter two or more start times that overlap (in the same or in dif-
ferent programs), the Timer will not activate two stations at the same
time. Instead, the Timer activates the first station and then activates the
next station(s) in sequence after the first station finishes its preset water-
ing duration.
The Timer will NOT stack to the next calendar day. This prevents the
Timer from violating an odd or even day watering schedule.
Manual and Semi-Automatic Modes
The Timer gives you a number of manual and semi-automatic modes for
flexibility in watering. You can override the Timer’s automatic program-
ming in a variety of ways.
Programming the Timer can be accomplished in just a few basic steps.
Before you begin programming, it is important to install the batteries, set
the time of day and date, and establish a watering plan.
Install the Batteries
The Timer requires two AA batteries to maintain the time, date, and pro-
grams in case of AC power loss. In a typical installation, fully charged
batteries should provide sufficient power for approximately three years
of operation.
Remove the terminal cover.
Insert two AA batteries into the battery compartment.
Return the terminal cover to its closed position.
The Timer has two programs you can setup to control a variety of
watering schedules. Depending on your needs, you can use either or
both programs.
Enter Watering Schedule in Any Order
You have the option of entering your watering schedule in whatever
order you like. This feature makes it very easy to review and change
your watering schedule. Your settings can be changed at any time while
you’re setting up the initial schedule or even after years of operation.
Start Times for Program A or B
Note:
A start time is the time of day that the program begins watering the first
station, and all other stations in the program will then follow in sequence. There
are not separate start times for each station. Start times do not correspond to spe-
cific stations, but to programs (A or B). If you enter more than one start time, all
stations in the specified program will water again (in sequence).
The way you set the cycle start time is the same for both programs.
Turn the rotary dial to the
CYCLE START TIMES
position in the program
that you want to set. The display will show an A or B depending on
which program you have selected. The display will show —— : ——
and a blinking cursor in
CYCLE START
1
location
[See Figure 4].
Set the time you want to begin watering for start time 1 using the
+
or
–
keys, then press the
ENTER
key. The display will advance to
START
2.
For additional start times, simply repeat this procedure by
using the
+
and
–
keys to enter the time and then press
ENTER
.
Remember,
Each start time will activate all stations that are set to water
in the specified program. There are not separate start times for each sta-
tion. Start times do not correspond to specific stations.
Up to four start times can be entered per program (A or B).
FIGURE 4: LCD Display with Start Time
Water Duration for Program A or B
Note:
Both programs require watering durations to be programmed.
Turn the rotary dial to
ZONE DURATION
position in either the A or B pro-
gram. The display will show which program you have selected with
an "A" or "B" and the - - cursor blinking at station "1"
[See Figure 5].
FIGURE 5: Station Duration for Program A
You can set the watering duration from 1 to 99 minutes. Press and
hold the + key to advance the number of minutes, or use the - key
to go in reverse, then press
ENTER
.
When the minutes are set, “A” or
“B” will appear over station 1 and the cursor will advance to station
2 and begin blinking.
Simply repeat these steps to set watering durations for all zones on
this program
To skip a station, press the
NEXT
key.
To erase previously programmed watering durations, press the
CLEAR
key.
Assigning Watering Days for Program A
Turn the rotary dial to
DAY OF WEEK
in program A. The display will
show an “A” and the cursor will blink under the days of week
Monday, Tuesday, Wednesday, etc.
[See Figure 6].
FIGURE 6: LCD Display with Watering Days
Press
ENTER
to activate watering on Monday. An arrow appears under
M and the cursor will advance to Tuesday (“T”), press
ENTER
to acti-
vate watering on this day. Repeat these steps for all days of the
week.
To skip a day, press
NEXT
.
To delete a previously entered day, press
CLEAR
If you want to water every second day, press the
NEXT
key to advance
the cursor to “2nd”, then press
ENTER
.
Note:
If you choose to water every 2nd day, you cannot set specific days of
the week for watering
Assigning Watering Intervals for Program B
Program B is used to water at specific intervals between days (1 to 28),
or on odd or even calender dates. The Timer has a leap-year compen-
sator and will ensure conformance to the odd and even schedule
through the year 2100.
Turn the rotary dial to
WATERING INTERVAL
.
The cursor will blink to the
left of the word
INTERVAL
[See Figure 7].
FIGURE 7: LCD Display with Watering Interval
Press and hold the
+
or
-
keys to select the number of days between
watering.
Example:
If you want to water once every 10 days, set the
interval at 10.
To activate the watering interval, press
ENTER
.
Note:
If an interval of “3” is entered today, the Timer will water for the first
time today, and then again every “3” days.
To select odd or even day watering, press
NEXT
.
The cursor will move
to either the odd or even setting, then press
ENTER
.
To erase a schedule, press
CLEAR
.
To enter a new schedule, press
NEXT
.
Reviewing and Changing Your Program
The Orbit Timer lets you easily review a complete watering plan.
For example, to review Program-A watering start times, simply turn the
rotary dial to the
CYCLE START TIMES
position in Program-A and check the
times that have been entered. Using the
NEXT
key, you can advance
through the schedule without fear of disturbing any programming. If
you want to change the start times, watering days, or interval, simply
follow the directions for that program. After reviewing or changing a
watering schedule, remember to turn the rotary dial back to
AUTO
.
Ready for Automatic Operation
After programming is complete, turn the rotary dial to
AUTO
[See Figure 8].
The Timer is now fully programmed and ready to use
in the automatic mode. In automatic mode, each program will operate
sequentially, starting with Program-A.
FIGURE 8: Ready for Automatic Operation
The Orbit
Timer has
the ability to override the automatic program without disturbing the
preset program.
Using the Semi-Automatic Mode
(All stations cycle once both A & B programs)
Turn the rotary dial to
AUTO
,
then press the
MANUAL
key. The dis-
play will show
“AB”, “MANUAL”,
and
“ALL”
will be blinking
[See Figure 9].
This indicates all stations will semi-automatical-
ly water for their assigned durations in sequence.
To activate the
assigned
water durations in the A
and
B programs
for each station, press
ENTER
.
FIGURE 9: Semi-Automatic Watering for Stations Assigned to A and B
Programs
Note:
Water durations assigned to station 1 in program A will water
first, then move to station 1 in program B before advancing to the second
station and will continue alternating. Only those stations assigned a
watering duration will water when using the manual or semi-automatic
mode
[See Figure 10].
FIGURE 10: Semi-Automatic Watering Entered for A and B Programs, All Stations
(All stations cycle once, A program only)
To activate stations assigned watering duration for the A program
only,
press the
MANUAL
key, followed by the
NEXT
key. This will activate sta-
tions with assigned watering durations in the A program only. To initi-
ate this semi-automatic watering, press
ENTER
[See Figure 11].
(All stations cycle once, B program only)
To activate stations assigned watering durations for the B pro-
gram
only,
press the
MANUAL
key, followed by pressing the
NEXT
key
two distinct times. This will activate only those stations with
assigned watering durations in the B program only. To initiate this
semi-automatic watering, press
ENTER
.
FIGURE 11: Manual Watering in Either the A or B Program Only
Using Manual Operation
The manual operation mode allows you to set durations in any of
the stations from 1 to 99 minutes.
Turn the rotary dial to
AUTO
.
Press the
MANUAL
key. Then press
NEXT
three times. The display
will show a blinking cursor on station 1 along with
- - MINS
[See Figure 12].
FIGURE 12: LCD Display with Manual Operation
To set the number of minutes for watering duration, press and
hold the
+
key to advance to desired number of watering minutes.
Use the
-
key to go in reverse. Press
ENTER
to begin watering.
To skip a station, press
NEXT
until the cursor is blinking over the
station number you wish to program. Example: To set station 3
for five minutes, press the
MANUAL
key; then press the
NEXT
key
five times to select the manual operation mode and advance to
watering for station 3; using the + or - key, set the manual water-
ing duration to five minutes; then press
ENTER
[See Figure 13].
FIGURE 13: Manual Watering Station 3 for Five Minutes
1
s e c t i o n
1
4
3
2
Introduction
FIGURE 1: Location of Controls
on the Timer
2
s e c t i o n
Getting Started
3
s e c t i o n
Programming
Semi-Automatic &
Manual Operation
4
s e c t i o n
ALL
MODELS
5:00
WTM230158 57114-14 rF_Eng.qxd 12/10/2002 1:50 PM Page 1