


B-HYVE XR
SMART
INDOOR/OUTDOOR
SPRINKLER TIMER
User’s Guide
TIMER INSTALLATION
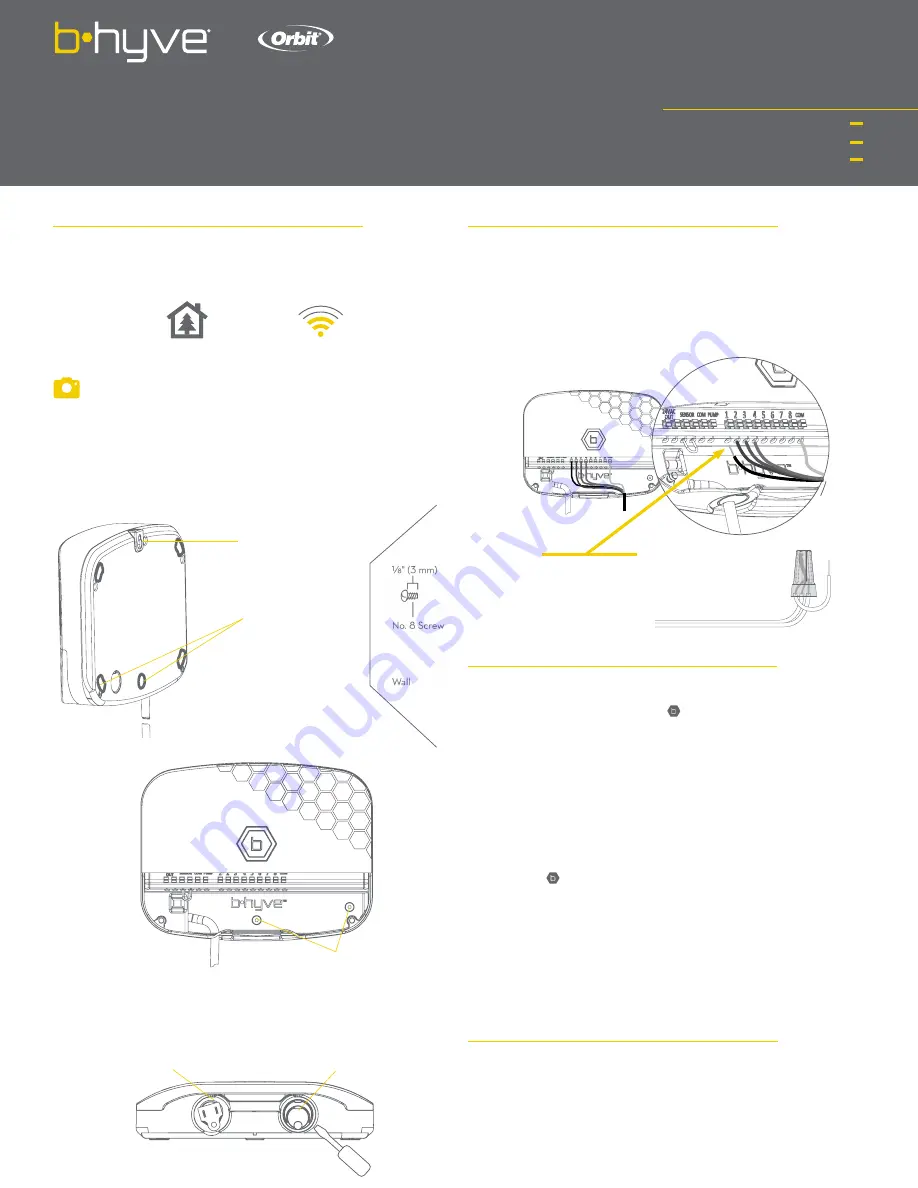
Select a location
Choose a location near power and away from direct sunlight, if possible. This
location should also have a good Wi-Fi signal. You can check this using a smart
phone. (Find a location that has a minimum of two bars)
Mount the timer
Install a screw (included) into the wall. Use the expanding anchors (included) for
plaster, masonry or drywall installations. Hang the timer on the installed screw
using the keyhole slot. Level the timer and drive the second screw through one
of the preformed mounting holes to secure the timer.
Note:
If replacing a timer, it is helpful to take a photo of the wires before
you remove them from the old timer.
CONTENTS IN THE BOX
B-hyve XR Smart Sprinkler Timer
Mounting Screws and Anchors
Quick Start Guide
Keyhole
Pre-formed
Mounting Holes
Wire hole with 1/2” and 3/4”
knock-outs. (Remove with
screwdriver.)
Bottom View
Front View
Knock-out for
hardwired installations
minimum signal
indoor or outdoor
Pre-formed
Mounting Holes
CONNECT VALVE WIRES
Prepare wire
Strip 1/2” (13 mm) of insulation from each wire.
Connect wires
Push in one wire from each valve to a “Common” (COM) wire and the other
wires to a numbered terminal (only one wire per terminal).
Note:
We recommend you consult an electrician for hardwired installations.
1. Strip Wire
2. Push In
Tie multiple common
wires together with a
wire nut and a short wire
connected to the timer.
CONNECTING TO WI-FI
Plug in your Orbit® B-hyve® timer
Once your B-hyve timer is plugged into the power source, it will automatically
look to pair with your smart device. The will begin to blink blue. This indi-
cates that your timer is ready to pair with your smart device. Ensure that your
smart device has Bluetooth® turned on.
Connect to your Orbit® B-hyve® timer
Open your B-hyve app, create an account or login, and follow the step-by-step
process to add and set up your device. The B-hyve app will connect to your
device and you will, then, be guided to connect to your home Wi-Fi network.
Connect to your Wi-Fi network
Select your network from the list and enter the password for the network to
connect your timer to your Wi-Fi signal. When
connected, the will illuminate solid white indicating a successful pairing.
Note:
If you do not see your network name in the list, tap the refresh button in the
app. If your network name still does not appear, tap “Advanced” in the app and
enter your network name and password. The B-hyve App and the display windows
on the timer will assist you through the timer pairing and set-up process.
Note:
For optimum timer performance, connect the Wi-Fi to recieve the lastest
timer updates.
PROGRAMMING AND OPERATION
Programming the timer
The app has help screens and video to assist you with Wi-Fi connections, pro-
gramming, smart watering and other general questions you may have.
Note:
Your programmed schedules are stored both in the app and on the timer.
Watering will continue, if Wi-Fi connection is lost.


