

+++
**)
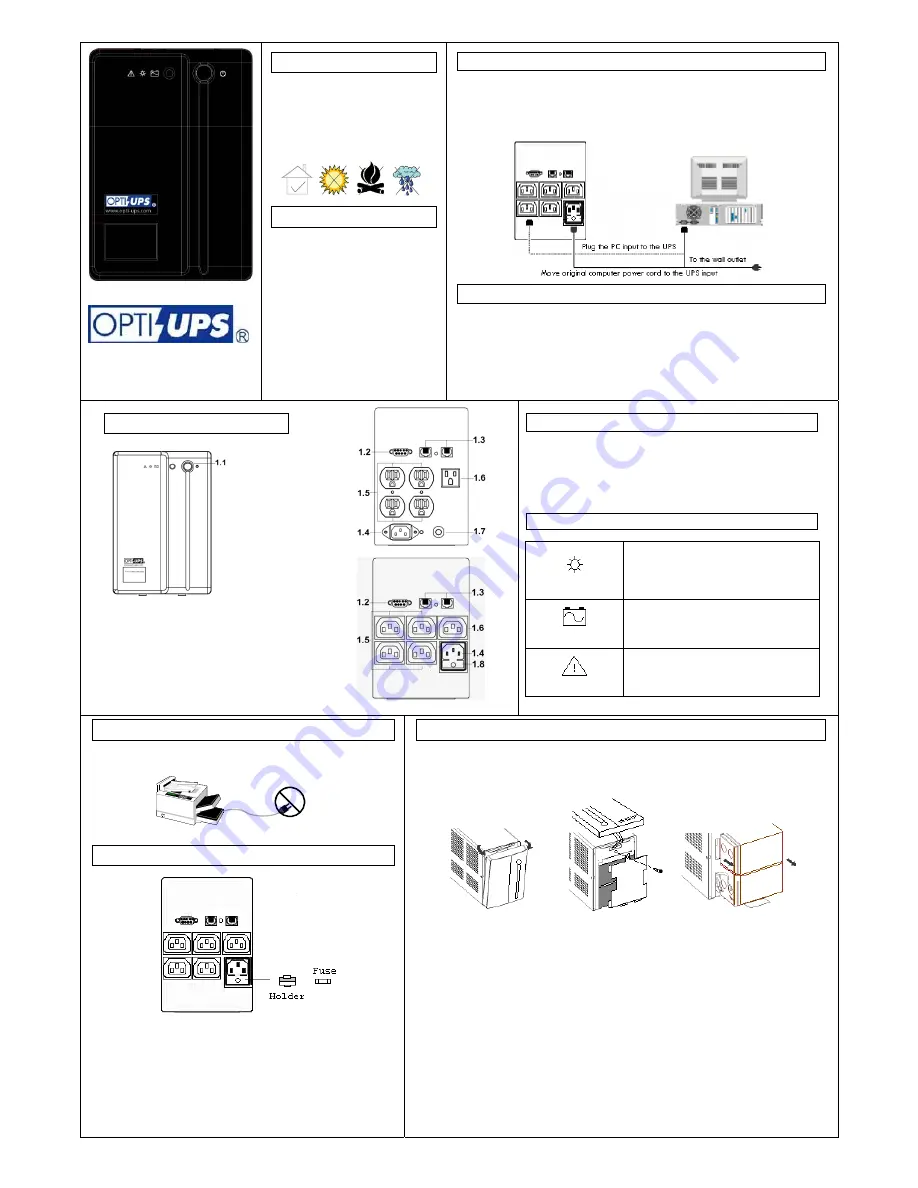
Placement
This UPS is intended for indoor use
only;
its internal components are not
sealed
from the environment.
Please install it in a protected
environment away from excessive heat
or excessive moisture.
Charging the UPS first
The battery is fully charged at the
factory. However, it is recommended to
charge the battery at least 8 (eight)
hours before using the UPS, since
energy loss may have occurred during
shipping or long duration storage. To
recharge the battery, simply leave the
UPS plugged into an AC outlet.
Connecting your equipment to the UPS
For UPS models with US-type outlets: connect the power cord(s) of your computer
equipment to the output receptacle(s) of the UPS.
For UPS with IEC outlets, as shown in the illustration, use your computer power cord to
connect UPS to the wall socket. Use the power cord supplied with the UPS to connect
your PC to one of UPS outlets (item 1.5 on the rear panel drawing below).
Turn on the UPS
To turn UPS on please press the power button for 3 seconds. Pressing the power button
shortly under normal mode will enable the self-test function. The silence function can be
enabled/disabled by shortly pressing the power button in backup mode. In addition, the
power button can be used as the master on/off switch for your equipment by leaving your
equipment connected to UPS and switched on. To turn off the UPS, please press power
button for about 3 seconds.
Warning
DO NOT PLUG LASER PRINTERS INTO THE UPS BECAUSE
THEY TYPICALLY DRAW TOO MUCH POWER
Fuse replacement procedure
(Note: for 220V/230V/240V units only)
1.
Use a slotted screwdriver to take out the fuse holder
2.
Take out the busted fuse from the fuse holder
3.
Use the screwdriver to push out the spare fuse from the holder
4.
Put the spare fuse in the holder
5.
Push the fuse holder back into the AC input socket
6.
Follow the UPS turn on procedure
Battery replacement procedure
Note: Follow this procedure for safe replacement of the battery. However, small sparks may occur
during the process. This is normal.
1.
Turn off the UPS and unplug it from the wall outlet
2.
Remove two screws both sides nearby the front panel
3.
Gently pull the top portion of the front panel until it unsnaps
4.
Place the front panel on top of the unit taking care not to pull out the wires for the panel
5.
Remove the screw for the battery cover
6.
Gently pull out the batteries using the tab located at the base of the battery
7.
Disconnect the two long wires connecting the batteries to the UPS
8.
Use the short wire to connect between the batteries and push the new batteries into place
9.
Connect the long wires to the new batteries, making sure that the red wire is connected to the red
battery terminal of the lower battery and the black wire to the black battery terminal of the upper
battery
10.
Mount the battery cover and replace the screw
11.
Snap back the front panel into place
12.
Follow the UPS turn on procedure
Front & Rear Panels
1.1 Power Button 1.5 UPS Outlets
1.2 RS-232 Port
*)
1.6 Surge Suppression Outlet
**)
1.3 Phone/LAN Jack
*)
1.7 Circuit Breaker
1.4 AC Input 1.8 AC Fuse
_____________________________________________
*)
TS-B models only
**)
Battery Backup Outlet for TS1700(B) (110V/120V) /
TS2250(B) (110V/120V/220V/230V/240V)
No Load Shutdown Function
As a battery saving feature, the UPS will automatically turn off if none
of the connected equipment is operating while the UPS is in back-up
mode. Once normal utility power returns, the unit will re-start
automatically. You can disable the “No Load Shutdown” function by
pressing the power button of your switched-off UPS until you hear two
beeps.
Front panel LED (UPS status indicator)
AC Mode
When the LED is continuously lit and the
buzzer is silent, the UPS is in normal mode and
providing power to your equipment. The UPS
will continue to filter electrical noise and
provide surge protection.
Battery Mode
When the LED blinks every 2 seconds in time
with the beeping sound, the UPS is providing
power from its battery.
Fault
When the LED is flashing rapidly and the
beeping sound is continuous, it indicates that
the UPS is overloaded.
www.opti-ups.com
Thunder Shield
User Manual


