background image

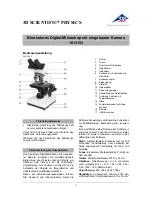
DISK SCANNING BIOLOGICAL MICROSCOPE

Petition

Thank you for your adoption of OLYMPUS microscope, this time.
Please read this manual carefully in order to get optimum performance of this microscope
and for safety considerations.
When using microscope, please have this manual by you and keep it with care.

AX

6608

Summary of Contents for IX2-DSU

Page 1: ...u for your adoption of OLYMPUS microscope this time Please read this manual carefully in order to get optimum performance of this microscope and for safety considerations When using microscope please...

Page 2: ......

Page 3: ...this section for safe use of the equipment 1 Caution 1 Suggestions to unpacking 1 Safety Caution 2 Symbol for safety considerations 3 Warning labels 4 When using the system 5 Cleanup and storage 5 Cau...

Page 4: ...g 3 8 3 7 Changeover of visual mirror unit front side 3 9 3 7 1 In case of BX 3 9 3 7 2 In case of IX 3 9 3 8 Disk IN OUT 3 10 3 9 Shutter OPEN CLOSE 3 10 3 9 1 In case of BX 3 10 3 9 2 In case of IX...

Page 5: ...itted light phase contrast observation 4 6 4 3 2 Transmitting differential interference observation 4 6 5 TROUBLESHOOTING GUIDE 5 1 6 SPECTRAL CHARACTERISTICS OF FILTERS 6 1 7 SPECIFICATIONS 7 1 7 1 B...

Page 6: ...n of UV cut plate 8 17 8 15 1 In case of BX 8 17 8 15 2 In case of IX 8 17 8 16 Installation of filter or shutter In case of U FWR or IX2 SHA 8 17 8 17 Filter IN OUT inside motorized filter wheel 8 18...

Page 7: ...box without removing transportation lock knob the disk unit may be damaged 1 Loosen two fixing screws 2 of access panel 1 on top of disk box using dedicated the Allen screwdriver that comes with micr...

Page 8: ...n fixing screws 2 at 2 places and fix it Safety Caution l When you change disk turn power of control box to OFF position and wait for one minute or more until the turn of disk is completely stopped Th...

Page 9: ...ide turret and rear side turret strong light would be applied to the specimen and it is dangerous Regarding method of changeover for front and rear side turret refer to Section 3 7 Changeover of mirro...

Page 10: ...ched to the place where caution is particularly required for operation Observe the instructions Lamp house mount adapter Hot Surface caution Disk box Entanglement caution When warning label is blurred...

Page 11: ...use will get very hot When installing acquire adequate space in vicinity of lamp house 10cm or more particularly on top Cleanup and storage l Never put dirt or fingerprint on surface of lens and filte...

Page 12: ...llowing manual conventions Conventions of note reference and point Conventions Description Indicates note to prevent injury of user and damage of product including home furniture etc Note Typical note...

Page 13: ...I I...

Page 14: ......

Page 15: ...with motorized focusing control of motorized microscope and thus by changing wavelength through Z drive of focusing control it acquires images for myriad observation 1 1 Principle Light emitted from...

Page 16: ...excited light of various wavelengths can be used by combination of excitation filter and cube In case of non confocal observation by displacing the disk from light path an image of deep focal point w...

Page 17: ...rescence BX RFAA and BX RLAA Motorized filter wheel U FWT and U FWO When you integrate motorized revolving nosepiece connect control box IX2 UCB with use of connecting cable U REMMT Monitor Computer C...

Page 18: ...MICROSCOPE BX61WI CONTROL BOX FOR IX2 HAND SWITCH IX2 UCB U HSTR2 Cooled CCD Camera Manual for Cooled CCD Camera you may use Computer Monitor Manual for computer you may use 1 3 2 BX DSU BX DSU inclu...

Page 19: ...h the following units Motorized fluorescent mirror unit cassette IX2 RFACA and motorized filter wheel U FWT and U FWO Monitor Computer Cooled CCD Camera Control box IX2 UCB DSU motor drive board DU MT...

Page 20: ...CH IX2 UCB U HSTR2 Cooled CCD Camera Manual for Cooled CCD Camera you may use Computer Monitor Manual for computer you may use 1 3 4 IX2 DSU IX2 DSU includes the units which have a mark in its descrip...

Page 21: ...I II I...

Page 22: ......

Page 23: ...Lateral Longitudinal feed handle Turn turret of front side and insert visual mirror unit that fits to specimen into light path Visual mirror unit front side 3 7 Turn turret of rear side and insert No...

Page 24: ...e 3 7 Set camera setting for observation Control of camera Adjust light intensity with use of ND filter to put in or remove from light path Filter change button Camera observation Put disk into light...

Page 25: ...23 UApo40x3 340 0 11 0 23 UPlanApo60xW3 0 15 0 20 LCPlanFI40x 0 2 5 and 60x 0 2 5 all come with a correction ring can compensate deterioration of resolution due to variance of cover glass thickness C...

Page 26: ...MBFL3 that ND filter is built in or insert ND filter of 3 Note to excitation bandwidth A few sets of excitation filters combined for different bandwidth are available Typically a set of wide bandwith...

Page 27: ...445 BA460 510 quinacrine quinacrine mustard Dyeing Chromosome thioflavine S Dyeing lymph cell acriflavine Dyeing Nucleic acid CFP use U MGFPHQ DM485 BP460 480 BA495 540 U MWB2 BP460 490 U MNB2 BP470...

Page 28: ...IBA2 BP460 490 IB U MNIBA2 DM505 BP470 490 BA510 550 Observation of B excited coloring matter only when Dyeing B excited coloring matter or multi Dyeing TRITC or texas red Meaning of mirror unit name...

Page 29: ...BV B IB G IY Phase contrast BX2 BX2WI IX2 Applicable disk UPlanApo 4x DSU D1 DSU D2 10x DSU D1 DSU D2 20x DSU D1 DSU D2 20xO DSU D1 40x DSU D3 40xOI3 DSU D1 DSU D2 60xW3 DSU D3 60xW IR3 DSU D3 100xOI...

Page 30: ...differential interference contrast observation the same combination as BX2 provided that it uses U UCD8 Useable combination Useable combination but it gets dark For phase contrast observation objectiv...

Page 31: ...up microscope IX and its operation buttons will be displayed on tab called Frame SW When you use BX61 BX62 or BX61WI however microscope does not appear Assignment of operating buttons for microscope...

Page 32: ...he identifying plate indicates IX2 UCB 2 3 5 Powering up 1 Switch on the control box 2 Switch on the lamp 3 Switch on CCD camera 3 6 Focusing Use coarse fine handle to bring the specimen in focus In c...

Page 33: ...IX 1 Look at mirror unit indication 1 on surface of mirror unit cassette or look at indication 2 at right side of turret and verify mirror unit number that is currently inserted into light path In ca...

Page 34: ...ft side of disk box would light in green and when it is displaced from light path the LED would go off 3 9 Shutter OPEN CLOSE 3 9 1 In case of BX When shutter knob 1 located at right lower side of tur...

Page 35: ...ssigned at ex factory as illustrated in left figure Two buttons one is for clockwise turn and the other for counter clockwise turn When you insert reference mirror put in No 1 verify that front side t...

Page 36: ...croscope frame to bring the specimen in focus 6 Pull out field iris diaphragm lever 3 located at side of illumination tube and squeeze it to the smallest diameter 7 Insert the Allen screwdriver that c...

Page 37: ...e 3 Turn rear side turret and insert reference mirror of No 1 into light path 4 Move shutter knob 1 to left mark side to open the shutter 5 Put objective lens 10x into light path Put centering target...

Page 38: ...ctory When you wish to make stringent adjustment further excersize the following procedures besides the procedures described in previous section Meanwhile note that after adjustment the state at ex fa...

Page 39: ...the procedures to go back to the original state 4 Turn rear side turret and bring arbitrarily selected fluorescent mirror unit or empty place into light path 5 Turn front side turret and bring referen...

Page 40: ......

Page 41: ...serve which part of cell is emitting fluorescence plainly 4 1 1 Simultaneous observation of reflected light fluorescent and phase contrast For phase contrast observation condenser U PCD2 or universal...

Page 42: ...r unit the place where fluorescent mirror unit is not installed into light path 2 Adjust polarizer of universal condenser and make it in Cross Nicol state 3 Insert revolving nosepiece into transmittin...

Page 43: ...is used instead of analyzer U AN When change of reflected light fluorescence and transmitting Nomarski differential interference is frequently done but simultaneous observation is not required it woul...

Page 44: ...des lamp ON OFF button Use these buttons when you change to fluorescent observation only 4 2 1 Simultaneous observation of reflected light fluorescence and phase contrast For phase contrast observatio...

Page 45: ...sepiece into differential interference slider 4 Turn turret of condenser and select turret of Nomarski prism that meets with objective lens to be used 5 Put the objective lens to use into light path 6...

Page 46: ...ut dummy mirror unit of rear side turret the place where fluorescent mirror unit or reference mirror is not installed into light path 2 Turn front side turret and put reference mirror of No 1 into lig...

Page 47: ...t turn Stripes of disk appear on the monitor Confocal effect cannot be acquired even if disk were put into light path Transport lock is left as attached Remove transport lock 8 4 Mirror unit is about...

Page 48: ...gm correctly 3 12 Field iris diaphragm is squeezed excessively Open aperture adequately 3 12 Centering of lamp house is not done Do centering of lamp house correctly 3 13 Visual mirror unit is positio...

Page 49: ...t to adequate time Instruction manual of camera used Range of camera brightness level is not correct Adjust to adequate level Instruction manual of camera used Non fluorescent glass is not used Use no...

Page 50: ......

Page 51: ...SPECTRAL CHARACTERISTICS OF FILTERS II DSU II 6 1 Page 6 SPECTRAL CHARACTERISTICS OF FILTERS RFPHQ DSU MRFPHQ 0 100 300 400 500 600 700 800 Wavelength nm Transmittance DM560 BA570 620HQ BP535 555...

Page 52: ......

Page 53: ...IN OUT system with hand switch Filter Electric filter wheel Electric 6 hole turret system 1 Empty hole 2 ND25 3 ND12 4 ND6 5 ND3 6 ND1 5 Front turret Manual 6 hole turret system 1 hole fixed mirror a...

Page 54: ...mpty hole 2 ND25 3 ND12 4 ND6 5 ND3 6 ND1 5 Front turret Manual 6 hole turret system 1 hole fixed mirror accessory Reference mirror Mirror unit turret Rear turret Electric 6 hole turret system 1 hole...

Page 55: ...er cable 3m D SUB 15 pin Control cable 1 7m Control cable 1 7m 20 pin Half pitch Halogen lamp extension cable 1 7m Microscope control cable 2m Turret cable 2m D SUB 9 pin 20 pin Half pitch Camera sign...

Page 56: ...Half pitch Halogen lamp extension cable 1 7m Microscope control cable 2 2m Turret cable 2m D SUB 9 pin 20 pin Half pitch Camera signal cable 4 5m D SUB 25 pin Parallel port Serial port Round type 4 p...

Page 57: ...n correct mounting position 5 While pressing the light illuminator towards rear side fix mounting screws 2 4 pieces to the light illuminator by turning the dedicated the Allen wrench that comes with k...

Page 58: ...ght illuminator 2 places 8 3 Installation of disk box 1 Loosen fixing screws 1 2 places using the Allen screwdriver 2 Insert disk box 2 into light illuminator observing pin position and push it until...

Page 59: ...of disk unit and open disk cover 6 4 Loosen transportation lock knob 7 and remove it from disk unit 4 Attach the transportation lock knob you just removed to threaded hole 8 of the disk unit Keep tra...

Page 60: ...he Allen screwdriver 4 Loosen fixing screw 4 of stand and put stand that comes as accessory underneath the illuminator Stand should be attached for sure to prevent upside down 5 Extend the stand to ap...

Page 61: ...the support or old lamp 4 Install mercury lamp designated to mounting socket firmly observing polarity to upper base and polarity to lower base Lamp to use should be USH102D made by Ushio Electric or...

Page 62: ...mercury lamp l Life of mercury lamp is either 200 or 300 hours Lamp may burst when the life of lamp is over When you used 200 hurs USH102D or 300 hours HBO103W 2 replace the lamp with new one for safe...

Page 63: ...n in identifying plate 1 The 100 V system can be used with voltages in the 100 to 120 V range and 200 V system can be used with voltages in the 220 V to 240 V range both with frequencies of 50 or 60 H...

Page 64: ...en screwdriver 8 9 2 In case of IX When you remove cassette during operation close option shutter for sure or turn power of light source to OFF position If you remove mirror unit cassette while the sh...

Page 65: ...ached at No 1 position Do not change the position of this reference mirror 2 Insert mirror unit 3 to be used into mount dovetail 4 of mirror unit and push it until it hits to dead end and then tighten...

Page 66: ...d detach it by pulling upward In case of reflected light fluorescence observation attach dummy mirror unit for sure to the place where mirror unit is not installed In case of transmitting observation...

Page 67: ...Filter excitation filter or dichroic mirror Dimensional conditions for optical parts Barrier Filter Excitation filter mm 25 0 2 0 1 f Max Height 6mm Dichroic filter mm 38 26 0 3 0 1 0 3 0 1 Thickness...

Page 68: ...vetail of disk box and push the turret from top until it hits to dead end 4 Tighten fixing screw 3 using the Allen screwdriver 5 Attach access panel 1 on top of disk box and tighten fixing screws 2 2...

Page 69: ...access panel 2 Loosen fixing screw from hole 3 located at left side of disk box using the Allen screwdriver and pull disk unit 4 upward Pull out disk unit gently so as not to hit disk unit with insid...

Page 70: ...isk cover 6 to original position and tighten knob 5 of disk unit 2 places and fix the cover 8 The disk removed should be kept in the packet Transport lock knob should be attached to the disk unit 9 Al...

Page 71: ...fixing knob to fix firmly 8 16 Installation of filter or shutter In case of U FWR or IX2 SHA 1 Loosen fixing screws 1 that fix lamp house mount adapter at two places and remove the lamp house mount a...

Page 72: ...e filter wheel 2 3 Loosen fixing screws 3 of filter wheel cover at four places using the Allen screwdriver and remove the cover Filter is of 32mm diameter 25mm diameter use conversion adapter and thic...

Page 73: ...tion must be made in reverse with arrow 5 When you finished installation of all filters required return the filter wheel cover to original position and fix it by tightening four fixing screws 3 6 Inse...

Page 74: ...ter for Ludl In case of LAMBDA10 1 Screw in the upper adapter and lower adapter by turning them into threaded holes 1 and 2 of C mount for filter wheel and fix them firmly as illustrated 2 Align filte...

Page 75: ...remove adapter that is attached from the beginning using Philips type screwdriver 2 Align direction with red index 9 of port as illustrated and fasten four screws 10 that come as accessories from with...

Page 76: ...that comes as accessory for microscope frame and remove C mount adapter 2 inside the port 2 Screw in and fix the C mount adapter 2 that was removed to C mount section 3 of camera firmly 3 Insert C mo...

Page 77: ...drive board after you turn power of control box to OFF 1 Loosen four fixing knobs for two option slot covers at left side of back panel of control box 1 and remove covers and knobs 2 Aligning directio...

Page 78: ...P SW Use DIP SW set to OFF except the following DIP SW Turn DIP SW that is to be changed only to ON S2 NO 4 Interchanges F C change button and Stage retreat button located at left side of BX61 BX62 to...

Page 79: ...en if correct setting was done Rotation of focusing handle and actual objective lens movement would be reversed Focusing control may not be able to initialize depending upon the position Microscope do...

Page 80: ...obs you removed fix Z board 2 Likewise attach the other cover 3 Keep one piece of slot cover that remained with care as it may be required for Z board when it is removed 8 23 3 In case of IX81 For Z b...

Page 81: ...st install Z board after you turn power of control box to OFF 1 Loosen fixing knobs 6 pieces for two slot covers at back side of control box 1 and remove covers and knobs 2 Aligning direction of conne...

Page 82: ......

Page 83: ......

Page 84: ...INC 2 Corporate Center Drive Melville NY 11747 3157 U S A OLYMPUSSINGAPOREPTELTD 491B River Valley Road 12 01 04 Valley Point Office Tower Singapore 248373 OLYMPUSOPTICALCO U K LTD 2 8 Honduras Street...

Reviews: