Oki C9000 Series, User Manual
The Oki C9000 Series provides high-quality printing solutions for businesses. For detailed Brochure & Specs, users can download the manual for free from manualshive.com. Unlock the full potential of your printer with easy access to essential information to optimize performance and efficiency. Download your manual today!
Share
Download


Reviews:
No comments
Related manuals for C9000 Series

P2200 Series
Brand: Pantum Pages: 105

V-100
Brand: VASTEX Pages: 15

e7
Brand: Raymarine Pages: 135

PIXMA MG3120
Brand: Canon Pages: 4

PIXMA MG4120
Brand: Canon Pages: 4

MFX-3550
Brand: Muratec Pages: 213

M1DX
Brand: AstroJet Pages: 97

Arizona 640 GT
Brand: Oce Pages: 230

4400B - Phaser B/W Laser Printer
Brand: Xerox Pages: 24

Aficio SP 320 Series
Brand: Ricoh Pages: 272

Nuvera 100 roduction Systems
Brand: Xerox Pages: 70

LaserMatrix LM2405
Brand: Output Technology Pages: 249

FS-1041
Brand: Kyocera Pages: 16
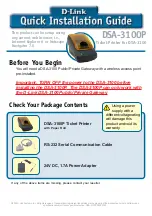
DSA-3100P - B/W Thermal Line Printer
Brand: D-Link Pages: 8

Stylus Office TX600FW Series
Brand: Epson Pages: 4

imagePress C710
Brand: Canon Pages: 129

imagePRESS C7000VP Series
Brand: Canon Pages: 87

imagePRESS C7000VP Series
Brand: Canon Pages: 137


