background image

Installation

Note:

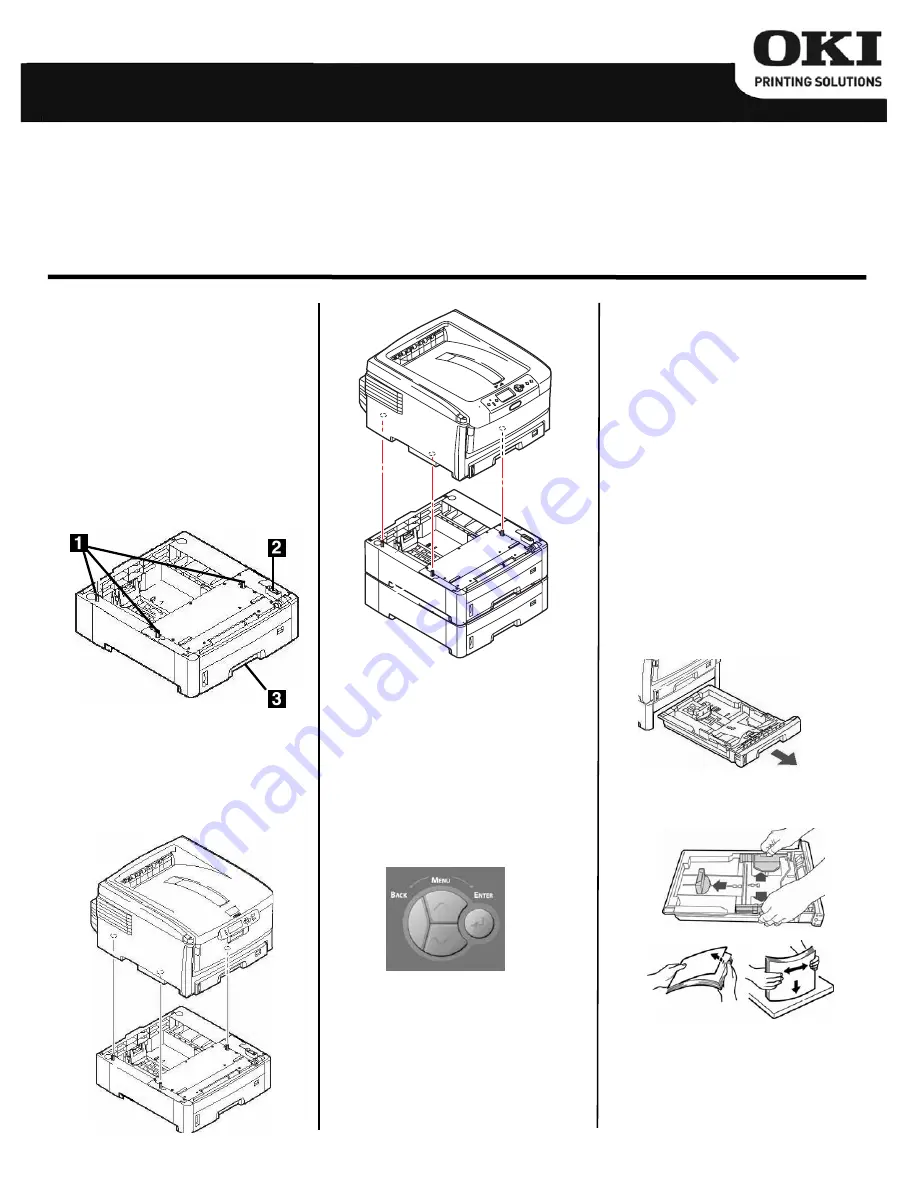
Two optional paper trays can 

be installed.

1. Unpack the tray.  Remove the 

shipping materials.

2. Turn off the printer.  Unplug the 

power cord.

3. Remove the interface cable.
4. Note the location of the pins (

1

), 

connector (

2

) and tray opening 

(

3

).  

5. Lower the printer onto the 

auxiliary tray, aligning the printer 

with the tray and lowering the 

holes/plug in the bottom of the 

printer onto the pins/connector on 

the tray(s). 

6. Check to be sure that the 

connection between the printer 

and the optional tray is secure.

7. Attach the interface cable.
8. Plug in the power cord.  Turn on 

the printer.

Check the Menu 

Settings for Tray2/

Tray3  

1. Press Enter. 
2. Press 

  repeatedly to scroll down 

to Print Information. Press Enter. 

3. Press Enter to select 

Configuration. 

4. Press Enter to select Execute.

The Configuration report prints. 

Scan down to Menus on the printout 
and check the settings for Tray2 

(Tray3

)

To change the settings:
1. Press Enter. 
2. Press 

  repeatedly to scroll down 

to Menus. Press Enter. 

3. Press Enter to select 

Configuration. 

4. Press 

  repeatedly to scroll down 

to Tray 2 Config. (Tray3 Config.). 

Press Enter. 

5. Make any needed changes. 
6. Press On line to engage the 

settings and exit the menu. 

Load Paper

1. Pull out the tray and remove any 

packing materials.    

2. Position the paper guides in the 

tray. Fan the paper.

Optional Paper Tray

English . . . . . . . . . . . . .1
Français . . . . . . . . . . . .3
Español. . . . . . . . . . . . .5
Português. . . . . . . . . . .7

Installation Instructions

Summary of Contents for C810n

Page 1: ...ck the Menu Settings for Tray2 Tray3 1 Press Enter 2 Press repeatedly to scroll down to Print Information Press Enter 3 Press Enter to select Configuration 4 Press Enter to select Execute The Configur...

Page 2: ...cintosh Note This is required for IP and Bonjour connections only USB and AppleTalk connec tions are normally configured automatically Macintosh OS X 3 Panther 1 Open the Mac OS X Print Fax Preference...

Page 3: ...ise sur pour acc der Print Information Appuyez sur ENTER Entr e 3 Appuyez sur ENTER Entr e pour s lectionner Configuration 4 Appuyez sur ENTER Entr e pour s lectionner Execute Ex cuter Le rapport Conf...

Page 4: ...connexions USB et AppleTalk sont normalement configur es automatique ment Macintosh OS X 3 Panther 1 Ouvrez le dossier Print Fax Preferences Pr f rences impression et t l copie de Mac OS X 2 Select Pr...

Page 5: ...sione ENTER 2 Presione varias veces para encontrar Print Information Men de impresi n Presione ENTER 3 Presione ENTER para seleccionar Configuration Configuraci n 4 Presione ENTER para seleccionar Exe...

Page 6: ...nal 6 Haga clic en OK Aceptar dos veces 7 Cierre Chooser Selector Active en el Controla dor Macintosh Nota Esto es necesario s lo para las conexiones IP y Bonjour las conexiones USB y AppleTalk genera...

Page 7: ...cessar Print Informa tion mprimir informa es Pressione Enter 3 Pressione o bot o Enter para sele cionar Configuration Configura o 4 Pressione o bot o Enter para selecionar Execute Executar O relat rio...

Page 8: ...AppleTalk s o normalmente configuradas automaticamente Macintosh OS X 3 Panther 1 Abra Print Fax Preferences Prefer ncias de impress o e fax do Mac OS X 2 Selecione Printing Impress o 3 Selecione Set...

Reviews: