Newer Technology miniStack NAS, User Manual
Introducing the Newer Technology miniStack NAS - a versatile storage solution packed with innovative features. To easily set up and unleash the full potential of this product, don't forget to download the comprehensive User Manual from our website for free. Embrace seamless functionality and unleash your storage potential with us today!
Share
Download


Reviews:
No comments
Related manuals for miniStack NAS
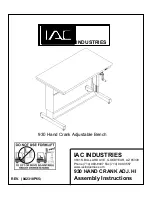
930
Brand: IAC INDUSTRIES Pages: 8

Touro Mobile
Brand: HGST Pages: 2

StoraXe PowerBooster GSS0608
Brand: ADS-tec Pages: 140

6318280
Brand: Compaq Pages: 157

Mobius Pro
Brand: OYEN DIGITAL Pages: 2

TS7650 PROTECTIER DEDUPLICATION APPLIANCE
Brand: IBM Pages: 218

30082SK-PTX
Brand: ABSCO SHEDS Pages: 18

DJSA-210 - Travelstar 10 GB Hard Drive
Brand: IBM Pages: 211

HD-HCU2 DriveStation
Brand: Buffalo Pages: 8

NA762TB3
Brand: Netstor Pages: 17

MemCard PRO
Brand: 8BitMods Pages: 15

2.5-INCH Travelstar HTS542525K9A300
Brand: Hitachi Pages: 2

2.5-INCH Travelstar HTS542525K9A300
Brand: Hitachi Pages: 5

2.5-Inch Mobile 7200 RPM 9.5mm Travelstar HTS727575A9E364
Brand: Hitachi Pages: 2
5000 Series
Brand: Hitachi Pages: 82

88-06-0x
Brand: Hitachi Pages: 137

3.5-INCH Deskstar HDP725050GLAT80
Brand: Hitachi Pages: 2

3.5-inch Deskstar HDS721010DLE630
Brand: Hitachi Pages: 2


