NETGEAR DM200, User Manual
The NETGEAR DM200 is a high-performance modem that offers seamless internet connectivity. Need a user manual to get started quickly? Look no further! Download the free and comprehensive Quick Start manual from manualshive.com to effortlessly set up and optimize your DM200 for uninterrupted browsing and networking.
Share
Download


Reviews:
No comments
Related manuals for DM200

V.90 PCI
Brand: IBM Pages: 82

SONIC
Brand: T-Mobile Pages: 10

B18-04649-01
Brand: Dantel Pages: 14
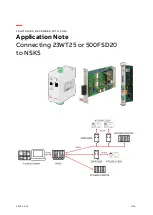
23WT25
Brand: ABB Pages: 20

URT-500
Brand: RFDATATECH Pages: 42

VT-MODEM
Brand: Sixnet Pages: 30

BreezeMAX Si 4000
Brand: Alvarion Pages: 8

3920
Brand: Paradyne Pages: 3

Cudy WU1300S
Brand: ALZA Pages: 32

cg3000-2staus
Brand: NETGEAR Pages: 2

005699-00 -
Brand: 3Com Pages: 12

Mesh 5.0
Brand: goTenna Pages: 22

684
Brand: Tahoe Pages: 36

TA-102
Brand: Terayon Pages: 26

08-01002-01
Brand: Elastic Networks Pages: 32

TDM-C504
Brand: TRENDnet Pages: 15

2884C
Brand: US Robotics Pages: 80

UniMod LTE
Brand: Baer Pages: 32


