791-7170
1
rev. 03/04/16
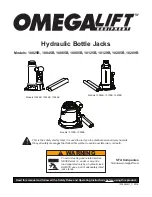
Capacity. . . . . . . . . . . . . . . . . . . . . . . . . . . . . . . . . . . . . . . . . . . 1 Ton
Low Height. . . . . . . . . . . . . . . . . . . . . . . . . . . . . . . . . . . . . . . . . . . 10"
High Height . . . . . . . . . . . . . . . . . . . . . . . . . . . . . . . . . . . . . . . . . . 44"
Saddle Forward Tilt . . . . . . . . . . . . . . . . . . . . . . . . . . . . . . . . . . . . 40°
Saddle Backward Tilt . . . . . . . . . . . . . . . . . . . . . . . . . . . . . . . . . . 25°
Saddle Left Tilt . . . . . . . . . . . . . . . . . . . . . . . . . . . . . . . . . . . . . . . 12°
Saddle Right Tilt . . . . . . . . . . . . . . . . . . . . . . . . . . . . . . . . . . . . . . 10°
Front Width . . . . . . . . . . . . . . . . . . . . . . . . . . . . . . . . . . . . .27-15/16"
Back Width . . . . . . . . . . . . . . . . . . . . . . . . . . . . . . . . . . . . . .25-3/16"
Length . . . . . . . . . . . . . . . . . . . . . . . . . . . . . . . . . . . . . . . . . . .53-1/2"
Shipping Weight . . . . . . . . . . . . . . . . . . . . . . . . . . . . . . . . . . 322 lbs.
MODEL # 791-7170
1 TON
HYDRAULIC TRANSMISSION
JACK
SPECIFICATIONS
BEFORE USING THIS DEVICE, READ THIS
MANUAL COMPLETELY AND THOROUGHLY,
UNDERSTAND ITS OPERATING
PROCEDURES, SAFETY WARNINGS AND
MAINTENANCE REQUIREMENTS.
It is the responsibility of the device owner to make sure all personnel
read this manual prior to using the device. It is also the responsibility
of the device owner to keep this manual intact and in a convenient
location for all to see and read. If the manual or product labels are lost
or not legible, contact NAPA for replacements. If the operator is not
fluent in English, the product and safety instructions shall be read to
and discussed with the operator in the operator's native language by
the purchaser/owner or his designee, making sure that the operator
comprehends its contents.
• Read, study, understand & follow all instructions before
using. • Inspect the jack before each use. Do not use Jack if
damaged, altered, modified, in poor condition, or has loose
or missing hardware or components. Make corrections
before using. • Consult the vehicle manufacturer for
the transmission's center of balance. • Secure the
transmission to the jack's saddle with the anchorage
restraint system provided before raising or lowering the
transmission. • Center load on saddle. Be sure setup is
stable before working on vehicle. • Support the engine
with a stand before unbolting the transmission from the
engine. • Wear eye protection that meets ANSI Z87.1 and
OSHA standards (Users & bystanders) • Do not use jack
beyond its rated capacity. Do not shock load. • Use only
on a hard level surface. • Adequately support the vehicle
before starting repairs. • Use of this product is limited to
the removal, installation and transportation in the lowered
position, of transmissions, transfer cases and transaxles.
• Do not use any adapters unless approved or supplied
by NAPA • Do not use (or modify) this product for any
other purpose than that for which it was designed without
consulting the manufacturer's authorized representative.
• Always lower the jack slowly and carefully. • This product
contains chemicals known to the State of California to
cause cancer and birth defects or other reproductive harm.
Wash hands thoroughly after handling.
• Failure to heed
these warnings may result in serious or fatal personal injury
and/or property damage.
WARNING