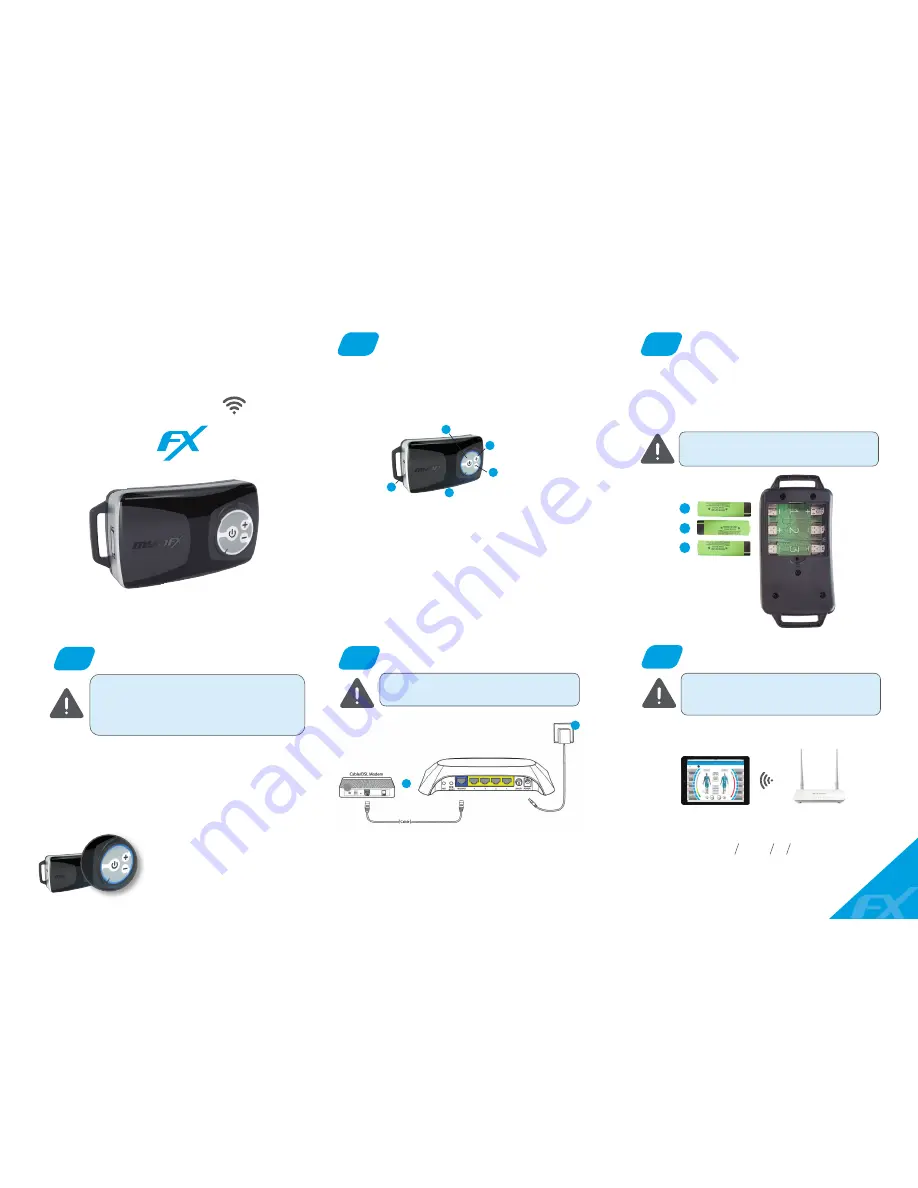
CONNECT myoFX ROUTER
1
CONNECT THE TABLET TO THE
NETWORK
PLACE BATTERIES
2
5
4
3
1. Connect the LAN port of the WIFI from center to
WAN port (blue) of the myoFX router.
2. Connect the myoFX router to the electric current.
Connect the tablet to myoFX WIFI
Name of network:
myoFX-EMS
Password:
My0FX3m0t10n!!!
To ensure the proper operation of the EMS
System do not link the tablet to another
different WIFI signal.
1
2
myoFX EMS System DEVICE
There are also separate quick start guide for 4G
tablets
Batteries are interchageable but need to be placed
in a specific direction and order:
first the 1,
followed 2 and to end 3.
Note the + and - poles for proper placement.
1. Wiring vest connection.
2. Connection to the charger.
3. Start/stop button.
4. Lower intensity.
5. Increase intensity.
1
1
2
3
2
4
5
3
Never press the reset button, it deletes the
present configuration.
CHARGE BATTERIES
Loading process:
1. Connect the charger to the device.
2. During the charging process you should see a
rotating blue light.
3. The full charge period is aprox. 2 h.
4. When it has reached full charge the LED ring is
illluminated blue fixed.
5. Disconnect the charger from the device.
Before using the device for the first time,
charge the batteries.
Even if the device is not used, the batery will
slowly discharge. It is advisable to check the
load periodically and fully charge before usage.
Pushing the
+
and
-
buttons
simultaneously check the
charge level. Device has to be
connecter to wifi, yellow LED
will be visible. The amount of
circle indicates charge level.
Incorrect order of placement of myo
batteries will impide battery charge.
myo
E m S
S y S t E m
QUICK START
GUIDE
WIFI CONNECTION
The device turns on with a single pulse on
start/stop button.
The
yellow
light indicates that the device is
linked to the app.


