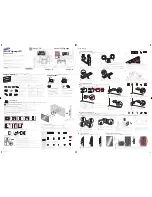
background image

15.6 PAL / DVB-T2

MYE Entertainment

MYE PERSONAL DIGITAL TV SYSTEM

M156TV-PDM4

Owners Manual

Summary of Contents for M156TV-PDM4

Page 1: ...15 6 PAL DVB T2 MYE Entertainment MYE PERSONAL DIGITAL TV SYSTEM M156TV PDM4 Owners Manual ...

Page 2: ......

Page 3: ... 2 4 Color Temperature Noise Reduction 10 11 3 SOUND SETUP 12 13 3 1 3 3 3 5 Sound Mode Auto Volume AD Switch 12 13 13 3 2 3 4 Balance Surround Sound 12 13 4 TIME SETUP 14 15 4 1 4 3 Clock Auto Sleep 14 15 4 2 4 4 Sleep Time Time Zone 14 15 5 OPTION SETUP 15 17 5 1 5 3 OSD Language Subtitle Language 15 16 5 2 5 4 Audio Languages Hearing Impaired 16 17 6 CUSTOM FEATURES SETTING 17 18 6 1 6 3 6 5 6 ...

Page 4: ...QPHQW 3URSHUO FDUHG IRU WKLV SURGXFW ZLOO provide years of high quality entertainment Prepare an area in which to place the product components as they are removed from the box prior to installation The surface of the work area should be clean so as not to damage the screen and associated components Do not open package using sharp instruments or tool Inspect all shipping carton for signs of damage ...

Page 5: ...use the power adapter supplied with this product Use of non approved power adapters may result in personal injury or damage to the product This product should be installed using a manufacturer approved mounting method ONLY Use of unapproved mounting brackets may damage the product and void the warranty Route all cables safely per mounting situation Ensure that the cables are routed in a manner as ...

Page 6: ... VFUHZV DV WKLV PD UHVXOW LQ GDPDJH WR WKH VFUHHQ 8VH D 3KLOOLSV VFUHZGULYHU taking care not to over tighten SCREEN MOUNTING SCREWS Fasten the F connector of the coaxial cable on to the WWLQJ RQ WKH UHDU RI WKH VFUHHQ It is important that FDUH EH WDNHQ ZLWK WKLV FRQQHFWRU DV over tightening will result in serious damage to the screen This connector should be started using RQO QJHUV DQG WKHQ WLJKWH...

Page 7: ...Y PAD ORIENTATION 1 2 3 4 5 6 7 8 9 10 Intellijack Icon The IntelliJack self diagnostic headphone circuit detects when the headphone jack has failed or been damaged KHQ D IDXOW KHDGSKRQH MDFN LV GHWHFWHG D 8 KHDGSKRQH LFRQ DSSHDUV RQ WKH NH SDG VHH DERYH W ZLOO remain on until a new jack is installed and the circuit is reset See page 19 To reset the faulty headphone jack FLUFXLW LQVHUW D NQRZQ JRR...

Page 8: ...C 0001 INSTANT CHANNEL PROGRAMMING FEATURE CC 0002 MENU CC 0003 CUSTOM FEATURES 1 CHANNEL SETUP 11 RQWDLQV SUHVHWV XWR 7XQLQJ 79 0DQXDO 7XQLQJ 79 0DQXDO 7XQLQJ 3URJUDPPH GLW 1 AUTO TUNING 1 Move to CHANNEL Menu 2 Use CHANNELŸźNH V WR VHOHFW Auto Tuning 3XVK CC WR HQWHU 4 Use VOLUMEŸźNH V WR VHOHFW Tune Type DTV ATV DTV ATV 5 Push CHANNELźNH 6 Use CHANNELŸź NH V DQG VOLUMEŸź keys to Select Country ...

Page 9: ...EL Ÿź NH V WR VHOHFW ATV Manual Tuning 3XVK CC WR HQWHU 4 Use CHANNEL ŸźNH V WR VHOHFW 6WRUDJH Use VOLUME ŸźNH V WR VHOHFW VWRUDJH QXPEHU from 1 to 100 5 Use CHANNEL ŸźNH V WR VHOHFW 6 VWHP Use VOLUME ŸźNH V WR VHOHFW 6 VWHP Channel Tuning 0 000 00 MHz 00 TV TV 0 Programme s DTV 0 Programme s Radio 0 Programme s Data 0 Programme s MENU Programme Edit CHANNEL Auto Tuning ATV Manual Tuning DTV Manua...

Page 10: ...nd then move or adjust CHANNEL Place by using CHANNELź NH 6 CHANNEL NAME EDIT Only ATV Use CHANNELź NH WR VHOHFW WKH 11 WR HGLW Use VOLUME Ÿ NH WR VHOHFW 11 CHANNEL Name can be edited by using VOLUMEŸź DQG CHANNELŸźNH V ZLWK alphabets and numbers ATV Manual Tuning Frequency Unregistered Storage To 1 System DK Current CH1 Search Fine Tune ENTER SAVE MENU DTV Manual Tuning Programme Edit CHANNEL Aut...

Page 11: ...4 Use VOLUME Ÿź NH V WR VHOHFW Color Temperature Medium Warm User Cool 5HG UHHQ OXH RI 8VHU 0RGH FDQ EH DGMXVWHG E XVLQJ CHANNELŸźDQG VOLUMEŸź NH V Color Temperature Noise Reduction PICTURE Picture Mode Standard Aspect Ratio Color Temperature Medium Noise Reduction PICTURE Picture Mode Aspect Ratio 2 PICTURE SETUP 3 785 RQWDLQV SUHVHWV 3LFWXUH 0RGH RORU Temperature VSHFW 5DWLR 1RLVH 5HGXFWLRQ 3LFW...

Page 12: ... NH V WR VHOHFW 4 3 or 16 9 4 Noise Reduction 1 Move to PICTURE menu 2 Use CHANNEL Ÿź NH V WR VHOHFW Noise Reduction 3XVK CC WR HQWHU 4 Use CHANNEL Ÿź NH V WR VHOHFW Off Low Middle High Color Temperature Noise Reduction PICTURE Picture Mode Aspect Ratio 4 3 Color Temperature Noise Reduction Off PICTURE Picture Mode Aspect Ratio Noise Reduction off Low Middle High MENU Aspect Ratio 4 3 16 9 MENU ...

Page 13: ...ed by using CHANNELŸź DQG VOLUME Ÿź NH V 2 Balance 1 Move to SOUND menu 2 Use CHANNEL Ÿź NH V WR VHOHFW Balance 3XVK CC WR HQWHU 4 Use VOLUME ŸźNH V WR DGMXVW Balance from 50 to 50 Balance Surround Sound SOUND Sound Mode Standard Auto Volume AD Switch Balance 0 Surround Sound SOUND Sound Mode Auto Volume AD Switch 3 SOUND SETUP 6281 RQWDLQV SUHVHWV 6RXQG 0RGH DODQFH XWR 9ROXPH 6XUURXQG 6RXQG 6ZLWF...

Page 14: ...XUURXQG 656 7UX6XUURXQG 7 5 AD Switch 1 Move to SOUND menu 2 Use CHANNEL Ÿź NH V WR VHOHFW AD Switch 3XVK CC WR HQWHU 4 Use VOLUME Ÿź NH V WR VHOHFW 6ZLWFK 21 2 5 AD Volume of ON Mode can be adjusted by using CHANNELŸźDQG VOLUME Ÿź NH V Balance Surround Sound SOUND Sound Mode Auto Volume Off AD Switch Balance Surround Sound Off SOUND Sound Mode Auto Volume AD Switch Balance Surround Sound SOUND So...

Page 15: ...WWLQJ Date Month Year Hour Minute 5 Push VOLUMEŸź NH V WR DGMXVW 2 Sleep Time 1 Move to TIME menu 2 Use CHANNEL Ÿź NH V WR VHOHFW Sleep Time 3XVK CC NH WR HQWHU 4 Use CHANNEL Ÿź NH V WR VHOHFW Off 10min 20min 30min 60min 90min 120min 180min 240min Sleep Timer TIME Clock Auto Sleep Time Zone Sleep Timer Off TIME Clock Auto Sleep Time Zone Clock Month jan Year 1981 Hour 01 MENU Date 01 Minute 01 Sle...

Page 16: ...nguage 3XVK CC WR HQWHU 4 Use CHANNEL Ÿź DQG VOLUMEŸź NH V on remote to select language Balance Surround Sound SOUND Sound Mode Auto Volume Off AD Switch Sleep Timer TIME Clock Auto Sleep Time Zone Canary GMT Audio Language OSD Language English Subtitle Language Hearing Impaired OPTION Color Rnage 0 255 Software Update USB Time Zone Canary GMT Lisbon GMT London GMT Rabat GMT Amsterdam GTM 1 Beogra...

Page 17: ...Subtitle Language 3XVK CC WR HQWHU 4 Use VOLUME Ÿź NH V RQ UHPRWH WR VHOHFW Primary 5 Push CHANNELź NH 6 Use CHANNELŸź DQG VOLUME Ÿź NH V on remote to select 1st language 3XVK 0 NH WR QH W PHQX 8 Use VOLUME Ÿź NH V RQ UHPRWH WR VHOHFW Secondary 9 Use CHANNELŸź DQG VOLUME Ÿź NH V on remote to select 2nd langauge 10 Push Dash key to exit menu OSD Language Subtitle Language Hearing Impaired OPTION Co...

Page 18: ... NH SDG CUSTOM FEATURES 7 presets Detect Vibration Channel Default Time Channel Default Auto Default Auto Power ON Manual CH Setting Set Factory Default 1 Detect Vibration 1 Use CHANNEL Ÿź NH V WR VHOHFW Detect Vibration 2 Use VOLUME Ÿź NH V WR VHOHFW Time Off 1min 2min 3min 4min 5min 6min 7min 8min 3UHVV WKH 0 NH WR VDYH and get back to the Custom Feature 2 Channel Default Time 1 Use CHANNEL Ÿź N...

Page 19: ...KH 0 NH WR VDYH DQG JHW EDFN WR WKH XVWRP HDWXUH 6 Manual Channel Setting 1 Use CHANNEL Ÿź NH V WR VHOHFW Manual Channel Setting 3XVK CC NH WR HQWHU 3 Use CHANNEL ź NH RQ UHPRWH WR select CHANNEL 3XVK CC NH V WR FKDQJH VHWWLQJ Auto Default Channel Default Favorite Not Viewable Viewable IWHU VHWWLQJ IRU HDFK FKDQQHO 3UHVV DVK NH WR VDYH DQG H LW 7 Restore Factory Default 1 Use CHANNEL Ÿź NH RQ UHPR...

Page 20: ... JRRG SDLU RI KHDGSKRQHV IRU VHFRQGV IMPORTANT Faulty headphones can trigger the headphone jack icon It is important to test the headphone jack SULRU WR UHSODFHPHQW I WKH KHDGSKRQH MDFN LV GHHPHG 2 VLPSO UHVHW WKH IDXOW KHDGSKRQH MDFN 67 3 HEADPHONE JACK SCREWS 816 5 7 66 0 6 5 6 7 51 7 1 7 1 5 7 1 25 5 72 7 66 0 287 5 029 66 0 7 33 1 7 5217 25 5 62 7 66 0 5 6 5 7 23 1 1 3 UNPLUGTHE OLD HEADPHONE ...

Page 21: ...3 CAREFULLY PUSH ACCESS WIRE BACK INTO DOCK CAVITY AND ATTACH DOCKING STATION TO TV ENCLOSURE 4 INSERT AND CAREFULLY TIGHTEN REAR DOCK TOP AND BOTTOM SCREWS 5 INSERT AND CAREFULLY TIGHTEN DOCKING STATION SIDE SCREWS 6 RETURN POWER TO TV AND TEST FRONT VIEW REAR VIEW 2 3 4 5 OPERATION 1 TURN TV POWER ON 2 INSERT iPod iPhone INTO DOCKING STATION 3 SELECT CONTENT FROM THE iPod iPhone 35 66 2 72 9 5 I...

Page 22: ...UCT THAT FAILS AFTER THE WARRANTY PERIOD EXPIRES WILL BE REPAIRED OR REPLACED AT THE CURRENT PART AND LABOR PRICING AFTER AUTHORIZATION FROM THE CUSTOMER REPAIRS ARE WARRANTED FOR 90 DAYS MYE 17 57 10 17 6 2 7 216 81 5 7 6 55 17 5 0 7 6 6 7 257 2 WARRANTY PERIODS AND COVERAGE 0 79 3 0 5 3 576 25 CONDITIONS AND RESTRICTIONS THIS WARRANTY IS VALID ONLY IN ACCORDANCE WITH THE FOLLOWING CONDITIONS THE...

Page 23: ...TATES DO NOT ALLOW 0 7 7 216 21 2 21 1 03 55 17 676 62 7 29 0 7 7 21 0 127 33 72 28 0 17 57 10 17 62 5 6 06 1 8 6 27 5 2 7 216 25 7 6 35 66 25 03 5 6 1 25 27 5 6 7 5 63 7 72 1 121 21 250 1 25 7 1 1 352 8 7 1 8 1 87 127 0 7 72 1 2 7 21 7 5 7 0 25 5 0 1 7257 7 5 25 127 5 6 1 520 7 1 1 2 0 25 76 6833 56 7 5 7 9 3 66 9 25 0387 1 1 2 7 21 7 5 7 0 25 5 0 25 266 2 25 0 72 1 352 8 7 7 6 6 0 5 1 5 6 6 33 E...

Reviews: