Mowin MSMART20H0B00, Instruction Manual
Looking for the Instruction Manual for Mowin MSMART20H0B00? You can download the manual for free from manualshive.com. Our user-friendly manual provides all the information you need to operate your Mowin MSMART20H0B00 efficiently. Get your manual now and make the most out of your product.
Share
Download


Reviews:
No comments
Related manuals for MSMART20H0B00
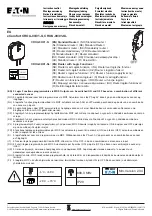
xComfort CROU-00/01-S
Brand: Eaton Pages: 4

DL0007
Brand: Dojo Pages: 32

Max
Brand: Leggero Pages: 36

00176531
Brand: Hama Pages: 20

SOCKET
Brand: iDevices Pages: 12

Pulse Hub
Brand: LuXout Shades Pages: 28

ABB-free home
Brand: ABB Pages: 20

ZSE33
Brand: ZooZ Pages: 7

v30/30
Brand: Comm Net Systems Pages: 30

Icompel IC-RESERVA-10T
Brand: Black Box Pages: 20

TYB601B
Brand: hager Pages: 2


