background image

IMPORTANT INSTRUCTIONS TO THE INSTALLER:

PLEASE READ THESE INSTRUCTIONS, FILL IN THE BLANKS BELOW,

THEN PROVIDE THE INSTRUCTIONS TO THE USER BY SECURELY

TAPING THEM TO THE FLOW HANDLE OR THE ESCUTCHEON.

WARNING: Risk of scalding

Varying the calibration of this thermostatic valve to increase water 
temperature increases the risk of injury from scalding. The installer is 
responsible for installing the valve and any recalibration of the water 
temperature in accordance with the instructions.

CAUTION:  Danger of scald injury. Valve can be recalibrated to 

provide higher temperature water.

This valve has been preset at the factory to provide a range of water
temperatures. Any change in settings or water inlet conditions from
those used during calibration at the factory may raise the outlet
temperature and may cause scalding. The responsibility for the
proper installation and any recalibration of this valve lies with the
installer.

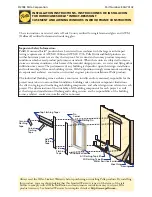
TWO HANDLE THERMOSTATIC TUB/SHOWER FAUCET

T3428, T3428CP, T3428CPM, T3428STV, T3428NLBL, T3428CGPC,
T3428CGSA, T3429, T3429CP, T3429CPM, T3429STV, 3429NLBL, 
T3429CGPC, T3429CGSA, T3431, T3431CP, T3431CPM, T3431STV,
T3431NLBL, T3431CGC, T3134CGSA

ENGLISH

INS235A

THIS THERMOSTATIC VALVE HAS BEEN PRESET

BY

OF 

TO A MAXIMUM WATER DISCHARGE TEMPERATURE OF

______ºF. ANY CHANGE TO THIS SETTING MAY RAISE THE 

DISCHARGE TEMPERATURE AND COULD CAUSE SCALDING.

DATE:__________

!

Complies with: ASME A112.18.1M, CSA B125, & ASSE 1016

Summary of Contents for 3429NLBL

Page 1: ...the factory to provide a range of water temperatures Any change in settings or water inlet conditions from those used during calibration at the factory may raise the outlet temperature and may cause s...

Page 2: ...NCH LLAVE DE TUBO CL DE LAVABO PHILLIPS SCREWDRIVER DESTORNILLADOR DE ESTRELLA TOURNEVIS POINTE CRUCIFORME FLASHLIGHT LINTERNA LAMPE DE POCHE HEX WRENCH LLAVE HEXAGONAL CL HEXAGONALE PLUMBER S PUTTY M...

Page 3: ...de douche Adaptador el brazo de la regadera 4 Escutcheon Rosace de base Chapet n 5 Ring Escutcheon Rosace d anneau Chapet n en anillo 6 Temperature Knob Bouton de temperature Perilla de temperatura 7...

Page 4: ...set screw DO NOT OVERTIGHTEN INSTALL SHOWER ARM 1 2 copper lookout pipe protruding from wall must be 2 50mm min to 3 76mm max in length and be free of deep scratches dents kinks or bends The cutoff e...

Page 5: ...temperature knob 6 towards the temperature extension until the internal splines projections on the inner diameter in the temperature knob start to engage the external splines on the temperature extens...

Page 6: ...ull down 6 o clock position 2 Turn on the hot and cold water supplies 3 Turn the temperature knob fully counterclockwise so the number 9 is in the vertical 12 o clock position The numbers represent in...

Page 7: ...e with the tab as close as possible to the clockwise side of the pin in the retaining nut This should be done without rotating the spindle Do not install the screw at this time 7 Turn the flow handle...

Page 8: ...be responsible for labor charges and or damage incurred in installation repair or replacement nor for any indirect incidental or consequential damages losses injury or costs of any nature relating to...

Page 9: ...tures d eau Tout changement apport aux r glages ou aux conditions d entr e de l eau d finis en usine peut augmenter la temp rature de l eau sortant et causer des br lures L installateur est responsabl...

Page 10: ...girar el surtidor de la tina hacia su posici n correcta contra la pared y termine de ajustar el tornillo NO AJUSTE DEMASIADO INSTALACI N DEL BRAZO DE LA REGADERA La tuber a o niple de cobre de 1 2 13...

Page 11: ...temperatura 6 hacia la extensi n de temperatura hasta que las ranuras internas proyecciones en el di metro interno en la perilla de temperatura empiecen a acoplarse con las ranuras externas en la exte...

Page 12: ...L FUNCIONAMIENTO CORRECTO 1 Asegurase que la manija del flujo de agua 7 est todav a completamente girada hacia abajo en la posici n de las 6 horas 2 Abrir la provisi n de agua caliente y fr a 3 Girar...

Page 13: ...odav a 7 Girar la manija del flujo de agua en sentido antihorario para iniciar el flujo de agua 8 Una vez que la temperatura del agua se ha estabilizado controlar la temperatura Esta ser la nueva temp...

Page 14: ...er responsable de costos laborales y o da os producidos durante la instalaci n reparaci n o cualquier da o incidental o consiguiente p rdidas heridas u costos de cualquier naturaleza relacionados con...

Page 15: ...de agua Cualquier cambio en los ajustes o en las condiciones de suministro a aquellos usados durante el calibraje hecho en la f brica podr a elevar la temperatura de la salida y causar escaldaduras La...

Page 16: ...la pomme de douche l aide d une cl sur les c t s plats situ s sur la sph re de douche Tenir le bras de douche d une main tout en serrant DIRECTIVES D INSTALLATION Pour savior quels sont les outils uti...

Page 17: ...olongeant du bas du bouton de temp rature puisse passer par l ouverture dans la rosace de base Serrer la coquille inf rieure la main seulement V rifier que le 9 est toujours la position de 12 h La fix...

Page 18: ...Centrer la rosace d anneau la main pendant que la poign e est filet e dans la tige du robinet ESSAI DE FONCTIONNEMENT 1 S assurer que la poign e de d bit 7 est compl tement la position de 6 h 2 Ouvrir...

Page 19: ...s d une montre en s assurant que l onglet est aussi pr s que possible du c t droit de la broche dans l crou de retenue sans faire pivoter la tige Ne pas installer la vis 7 Pivoter la poign e de d bit...

Page 20: ...hat Le re u de vente original du consommateur ayant achet le robinet initialement doit accompagner toute r clamation Les d fauts ou les dommages caus s par l utilisation de pi ces non fournies par Moe...

Reviews: