background image

English

Português

Magyar

Español

Türkçe

Svenska

Deutsch

Ελληνικά

Polski

Italiano

Český

Hrvatski

Română

Français

Русский

Slovenščina

Nederlands

Slovenský

Български

Dansk

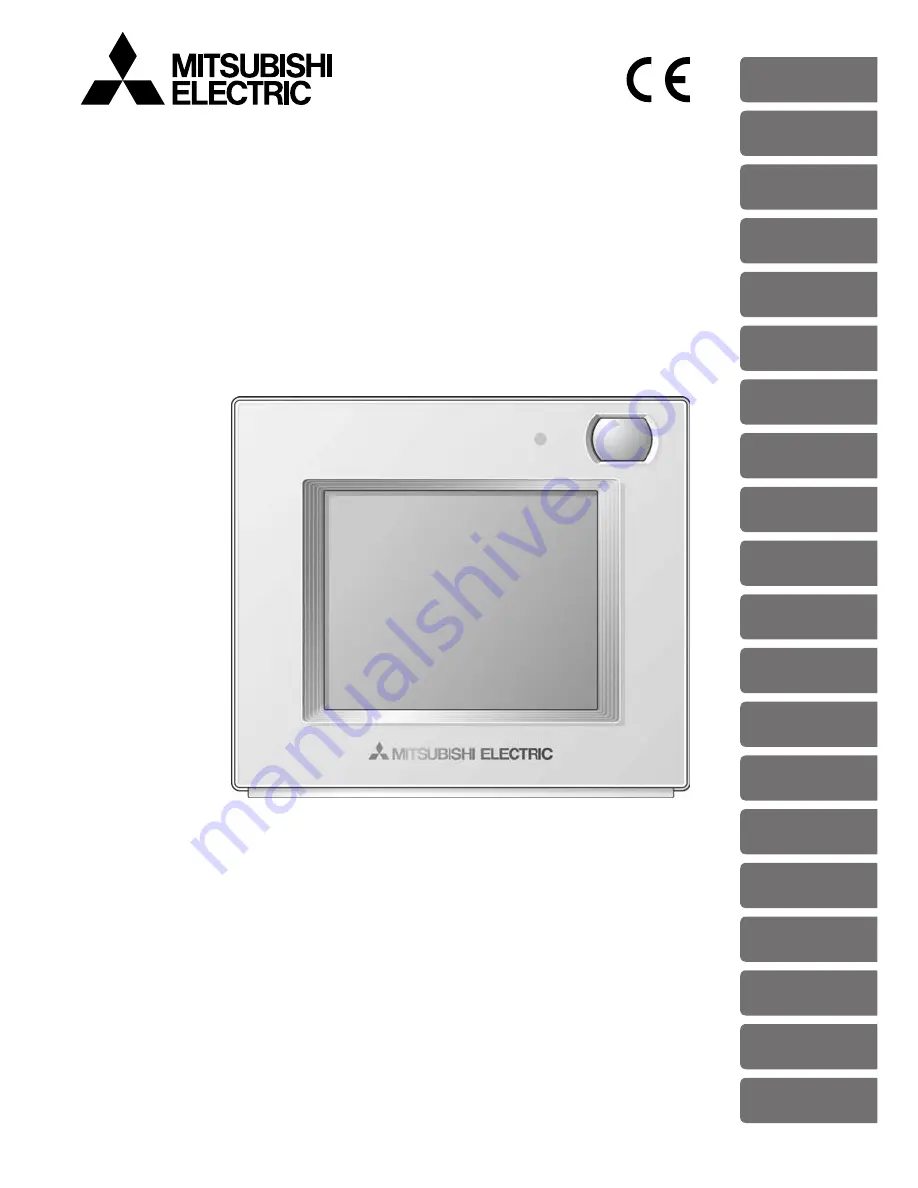
CITY MULTI Control System

Smart ME Controller PAR-U02MEDA

Instruction Book

Prior to use, thoroughly read the instructions in this manual to use the product correctly. 

Retain this manual for future reference.

Make sure that the CD-ROM, Installation Manual, and Simple Operation Manual are passed 

on to any future users.

To ensure safety and proper operation of the remote controller, the remote controller should 

only be installed by qualified personnel.

Summary of Contents for par-u02meda

Page 1: ...ntroller PAR U02MEDA Instruction Book Prior to use thoroughly read the instructions in this manual to use the product correctly Retain this manual for future reference Make sure that the CD ROM Installation Manual and Simple Operation Manual are passed on to any future users To ensure safety and proper operation of the remote controller the remote controller should only be installed by qualified p...

Page 2: ...environment When the built in occupancy sensor detects vacancy in a specific zone the controller uses its internal function to reduce energy consumption Controller interface 1 2 3 4 5 1 Occupancy Sensor The occupancy sensor detects vacancy for energy save control 2 Brightness Sensor The brightness sensor detects the brightness of the room for energy save control 3 Temperature Humidity Sensor The s...

Page 3: ... the vacancy One of the following energy save controls can be used at a time Energy save control mode Control when vacancy is detected Non use ON OFF The unit will be turned off Set temperature offset The set temperature will be offset Fan speed down The fan speed will be set to Low Thermo off The unit will go into the Thermo off state Energy save control can be stopped according to the brightness...

Page 4: ...e time Energy save control is being performed Lights up in the predetermined color 1 The occupancy sensor has sensed an occupant Inverts the brightness High Low twice 1 A button is touched on the Home screen Inverts the brightness High Low 1 1 The settings can be made on the LED Indicator setting screen Default color setting Color Operation mode setting default Room temperature Blue Cool Auto_Cool...

Page 5: ...h the Menu 29 Menu list 29 About passwords 30 Navigating through the Menu 31 Function settings 35 Date and time 35 Schedule 38 Timer 41 Night setback 45 Display format 47 Sound and contrast 49 Energy saving Assist function 50 LED Indicator 56 Touch panel calibration 59 Lock operations 60 Sensor threshold setting 61 Set temperature range limit 66 Auto return 69 Maintenance 72 Screen cleaning 72 Fil...

Page 6: ...ck malfunctions smoke or fire To reduce the risk of shorting current leakage electric shock malfunctions smoke or fire do not wash the controller with water or any other liquid To reduce the risk of electric shock malfunctions smoke or fire do not operate the touch panel or touch other electrical parts with wet hands When disinfecting the unit using alcohol ventilate the room adequately The fumes ...

Page 7: ...e or modify the controller Improper installation or repair may cause injury electric shock or fire To reduce the risk of shorting electric shock fire or malfunction do not touch the circuit board with tools or with your hands and do not allow dust to accumulate on the circuit board Additional precautions To avoid damage to the controller use appropriate tools to install inspect or repair the contr...

Page 8: ...on an audio CD player as this may damage your ears and or speakers The CD ROM that is supplied with the Smart ME Controller contains an Installation Manual and Instruction Book Each document is in PDF format Viewing documents requires a computer with Adobe Reader or Adobe Acrobat installed Adobe Reader and Adobe Acrobat are registered trademarks of Adobe Systems Incorporated ...

Page 9: ...9 Safety precautions ...

Page 10: ...10 Screen display Screen configuration General equipment screen Home screen This screen will not appear if no Advanced HVAC CONTROLLERs AHC are connected Menu User screen ...

Page 11: ...screen The setting items that are not available for the connected indoor unit will not appear on the display This screen will not appear if no Advanced HVAC CONTROLLERs AHC are connected Menu Service screen A password is required to access the Menu Service screen ...

Page 12: ...12 Screen display Display Home screen Basic All icons are displayed for explanation 1 8 e b 4 c d a 2 3 7 h g f 5 i 9 6 0 Advanced o n j k l m ...

Page 13: ...he icon appears when the timer operation is prohibited d Appears when the ON OFF timer is activated or when the Night setback function is enabled e Appears when the brightness sensor detects light brighter than a predetermined level f Appears when the occupancy sensor senses an occupant g Appears during the energy save control depending on the indoor unit model h Appears when the filter needs main...

Page 14: ...14 Screen display Indoor unit setting screen u r s q t p General equipment screen w v x Humidity setting screen z y A ...

Page 15: ...ch to return to the Home screen u Touch to go to the Humidity setting screen v AHC input output status The input and output status of the general equipments connected to Advanced HVAC CONTROLLER AHC appear w Touch to go to the Home screen x Touch to go through the General equipment screen pages y Touch to decrease the set humidity z Touch to increase the set humidity A Touch to go to the Indoor un...

Page 16: ... Display format Page 47 Language Temperature unit Room temperature display Backlight timeout Sound and contrast Page 49 Energy saving Page 50 LED Indicator Page 56 LED indicator setting With Brightness sensor Touch panel calibration Page 59 Lock operations Page 60 Sensor threshold setting Page 61 Occupancy sensor Brightness sensor Set temp range limit Page 66 Auto return Page 69 Screen cleaning Pa...

Page 17: ...rlock setting Search connection information Cool Heat display Temperature sensor offset Humidity sensor offset Room name Telephone number IC Function settings LED color adjustment Reset RC AHC port name screen Error menu Self check Test run Not all functions are available on all models of indoor units ...

Page 18: ...ettings There is no settings that can skip this process Touch to move the cursor left Touch to move the cursor right Touch to input the number Changes cannot be made unless the correct password is entered ON Indicates settings that can be changed only while the units are in operation Indicates functions that are not available when the buttons are locked or the system is centrally controlled ...

Page 19: ... up when the indoor unit is turned on The LED indicator display depends on the settings for the function settings When the operations of the LOSSNAY and indoor units are interlocked LOSSNAY units will turn on or off when indoor units are turned on or off The unit will operate with the previously set operation mode set temperature and fan speed ...

Page 20: ... indoor unit will not appear on the display 2 Depending on the indoor unit model either one or two set temperatures single or dual set point s can be set for Auto mode LED indicator color changes according to the operation mode and the settings for the function settings What the blinking mode name means The mode name will blink when other indoor units in the same refrigerant system connected to th...

Page 21: ...s that are specified for the Cool Dry mode and the Heat mode will be used to automatically control the room temperature to stay within the set temperatures This mode is especially effective during the in between seasons when the temperature difference between the highest and the lowest is large and both heating and cooling modes are used within the same day Set temp Cool Operation pattern during A...

Page 22: ...temperature Depending on the Temperature unit setting temperatures will decrease or increase by 0 5ºC 1ºC 1ºF or 2ºF increments See page 47 Refer to the table on page 23 for the settable temperature range for different operation modes Set temperature cannot be set for the Fan mode Cool Heat or Auto single set point mode ...

Page 23: ... 3 The same values are used for the set temperature for Cool Dry mode and the cooling set temperature for Auto mode dual set points Likewise the same values are used for the set temperature for Heat mode and the heating set temperature for Auto mode dual set points 4 The cooling and heating set temperatures can be set under the following conditions The cooling set temperature is greater than the h...

Page 24: ... fan speeds depends on the indoor unit model Note The actual fan speed will differ from the fan speed displayed on the LCD when one of the following conditions is met While Standby or Defrost is displayed When the room temperature is higher than the set temperature during the heating mode Immediately after the heating operation during stand by for switching the operation mode During the Dry mode O...

Page 25: ...e actual air direction will differ from the air direction displayed on the LCD when one of the following conditions is met While Standby or Defrost is displayed When the room temperature is higher than the set temperature during the heating mode Immediately after the heating operation during stand by for switching the operation mode icon When this icon appears the air direction setting will automa...

Page 26: ...6 Basic operations Louver setting Button operation Louver Touch or to turn on or off the louver swing Off On The louver setting will not appear if the indoor unit does not feature the louver function ON ...

Page 27: ...o go through the fan speeds of the LOSSNAY unit in the following order Settable only when LOSSNAY unit is connected Off Low High Indoor unit fan may operate even when the LOSSNAY unit is operated individually depending on the models of the indoor unit and the LOSSNAY unit ...

Page 28: ...Humidity setting Button operation Humidity Touch or to decrease or increase the humidity by 1 RH The settable range is between 20 and 80 RH The Humidity setting screen will appear only when a humidifier is connected to AHC ...

Page 29: ...e energy save control 50 Sets the fan speed to Low for the energy save control 50 Puts the unit into the Thermo off state for the energy save control 50 Specifies the days and the time periods when the energy save control will be deactivated 53 Sets the brightness sensor condition to deactivate the energy save control 53 LED Indicator Sets the operation mode display setting Sets the room temperatu...

Page 30: ...on the indoor and LOSSNAY units 73 Error information Displays the error status when an error occurs 75 About passwords A password is required to access certain windows Two types of passwords are used as follows Password that is used on the Menu User Password that is used on the Menu Service Example enter password screen Refer to section 2 Service Menu in Chapter 2 Initial Setting in the Installati...

Page 31: ...31 Navigating through the Menu Navigating through the Menu Button operation Accessing the Menu Touch the Menu button The Menu screen will appear ...

Page 32: ...e Menu Button operation Navigating through the pages Touch or to switch between the pages To access the Menu Service screen touch the Service tab A maintenance access password will be required to access the Menu Service screen ...

Page 33: ...screen When an attempt is made to access a password protected screen a Login page will appear Enter a user password default 0000 The settings screen for the selected item will appear Navigating through the screens To return to the Menu screen Menu button To return to the previous screen Back button ...

Page 34: ... Exiting the Menu screen Touch the Home button to exit the Menu screen and return to the Home screen If no buttons are touched for 10 minutes the screen will automatically return to the Home screen Any settings that have not been saved will be lost ...

Page 35: ...ist Date and time setting is required before making the following settings Schedule ON OFF timer Night setback Energy saving Daylight saving time 2 Touch or to set the current date month year and time Touch Done to save the settings Navigating through the screens To return to the Menu screen Menu button To return to the previous screen Back button ...

Page 36: ...and time from the Menu Then touch Date and time format in the list 2 Touch the buttons to select date and time display formats Touch Done to save the settings Navigating through the screens To return to the Menu screen Menu button To return to the previous screen Back button ...

Page 37: ...o Enabled Set the following items with the buttons Date Month Start Start time Forward to Set the time when the clock is to be set forward to at the Start time above Date Month End 2nd page End time 2nd page Backward to 2nd page Set the time when the clock is to be set backward to at the End time above Touch Done to save the settings Navigating through the screens To return to the Menu screen Menu...

Page 38: ... clock is not set when the ON OFF operation operation mode setting set temperature setting or timer execution is prohibited from the centralized controller 2 The default setting is Disabled To activate the Schedule function touch the Disabled button to change it to Enabled Touch Done to access the settings screen 3 The current settings will appear Touch the day of the week button to see the schedu...

Page 39: ...Temperature The settable operation modes and temperature ranges vary depending on the indoor unit model To continue setting schedules for other time periods touch to access the settings screen When done making the settings touch Done A confirmation screen will appear Touch OK to save the settings Navigating through the screens To return to the Menu screen Menu button To return to the previous scre...

Page 40: ...ne making the settings touch Done A confirmation screen will appear Touch OK to save the settings Navigating through the screens To return to the Menu screen Menu button To return to the previous screen Back button will appear on the Home screen when the schedule setting for the current day exists The icon will not appear while the ON OFF timer is enabled or the timer execution is prohibited from ...

Page 41: ...ck is not set when the ON OFF operation or timer execution is prohibited from the centralized controller 2 To activate the ON OFF timer touch the Disabled button to change it to Enabled Specify the ON time and OFF time with the buttons The time is settable in 5 minute increments Touch and hold or to rapidly advance the numbers To set the ON OFF timer to repeat daily set the Repeat setting to Enabl...

Page 42: ...42 Function settings will appear on the Home screen when the ON OFF timer is enabled The timer will not be executed when the timer execution is prohibited from the centralized controller will disappear ...

Page 43: ...hen the ON OFF operation or timer execution is prohibited from the centralized controller 2 To activate the Auto OFF timer touch the Disabled button to change it to Enabled Specify the Stop in time with the buttons Specify the time to elapse before the indoor unit is automatically turned off The settable range is 30 to 240 minutes in 10 minute increments Touch and hold or to rapidly advance the nu...

Page 44: ...44 Function settings Auto OFF will appear on the Home screen when the Auto OFF timer is enabled When the timer execution is prohibited from the centralized controller Auto OFF will disappear ...

Page 45: ...ture sensor PAC SE40TSA PAC SE41TS E or remote controller sensor to measure the room temperature Button operation 1 Select Night setback from the Menu The Night setback function will not work in the following cases when the unit is in operation when the Night setback function is disabled during an error during test run when the clock is not set when the ON OFF operation set temperature setting or ...

Page 46: ...ower and upper limit temperatures must be 4ºC 8ºF or more The settable temperature range varies depending on the connected indoor unit model Start Stop times The time is settable in 5 minute increments Touch and hold or to rapidly advance the numbers Touch to access the previous screen Touch Done to save the settings Navigating through the screens To return to the Menu screen Menu button To return...

Page 47: ...s from the Menu Then touch Display format in the list 2 Language Touch the button to select the display language of your choice The language options are English French Spanish German Italian Russian Portuguese and Swedish Temperature unit Touch the button to select the temperature unit from ºC 0 5ºC increments 1ºC 1ºC increments or ºF P ...

Page 48: ... temperature does not appear on the Home screen The indoor humidity display will also be shown or hidden according to the Show Hide setting above Backlight timeout Touch the button to select the desired timeout of the backlight from 5 10 20 30 and 60 seconds Touch Done to save the settings Navigating through the screens To return to the Menu screen Menu button To return to the previous screen Back...

Page 49: ...Sound level Set the volume of the buzzer that sounds when the screen is touched Level 0 3 Level 0 No sound Contrast Set the display contrast between 10 and 10 The greater the value the higher the contrast Touch Done to save the settings Navigating through the screens To return to the Menu screen Menu button To return to the previous screen Back button P ...

Page 50: ...unction can be set to activate when vacancy is detected while the air conditioning units are operated The default setting for this function is set to deactivate Selecting an energy save control mode Button operation 1 Touch Settings from the Menu Then touch Energy saving in the list P ...

Page 51: ...ure offset 2 When the units are operated in the Fan mode or when the set temperature setting is prohibited from the centralized controller the set temperature will not be offset 3 If the connected indoor unit does not support the fan speed adjustment function this item will not be displayed When the occupancy sensor detects occupancy during the energy save control the original operating status wil...

Page 52: ... when any mode is selected Adjust the detection sensitivity level according to the surrounding environment Recommended setting for ordinary use Level 0 The greater the value the higher the sensitivity The settable levels are 2 1 0 1 and 2 A higher detection level can lead to false detection because the sensor tends to detect more noise As option settings the energy save control assist function can...

Page 53: ...e brightness sensor detects Light or Dark To specify time periods and days touch Day and time from the list See step 2 below To set the detection conditions for the brightness sensor touch With Brightness sensor from the list See step 3 below These two different types of settings can be made in combination The energy save control assist function will be deactivated when one of the conditions for t...

Page 54: ...ith Brightness sensor To use the brightness sensor for the energy save control touch the Disabled button to change it to Enabled Touch the Occupancy sensor invalid condition button to select Light or Dark Light When the brightness sensor detects Light during vacancy the energy save control assist function will be deactivated Dark When the brightness sensor detects Dark during vacancy the energy sa...

Page 55: ...ol Because the settings for the items under Invalid item setting are made the energy save control will not be performed at these times even when the occupancy sensor detects vacancy Period during which energy save control can not be performed even when vacancy is detected Period during which energy save control can be performed when vacancy is detected Energy save control Energy save control 4 Aut...

Page 56: ...56 Function settings LED Indicator Button operation 1 Touch Settings from the Menu Then touch LED Indicator in the list 2 Touch LED Indicator setting in the list P ...

Page 57: ...e control Occupancy detection indicator 2nd page Select Enabled or Disabled When Enabled is selected the LED indicator blinks once every 30 seconds when the occupancy sensor detects occupancy Setting item specific to Mode Mode color 3rd and 4th pages Select the desired LED color for each operation mode Setting item specific to Room temp Room temp range and LED color 3rd page Set the desired temper...

Page 58: ...to change it to Enabled Set the following items Detection Light Select the brightness level of the LED indicator to be used when the brightness sensor detects Light Select Brighten Darken or OFF Detection Dark Select the brightness level of the LED indicator to be used when the brightness sensor detects Dark Select Brighten Darken or OFF Touch Done to save the settings Navigating through the scree...

Page 59: ...they appear starting from the top left corner After all nine squares are touched the screen will return to the previous screen If each square is not touched within one minute after the last square is touched calibration will be canceled and the screen will return to the previous screen To calibrate the screen properly use a pointy but not sharp object to touch the black dots Sharp objects may scra...

Page 60: ... following operation items touch the Unlocked button to change it to Locked ON OFF Operation mode Set temperature Air direction Touch Done to save the settings Navigating through the screens To return to the Menu screen Menu button To return to the previous screen Back button will appear on the Home screen when the operation is locked P ...

Page 61: ...hreshold setting Occupancy sensor Button operation 1 Touch Settings from the Menu Then touch Sensor threshold setting in the list 2 To set the detection sensitivity level of the occupancy sensor touch Occupancy sensor in the list P ...

Page 62: ...ions under normal conditions If the sensor is oversensitive or undersensitive adjust the detection sensitivity level Use the following tests to adjust the detection sensitivity to the appropriate level A vacancy test Test 1 and an occupancy test Test 2 A higher detection sensitivity level can lead to false detection because the sensor tends to detect more noise Touch Done to save the settings Navi...

Page 63: ... vacancy without being interfered with by noise Red Error The sensor falsely detected occupancy due to noise If the sensor failed to correctly detect vacancy lower the detection sensitivity level and try again To start Test 2 touch Test 2 When movements are detected the LED indicator will light up in blue Walk away from the remote controller and walk around in areas where you want the sensor to de...

Page 64: ...ermine the Dark state and Light state can be set These statuses are used as parameters for energy save control and LED indicator control Set the lux values to an appropriate values suitable for a given environment Try changing the brightness in a given space e g by drawing curtains while adjusting the lux levels Set the values and touch Done Navigating through the screens To return to the Menu scr...

Page 65: ...rforming a test When Test is touched the current lux level in a given space will appear next to Monitor on the screen The LED indicator will indicate the brightness status of a given space in colors Red Light Green Dark Blue ...

Page 66: ...66 Function settings Set temperature range limit Button operation 1 Touch Settings from the Menu Then touch Set temp range limit in the list P ...

Page 67: ...3 F 28 C 19 C 83 F 67 F Cool Dry Auto Dual _Cool 19 C 35 C 67 F 95 F 35 C 19 C 95 F 67 F Heat Auto Dual _Heat 5 C 28 C 40 F 83 F 28 C 5 C 83 F 40 F Auto single set point is referred to as Auto Single in the table Auto dual set points is referred to as Auto Dual in the table The settable operation modes and temperature ranges vary depending on the indoor unit model The cooling and heating temperatu...

Page 68: ...king the settings touch Done to save the settings Navigating through the screens To return to the Menu screen Menu button To return to the previous screen Back button will appear on the Home screen when the temperature range is limited ...

Page 69: ... Auto return The Auto return function allows the user to operate the unit at the specified temperature after the specified period of time Button operation 1 Touch Settings from the Menu Then touch Auto return in the list P ...

Page 70: ...ol includes the Dry and Auto_Cool modes Heat Specify the time to elapse before the set temperature automatically changes to the set temperature specified below during heating operation The settable time range is 10 to 120 minutes in 10 minute increments Specify the set temperature to be used after the period of time specified above The settable temperature range is 5ºC to 28ºC 40ºF to 83ºF dependi...

Page 71: ...mple Lower the set temperature to 24ºC 75ºF Sixty minutes later the set temperature will automatically change to 28ºC 83ºF 60 minutes later The set temperature is manually changed from 28ºC 83ºF to 24ºC 75ºF Sixty minutes later the set temperature automatically changes to 28ºC 83ºF ...

Page 72: ...Clean the touch panel within 30 seconds The touch panel is deactivated for 30 seconds and then returns to the Menu screen The buzzer will sound while the touch panel is being touched Wipe with a soft dry cloth a cloth soaked in water with mild detergent or a cloth dampened with ethanol Do not use acidic alkaline or organic solvents ...

Page 73: ...lean the filters Wash clean or replace the filters when this sign appears Refer to the indoor unit Instructions Manual for how to clean the filters Button operation 1 Touch Filter information from the Menu 2 Touch Reset to reset the filter sign A confirmation screen will appear Touch OK ...

Page 74: ...cted filter cleaning timing for each unit may be different depending on the filter type will appear when the filter on one of the units is due for cleaning When the filter sign is reset the cumulative operation time of all units will be reset is scheduled to appear after a certain duration of operation based on the premise that the indoor units are installed in a space with ordinary air quality De...

Page 75: ...ill blink at 1 second intervals while the error is occurring Touch Reset to reset the error that is occurring A confirmation screen will appear Touch OK When an error occurs with the AHC Home button will appear The Home screen will be accessible without the need for an error reset Errors cannot be reset when the ON OFF operation is prohibited from the centralized controller 2 A message indicating ...

Page 76: ...llows the units to continue their operation only an error code will appear in the schedule display area enclosed in dotted line on the Home screen When this type of error occurs the LED indicator will not blink To reset the error press the ON OFF button ...

Page 77: ...range 20ºC 60ºC 4ºF 140ºF Humidity 20 90 RH Non condensing Weight 0 3 kg 11 16 lbs External dimensions W x H x D 140 x 120 123 x 25 28 8 mm 5 17 32 x 4 3 4 4 27 32 x 1 1 5 32 in The numbers in the parenthesis indicate the dimensions including the protruding parts 1 Not for use with a generic DC power supply device 2 Power consumption coefficient is a coefficient to calculate the relative power con...

Page 78: ... priority 1 The Auto return function will not be executed when the units are operated in the Set temperature offset mode 2 The units cannot be operated in the energy saving mode if the operation is prohibited from the centralized controller 3 The Night setback function will not be executed when the unit has been turned on by ON OFF timer 4 The Auto OFF timer function will not be executed while the...

Page 79: ... radio communications However there is no guarantee that interference will not occur in a particular installation If this equipment does cause harmful interference to radio or television reception which can be determined by turning the equipment off and on the user is encouraged to try to correct the interference by one or more of the following measures Reorient or relocate the receiving antenna I...

Page 80: ...B V HARMAN HOUSE 1 GEORGE STREET UXBRIDGE MIDDLESEX UB8 1QQ U K This product is designed and intended for use in the residential commercial and light industrial environment The product at hand is based on the following EU regulations Electromagnetic Compatibility Directive 2004 108 EC Restriction of Hazardous Substances 2011 65 EU ...

Reviews: